Version 3.0.1.GA
Project overview
Granite Data Services (GraniteDS) is a comprehensive development and integration platform for building Flex / Java EE RIA applications. The framework is completely open source and released partly under the LGPL 2.1 license, partly under a dual GPL 3 / commercial license for some advanced features.
Integration and features stack :
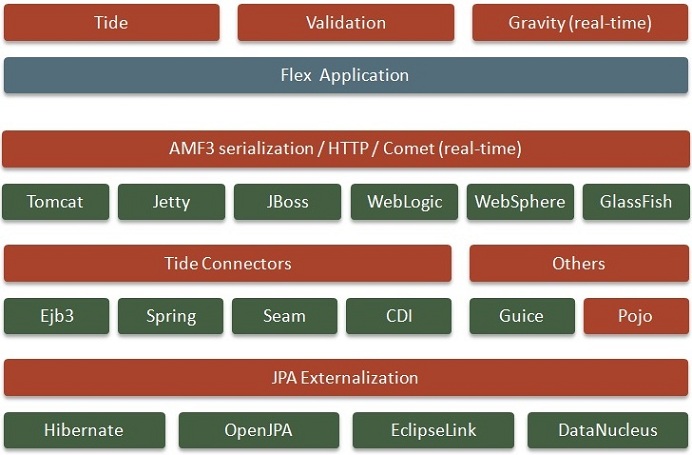
GDS has been designed to be lightweight, robust, fast, and highly extensible.
The main features of GraniteDS are :
-
An implementation of the Adobe AMF remoting protocol and of the AMF3 data format, with out-of-the-box adapters for all usual Java frameworks.
-
An implementation of a messaging framework based supporting Comet and Websocket transports which can connect to JMS servers.
-
A data management framework which simplifies the handling and synchronization of persistent data through client and server applications.
Who we are
The core development team is Franck Wolff and William Drai, two engineers from Granite Data Services. Many people have contributed to GraniteDS by giving ideas, patches or new features. If you feel you should be listed below, please email .
- Spring integration
-
-
Igor SAZHNEV: Initial Spring service factory implementation and Java Enum externalizer.
-
Francisco PEREDO: Acegi security support and Spring/Acegi/EJB 3 sample application.
-
Sebastien DELEUZE (aka Bouiaw): Spring 2 security service.
-
- Seam 2 Integration
-
-
Cameron INGRAM, Venkat DANDA and Stuart ROBERTSON: Seam integration implementation and Tide framework.
-
- Guice/Warp integration
-
-
Matt GIACOMI: Initial Guice/Warp integration implementation and sample application.
-
- Grails plugin
-
-
Ford GUO: major improvements of the GDS/Grails plugin.
-
- OSGi integration
-
-
Zhang BIN: Initial GDS/OSGi integration.
-
- DataNucleus Integration
-
-
Stephen MORE: initial DataNucleus engine support.
-
- Web MXML/ActionScript3 compiler
-
-
Sebastien DELEUZE (aka Bouiaw) and Marvin FROEDER (aka VELO): A servlet-based compiler that compiles your MXML and ActionScript3 sources on the fly.
-
- Maven build
-
-
Rafique ANWAR: Initial Maven POM files and deploy script (java.net).
-
Edward YAKOP: Improved Maven POM files and deploy script (Sonatype).
-
- ActionScript3 code generation
-
-
Francesco FARAONE and Saverio TRIONE: Gas3 extension with typed as3 client proxies generation.
-
- Documentation
-
-
Michael SLINN: Oversight.
-
Elizabeth Claire MYERS: Proofreading/editing.
-
- Other contributions
-
-
Francesco FARAONE: HibernateExternalizer Map support.
-
Marcelo SCHROEDER: Service exception handler.
-
Sebastien GUIMONT: Initial Java Enum support in Gas3.
-
Pedro GONCALVES: Improved service method finder for generics.
-
Getting Started
You can find some getting started guides focused on various use cases of the framework on the Getting Started section of the web site here.
Usage Scenarios
The main value of GraniteDS is to provide integration with other frameworks, both client and server side, so there really are lots of different possible combinations of deployment types and usage scenarios. This chapter will describe various options, and common combinations of technologies.
Client options
On the client there are two main choices :
-
Use the standard Flex
RemoteObjectAPI. This is the easiest if you migrate an existing application from BlazeDS/LCDS/whatever AMF provider. Note however that GraniteDS does not exactly support the standardConsumerandProducerFlex messaging API. It brings its own client implementations of these classesorg.granite.gravity.Consumerandorg.granite.gravity.Producerthat are very similar. -
Use the Tide remoting API with the GraniteDS/Tide server framework integration (supporting Spring, Seam, EJB3 and CDI). It provides the most advanced features and greatly simplifies asynchronous handling and client data management. It should be preferred for new projects or if you want to benefit from all GraniteDS functionalities.
The Tide remoting API is only a part of the Tide client framework (that supports dependency injection, conversation management, …) so you can also choose between using the complete Tide framework or only Tide remoting mixed with any other Flex framework such as Cairngorm, PureMVC, Spring ActionScript or Parsley. Obviously we recommend using only the Tide framework as it will greatly simplify the overall architecture of your application, but you will still able to use Tide even if higher powers force you to use another particular framework.
Finally it’s also possible to use the Tide client framework independently of the GraniteDS AMF provider. We really cannot recommend doing this if your server is Java-based but you can use Tide with AMFPHP, RubyAMF or any other server technology. The Tide framework is comparable in features to Swiz or Parsley but brings its own unique features and concepts (conversation contexts, centralized exception handling, data management…).
Common server stacks
This section describes some classic technology stacks used with Java applications and GraniteDS.
Spring/Hibernate on Tomcat 6+ or Jetty 6+
This is one of the most common use cases and allows for easy development and deployment. You can furthermore benefit from the extensive support for serialization of Java objects and JPA detached objects, and of NIO/APR asynchronous support of Tomcat 6.0.18+ or Jetty 6 continuations.
EJB3/Hibernate on JBoss 4/5
This is another common use case and it provides roughly the same features than Spring/JPA. The main difference is that it requires a full EE container supporting EJB 3.
Tide/Spring/Hibernate on Tomcat 6+ or Jetty 6+
This is an extension of the first case, with the additional use of the Tide remoting and data management API on the client. This will enable the most advanced features such as data paging, transparent lazy-loading of collections, real-time data synchronization… Tide also provides advanced client-side support for Spring Security authorization that for example allow to easily hide/disable buttons for unauthorized actions. This is currently the most popular technology stack.
Tide/EJB3/Hibernate on JBoss 4/5 or Tide/EJB3/EclipseLink on GlassFish v3
It’s also similar to the previous case, but using EJB 3 instead of Spring.
Tide/CDI/JPA2/Java EE 6 on JBoss 6/7 or GlassFish 3
Well this is not really a "common" stack but at least it is a fully Java EE 6 standard. If you are on a Java EE 6 compliant application server and can live without Spring, it is definitely the best option.
Finally note that for data-based applications using lots of CRUD functionality, there is full support for Spring Data JPA with either Spring or CDI.
Project Setup
GraniteDS consists in a set of Flex libraries (swcs) and a set of Java libraries (jars). It is designed to be deployed in a Java application server and packaged in a standard Java Web application, either as a WAR file or as an EAR file. The configuration of a GraniteDS project will generally involve the following steps :
-
Add the GraniteDS server jars to the
WEB-INF/libfolder of the WAR file or thelibfolder of the EAR file -
Add the GraniteDS listener, servlets and filters in the standard
WEB-INF/web.xmlconfiguration file -
Define the framework configuration of GraniteDS in the
WEB-INF/granite/granite-config.xmlfile -
Define the application configuration of GraniteDS (remoting destinations, messaging topics…) in the
WEB-INF/flex/services-config.xml -
Link you Flex project with the GraniteDS swcs libraries and define the necessary Flex compiler options
|
Note
|
Depending on which framework and application server you use on the server (Spring, Seam…) and on the client,
some of these steps may be completely omitted, or implemented differently.
For example, when using the Spring framework on the server, almost all the configuration can be defined in the standard
Spring context instead of the granite-config.xml and services-config.xml files.
GraniteDS tries to be as transparent and integrated as possible with the application environment,
however it can be useful to know how things work at the lower level in case you have specific requirements.
|
Server libraries
The GraniteDS server libraries are available from the libraries/server folder of the distribution.
You will always need granite-server.jar which contains the core features of GraniteDS.
Usually you will have to include the jar corresponding to
-
your server framework (
granite-server-spring.jarfor Spring for example) -
your JPA provider (
granite-server-hibernate.jarfor Hibernate) -
other integration libraries, for example
granite-server-beanvalidation.jarif you want to benefit from the integration with the Bean Validation API on the server.
Configuring web.xml
At the most basic level, GraniteDS is implemented as a servlet (in fact a servlet and a filter) and thus has to be configured in web.xml.
Here is a typical code snippet that maps the GraniteDS AMF servlet to /graniteamf/*.
It’s possible to define a different URL mapping if absolutely necessary but there is very little reason you would want to do this.
It is also highly recommended to also add the configuration listener that will release resources on application undeployment.
<listener>
    <listener-class>org.granite.config.GraniteConfigListener</listener-class>
</listener>

<filter>
    <filter-name>AMFMessageFilter</filter-name>
    <filter-class>org.granite.messaging.webapp.AMFMessageFilter</filter-class>
</filter>
<filter-mapping>
    <filter-name>AMFMessageFilter</filter-name>
    <url-pattern>/graniteamf/*</url-pattern>
</filter-mapping>

<servlet>
    <servlet-name>AMFMessageServlet</servlet-name>
    <servlet-class>org.granite.messaging.webapp.AMFMessageServlet</servlet-class>
    <load-on-startup>1</load-on-startup>
</servlet>
<servlet-mapping>
    <servlet-name>AMFMessageServlet</servlet-name>
    <url-pattern>/graniteamf/*</url-pattern>
</servlet-mapping>
Framework configuration
The configuration of the various GraniteDS parts is done in the file WEB-INF/granite/granite-config.xml.
There are many options that can be defined here, you can refer to the configuration reference.
As a starting point, you can create an empty file :
<?xml version="1.0" encoding="UTF-8"?>
<!DOCTYPE granite-config PUBLIC "-//Granite Data Services//DTD granite-config internal//EN"
    "http://www.graniteds.org/public/dtd/3.0.0/granite-config.dtd">

<granite-config/>
Or much easier let GraniteDS use class scanning to determine the default setup.
<?xml version="1.0" encoding="UTF-8"?>
<!DOCTYPE granite-config PUBLIC "-//Granite Data Services//DTD granite-config internal//EN"
    "http://www.graniteds.org/public/dtd/3.0.0/granite-config.dtd">

<granite-config scan="true"/>
Application configuration
The last thing to define on the server is the application configuration in WEB-INF/flex/services-config.xml.
This is for example the place where you will define which elements of your application you will expose to GraniteDS remoting,
or the topic for messaging. You can refer to the configuration reference for more details.
For example a simple configuration for an EJB 3 service would look like :
<services-config>
    <services>
        <service id="granite-service"
            class="flex.messaging.services.RemotingService"
            messageTypes="flex.messaging.messages.RemotingMessage">

            <destination id="example">
                <channels>
                    <channel ref="graniteamf"/>
                </channels>
                <properties>
                    <factory>ejbFactory</factory>
                </properties>
            </destination>
        </service>
    </services>

    <factories>
        <factory id="ejbFactory" class="org.granite.messaging.service.EjbServiceFactory">
            <properties>
                <lookup>myapp/{capitalized.destination.id}ServiceBean/local</lookup>
            </properties>
        </factory>
    </factories>

    <channels>
        <channel-definition id="graniteamf" class="mx.messaging.channels.AMFChannel">
            <endpoint
                uri="http://{server.name}:{server.port}/{context.root}/graniteamf/amf"
                class="flex.messaging.endpoints.AMFEndpoint"/>
        </channel-definition>
    </channels>
</services-config>
This configuration file declares 3 differents things, let’s list them in the reverse order :
-
Channel endpoint: this defines the uri on which the remote service can be accessed though GraniteDS remoting. This should match the servlet url mapping defined previously in
web.xml. Note that this uri will only be used when referencing thisservices-config.xmlfile from the client.
|
Note
|
server-name, server-port and context-root are placeholders that are automatically replaced
when running the application in the Flash Player.
To run the application on the AIR runtime you will have to specify the real name and port of the server
as it cannot be determined from the source url of the swf.
|
-
Service factories: here the configuration defines an EJB 3 factory, meaning that destinations using this factory will route incoming remote calls to the EJB 3 container. GraniteDS provides factories for all popular server frameworks. Most factories require specific properties, here for example the JNDI format for EJB lookup.
-
Service/destinations: this section defines a remoting service (described by its class and message type) and one destination interpreted as an EJB 3 as indicated by the factory property.
|
Note
|
Depending on the kind of framework integration that is used, the services-config.xml file
may not be necessary and can be omitted.
With Spring and Seam for example, everything can be defined in the respective framework configuration files
instead of services-config.xml.
|
Client libraries and setup
GraniteDS comes with two client swc libraries that must be linked with your Flex application.
The main library granite.swc should be linked with the standard mode (linked into code),
but the core internal library granite-essentials.swc must be linked with the compiler option -include-libraries.
When using the Tide client framework, you will also have to specify to the Flex compiler some annotations
that should be kept in the swf for runtime usage.
The following sections describe in more details these various options for different development environments.
|
Note
|
Due to API changes since the Flex SDK 4.5, there is a different version of the |
When using a services-config.xml file, it’s necessary to use the compiler option -services path/to/services-config.xml
so the Flex SDK itself can handle the creation of the channel and other remoting objects.
If you don’t use this option, you will have to specify manually a channel and endpoint for each destination in ActionScript 3 :
private function init():void {
        srv = new RemoteObject("myService");
        srv.source = "myService";
        srv.channelSet = new ChannelSet();
        srv.channelSet.addChannel(new AMFChannel("graniteamf",
            "http://{server.name}:{server.port}/myapp/graniteamf/amf"));
        srv.showBusyCursor = true;
}
Building with Ant
Ant is probably one of the most popular build tools.
The Flex SDK comes with a set of ant tasks that can perform various development tasks,
notably the compilation of the Flex application to a swf file.
The following XML code defines a typical target to build a Flex/GraniteDS application
(the variable FLEX_HOME should point to your Flex SDK installation directory) :
<taskdef resource="flexTasks.tasks" classpath="${FLEX_HOME}/ant/lib/flexTasks.jar"/>

<target name="compile.flex" description="Build swf from Flex sources">
    <mxmlc
        file="flex/src/${flex.application}.mxml"
        output="bin-debug/${flex.application}.swf"
        services="path/to/services-config.xml"
        context-root="/myapp"
        use-network="false"
        debug="true"
        incremental="true">

        <load-config filename="${FLEX_HOME}/frameworks/flex-config.xml"/>

        <source-path path-element="${FLEX_HOME}/frameworks"/>
        <source-path path-element="bin-debug"/>

        <!-- Definition of runtime annotations, not required when not using Tide -->
     	<keep-as3-metadata name="Bindable"/>
     	<keep-as3-metadata name="Managed"/>
     	<keep-as3-metadata name="ChangeEvent"/>
     	<keep-as3-metadata name="NonCommittingChangeEvent"/>
     	<keep-as3-metadata name="Transient"/>
     	<keep-as3-metadata name="Id"/>
     	<keep-as3-metadata name="Version"/>
        <keep-as3-metadata name="Lazy"/>
     	<keep-as3-metadata name="Name"/>
     	<keep-as3-metadata name="In"/>
     	<keep-as3-metadata name="Inject"/>
     	<keep-as3-metadata name="Out"/>
     	<keep-as3-metadata name="Produces"/>
     	<keep-as3-metadata name="Observer"/>
     	<keep-as3-metadata name="ManagedEvent"/>
     	<keep-as3-metadata name="PostConstruct"/>
     	<keep-as3-metadata name="Destroy"/>

     	<!-- All granite-essentials.swc classes must be included in the output swf -->
        <compiler.include-libraries dir="${gds.build}" append="true">
        	<include name="granite-essentials.swc" />
        </compiler.include-libraries>

     	<!-- Actually used only granite.swc classes are included in the output swf -->
     	<compiler.library-path dir="${gds.build}" append="true">
     		<include name="granite.swc"/>
     	</compiler.library-path>
     </mxmlc>
 </target>
Building with Maven
Though GraniteDS itself is not built with Maven (all will probably never be), its artifacts are published in the Maven central repository and can thus be easily added as dependencies to any Maven project.
The Java dependencies for the server application are under the group org.graniteds.
<dependency>
    <groupId>org.graniteds</groupId>
    <artifactId>granite-server</artifactId>
    <version>${graniteds.version}</version>
    <type>jar</type>
</dependency>

<dependency>
    <groupId>org.graniteds</groupId>
    <artifactId>granite-server-ejb</artifactId>
    <version>${graniteds.version}</version>
    <type>jar</type>
</dependency>

<dependency>
    <groupId>org.graniteds</groupId>
    <artifactId>granite-server-hibernate</artifactId>
    <version>${graniteds.version}</version>
    <type>jar</type>
</dependency>
...
Here is the list of available server libraries artifacts:
artifactId |
Role |
License |
|
granite-server |
Core library |
LGPL 2.1 |
|
granite-server-spring |
Spring 3+ framework integration |
LGPL 2.1 |
|
granite-server-spring2 |
Spring 2.x framework integration |
LGPL 2.1 |
|
granite-server-ejb |
EJB 3+ integration |
LGPL 2.1 |
|
granite-server-cdi |
CDI (Weld only) integration |
LGPL 2.1 |
|
granite-server-seam2 |
Seam 2 framework integration |
LGPL 2.1 |
|
granite-server-hibernate |
Hibernate 3.x integration |
LGPL 2.1 |
|
granite-server-hibernate4 |
Hibernate 4.x integration |
LGPL 2.1 |
|
granite-server-toplink |
TopLink essentials integration |
LGPL 2.1 |
|
granite-server-eclipselink |
EclipseLink integration |
LGPL 2.1 |
|
granite-server-datanucleus |
DataNucleus integration |
LGPL 2.1 |
|
granite-server-udp |
UDP messaging support |
GPL 3 / Commercial |
The Flex application can be built using the plugin. Here is a simple project descriptor for a Flex module, which defines the dependencies on the Flex framework, FlexUnit, and the GraniteDS Flex libraries :
<?xml version="1.0" encoding="UTF-8"?>
<project xmlns="http://maven.apache.org/POM/4.0.0"
    xmlns:xsi="http://www.w3.org/2001/XMLSchema-instance"
    xsi:schemaLocation="http://maven.apache.org/POM/4.0.0 http://maven.apache.org/maven-v4_0_0.xsd">

    <modelVersion>4.0.0</modelVersion>

    <groupId>com.myapp</groupId>
    <artifactId>myapp-flex</artifactId>
    <packaging>swf</packaging>
    <version>1.0-SNAPSHOT</version>
    <name>My Flex Module</name>

    <dependencies>
        <dependency>
            <groupId>com.adobe.flex.framework</groupId>
            <artifactId>flex-framework</artifactId>
            <version>${flex.framework.version}</version>
            <type>pom</type>
        </dependency>

        <dependency>
          <groupId>com.adobe.flexunit</groupId>
          <artifactId>flexunit</artifactId>
          <version>4.0-rc-1</version>
          <type>swc</type>
          <scope>test</scope>
        </dependency>

        <dependency>
            <scope>internal</scope>
            <groupId>org.graniteds</groupId>
            <artifactId>granite-client-flex</artifactId>
            <version>${graniteds.version}</version>
            <type>swc</type>
        </dependency>

        <dependency>
            <groupId>org.graniteds</groupId>
            <artifactId>granite-client-flex-advanced</artifactId>
            <version>${graniteds.version}</version>
            <type>swc</type>
        </dependency>
    </dependencies>

    <build>
        <finalName>myapp</finalName>
        <sourceDirectory>src/main/flex</sourceDirectory>
        <testSourceDirectory>src/test/flex</testSourceDirectory>

        <pluginManagement>
            <plugins>
                <plugin>
                    <groupId>org.sonatype.flexmojos</groupId>
                    <artifactId>flexmojos-maven-plugin</artifactId>
                    <version>${flexmojos.version}</version>
                </plugin>
            </plugins>
        </pluginManagement>

        <plugins>
            <plugin>
                <groupId>org.sonatype.flexmojos</groupId>
                <artifactId>flexmojos-maven-plugin</artifactId>
                <version>${flexmojos.version}</version>
                <extensions>true</extensions>
                <dependencies>
                    <dependency>
                        <groupId>com.adobe.flex</groupId>
                        <artifactId>compiler</artifactId>
                        <version>${flex.framework.version}</version>
                        <type>pom</type>
                    </dependency>
                </dependencies>
                <configuration>
                    <contextRoot>/myapp</contextRoot>
                    <sourceFile>Main.mxml</sourceFile>
                    <incremental>true</incremental>
                    <keepAs3Metadatas>
                        <keepAs3Metadata>Bindable</keepAs3Metadata>
                        <keepAs3Metadata>Managed</keepAs3Metadata>
                        <keepAs3Metadata>ChangeEvent</keepAs3Metadata>
                        <keepAs3Metadata>NonCommittingChangeEvent</keepAs3Metadata>
                        <keepAs3Metadata>Transient</keepAs3Metadata>
                        <keepAs3Metadata>Id</keepAs3Metadata>
                        <keepAs3Metadata>Version</keepAs3Metadata>
                        <keepAs3Metadata>Lazy</keepAs3Metadata>
                        <keepAs3Metadata>Name</keepAs3Metadata>
                        <keepAs3Metadata>In</keepAs3Metadata>
                        <keepAs3Metadata>Out</keepAs3Metadata>
                        <keepAs3Metadata>Inject</keepAs3Metadata>
                        <keepAs3Metadata>Produces</keepAs3Metadata>
                        <keepAs3Metadata>PostConstruct</keepAs3Metadata>
                        <keepAs3Metadata>Destroy</keepAs3Metadata>
                        <keepAs3Metadata>Observer</keepAs3Metadata>
                        <keepAs3Metadata>ManagedEvent</keepAs3Metadata>
                    </keepAs3Metadatas>
                </configuration>
            </plugin>
        </plugins>
    </build>
</project>
The necessary dependencies depend on the target Flex SDK and on the features required by the application. Here is the list of available Flex client libraries artifacts:
artifactId |
Role |
License |
|
granite-client-flex |
Core library (basic remoting + messaging) |
LGPL 2.1 |
|
granite-client-flex-advanced |
Advanced features library for Flex 3.x and Flex 4.0/4.1 (Tide framework, data management, validation…) |
GPL 3 / Commercial |
|
granite-client-flex-advanced |
Advanced features library for Flex 4.5+ including Apache Flex (Tide framework, data management, validation…) |
GPL 3 / Commercial |
|
granite-client-flex-udp |
UDP client library (requires AIR) |
GPL 3 / Commercial |
Using Maven archetypes
Building a full Flex / Java EE Web application with Maven is rather complex and implies to create a multi-module
parent project with (at least) 3 modules : a Java server module, a Flex module and a Web application module, each having
its own pom.xml, dependencies and plugin configurations.
It is thus recommended that you start from one of the existing GraniteDS/Maven archetypes :
-
GraniteDS/Spring/JPA/Hibernate: graniteds-flex-spring-jpa-hibernate
-
GraniteDS/Tide/Spring/JPA/Hibernate: graniteds-tide-flex-spring-jpa-hibernate
-
GraniteDS/Tide/Seam 2/JPA/Hibernate: graniteds-tide-flex-seam-jpa-hibernate
-
GraniteDS/Tide/CDI/JPA: graniteds-tide-flex-cdi-jpa
Note than using Maven 3 is highly recommended though Maven 2.2 should also work. A project can then be created using the following command :
mvn archetype:generate
	-DarchetypeGroupId=org.graniteds.archetypes
	-DarchetypeArtifactId=graniteds-tide-flex-spring-jpa-hibernate
	-DarchetypeVersion=2.0.0.GA
	-DgroupId=com.myapp
	-DartifactId=springflexapp
	-Dversion=1.0-SNAPSHOT
To build the application, just run :
cd springflexapp
mvn install
The Spring and Seam archetypes define a Jetty run configuration so you can simply test your application with :
cd webapp
mvn jetty:run-war
The CDI archetype defines an embedded GlassFish run configuration so you can test your application with :
cd webapp
mvn embedded-glassfish:run
To deploy your application to another application server (for example Tomcat), you may have to change the
Gravity servlet in web.xml. Then you can build a war file with :
cd webapp
mvn war:war
Developing with Flash Builder
There are different options for working with Flash Builder. The easiest is to use a single combined Flex/Java project that will contain the source files for both the server and client parts of the application.
You should install the GraniteDS Eclipse Builder plugin (see here) so you can benefit from the automatic Java to AS3 code generation. In can be installed in a standalone Flex/Flash Builder or in an Eclipse installation with the Flash Builder plugin.
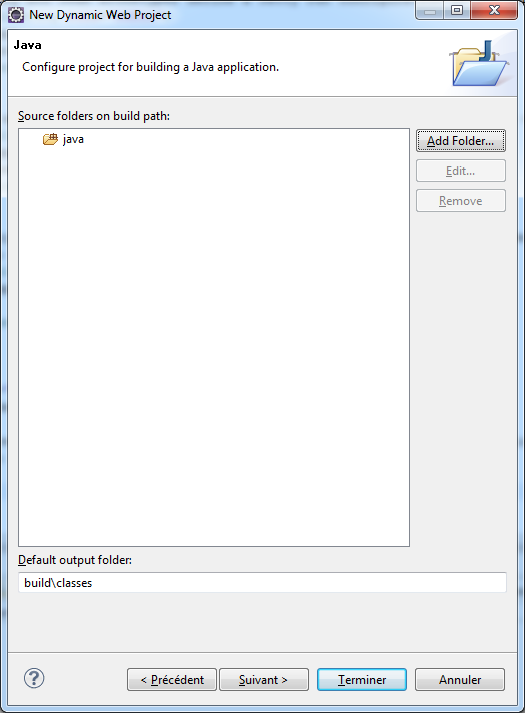
The first step is to create a new Java EE Web project. You can use the Eclipse WTP wizard (File / New / Web / Dynamic Web Project) :
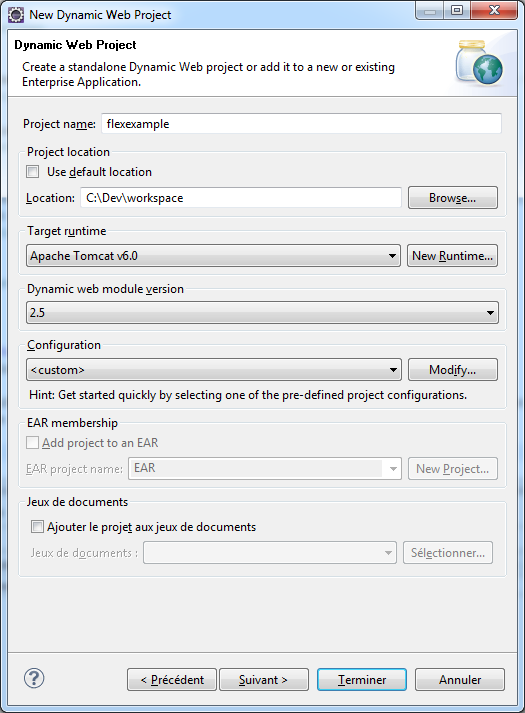
Change the name of the source folder to java instead of src to avoir conflicts with the Flex source folder
we will add later.
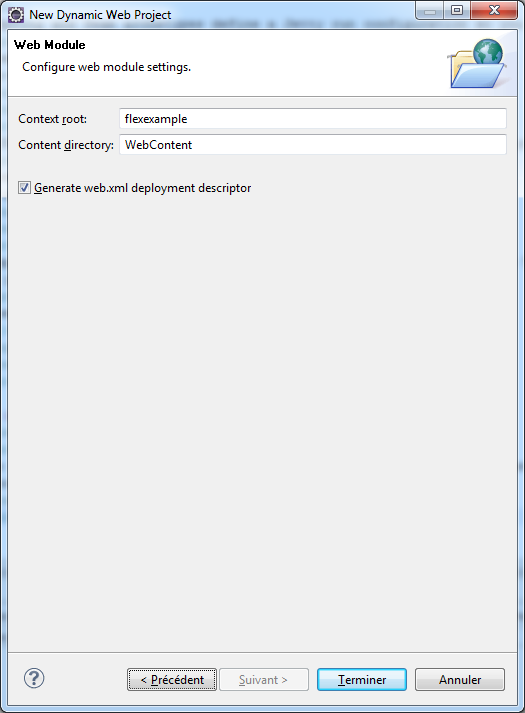
Then copy the necessary GraniteDS libs in the folder WebContent/WEB-INF/lib. It’s done for the Java side.
Next add the Flex nature to the project by right-clicking on the project and selecting Add/Change Project Type / Add Flex Project Type…. Then follow the steps on the wizard.
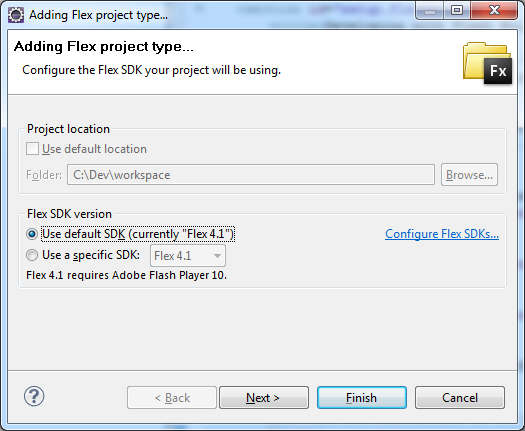
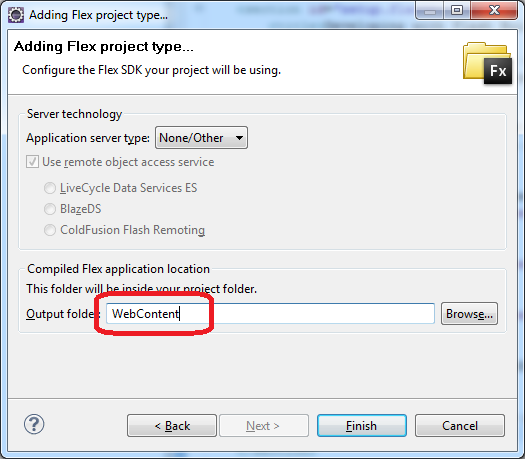
You may want to change the target build folder of Flex to WebContent so the target swf will be compiled
directly in the exploded war folder.
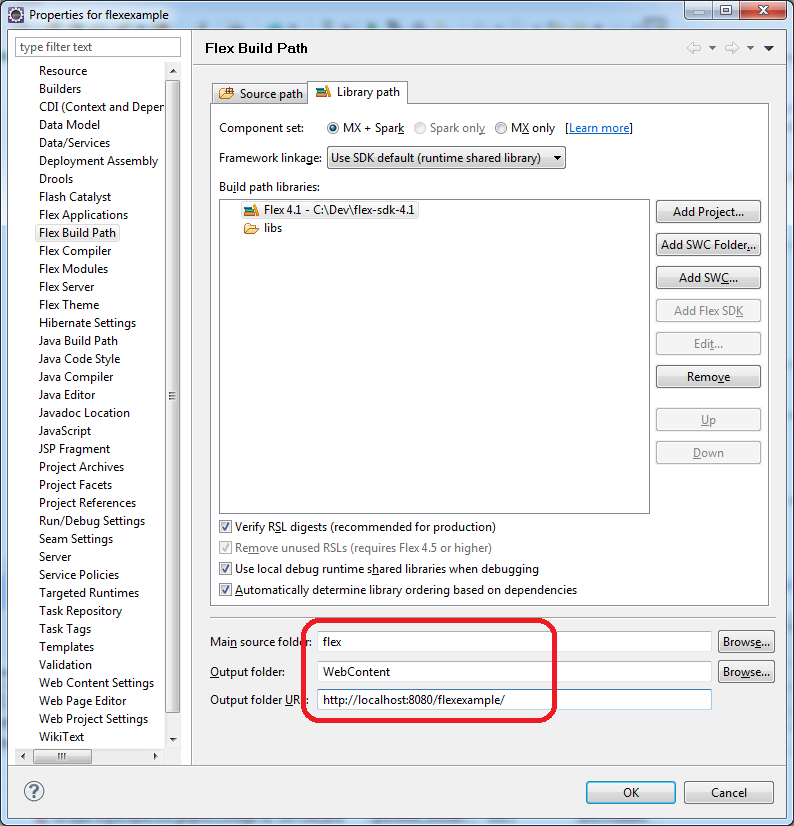
You should change the source folder to flex in the project properties in Flex Build Path and
define the target url so the Flex debugger will connect to the application deployed on the server :
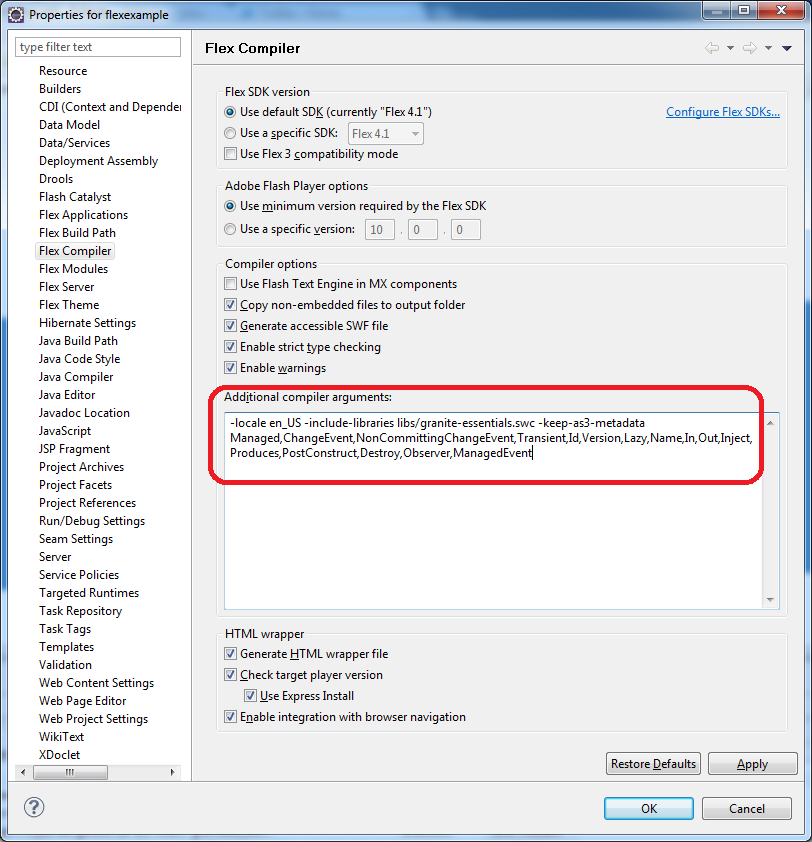
Next copy the GraniteDS client libraries granite.swc and granite-essentials.swc to the libs folder,
and configure the compiler options in the project properties in Flex Compiler:
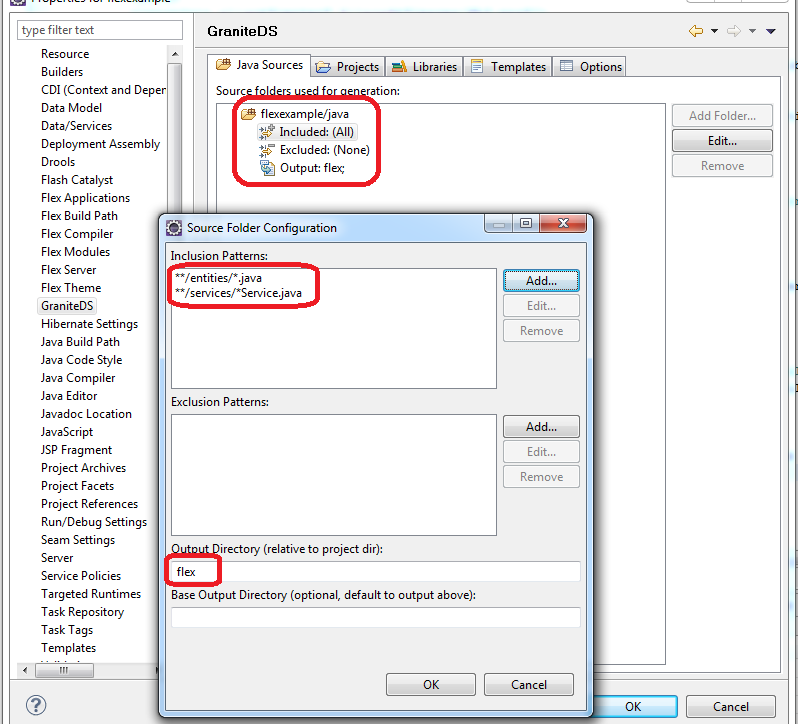
Finally we add the GraniteDS nature to the project with right-click / Add GraniteDS Nature.
Remember to change the target folder to flex. The GraniteDS properties should like this :
If you have configured a target server (Tomcat for example), you now have a complete environment to run your application.
All changes to the Flex application will be automatically deployed to Tomcat thanks to the Eclipse WTP
automatic publishing of the WebContent folder.
Remoting and serialization
Data serialization between a Flex client application and a Java EE server may use three kinds of transfer encodings:
-
XML (HttpService)
-
SOAP (WebService)
-
AMF3 (RemoteObject)
According to all available benchmarks, the last option, AMF3 with RemoteObject, is the faster and most efficient. Additionally it allows to work with
strongly typed objects in the Flex application and thus is more maintainable. GraniteDS provides a full implementation of the AMF3 protocol and a set
of adapters suitable for remote calls to POJO, EJB 3, Seam, Spring, and Guice services.
However, standard AMF serialization/deserialization does not provide any way, either with LiveCycle Data Services/BlazeDS or with GraniteDS, to transfer private or protected data fields. Only non-static, non-transient public fields, either those with public getter and setter or with a public declaration, are taken into account. This limitation applies to both Java and ActionScript 3 classes.
To preserve strong and secure data encapsulation of your beans while serializing their private internal state - such as a version number in entity beans — GraniteDS provides a specific serialization mechanism called externalization. See corresponding section for details.
Data serialization between a client application and a Java EE server may use different kinds of transfer encodings, including XML, JSON, Java serialization, or various other serialization frameworks. GraniteDS provides an implementation of the Adobe AMF3 (ActionScript Message Format) binary encoding which is very compact, fast and efficient. Other formats may be added later but AMF3 is a really easy-to-use and performant format.
The AMF3 format allows for serialization of strongly typed objects. GraniteDS adds the concept of externalization to transform the serialized objects before and after they are serialized. This allows for example to serialize JPA entities without triggering initialization of all lazy properties.
The AMF3 format
AMF3 is a very compact binary format for data serialization/deserialization and remote method invocation. A key feature of this format is that it preserves the entire graph of your data without duplicating identical objects (contrary to JSON for example). For example, if A1 and A2 contain a reference to the same B1, the serialization of A1 and A2 does not duplicate B1. The target client VM will contain exactly the same data graph with only one B1 referenced by one A1 and one A2. Furthermore, there is no risk of infinite recursion if the data graph contains circular references. For example, if B1 contains the set of A# that references B1. AMF3 messages are sent as a part of a AMF0 envelope and body. GraniteDS implements an AMF3 serializer/deserializer and relies on some code borrowed from the project for AMF0 serialization/deserialization. The AMF0 and AMF3 specifications are now public. You may download them . You will need a Macromedia or Adobe account.
The JMF format
TODO
Using the RemoteObject API
RemoteObject is the standard remoting API of the Flex SDK. It can be use either declaratively in MXML or programmatically in ActionScript.
A RemoteObject is attached to a server-side destination, generally defined in the services-config.xml (see the configuration reference).
You can also refer to the about RemoteObject
to get some useful information.
RemoteObject in MXML
For this example, we’ll show a simple POJO destination :
public class HelloService {

   	public String hello(String name) {
   		return "Hello " + name;
   	}
}
<services>
<service
id="granite-service"
class="flex.messaging.services.RemotingService"
messageTypes="flex.messaging.messages.RemotingMessage">
<destination id="hello">
<channels>
<channel ref="graniteamf"/>
</channels>
<properties>
<scope>request</scope>
<source>com.myapp.HelloService</source>
</properties>
</destination>
</service>
</services>
<channels>
<channel-definition id="graniteamf" class="mx.messaging.channels.AMFChannel">
<endpoint
uri="http://{server.name}:{server.port}/{context.root}/graniteamf/amf"
class="flex.messaging.endpoints.AMFEndpoint"/>
</channel-definition>
</channels>This service configuration defines an AMF channel and a simple POJO destination named hello mapped to this channel and which source is the Java class we have created. POJO is the default service adapter so we don’t have to specify a particular service factory.
<?xml version="1.0"?>
<mx:Application xmlns:mx="http://www.adobe.com/2006/mxml">

    <mx:Script>
        import mx.rpc.events.ResultEvent;
        import mx.rpc.events.FaultEvent;
        import mx.controls.Alert;

        public function resultHandler(event:ResultEvent):void {
            // Display received message
            outputMessage.text = event.result as String;
        }

        public function faultHandler(event:FaultEvent):void {
            // Show error alert
            Alert.show(event.fault.faultString);
        }
    </mx:Script>

    <!-- Connect to a service destination.-->
    <mx:RemoteObject id="helloService"
        destination="hello"
        result="handleResult(event);"
        fault="handleFault(event);"/>

    <!-- Provide input data for calling the service. -->
    <mx:TextInput id="inputName"/>

    <!-- Call the web service, use the text in a TextInput control as input data.-->
    <mx:Button click="helloService.hello(inputName.text)"/>

    <!-- Display results data in the user interface. -->
    <mx:Label id="outputMessage"/>
</mx:Application>
This demonstrates a very simple remote call with basic String data types. The destination defined in the MXML RemoteObject declaration should match
the destination name in services-config.xml.
It is very important to note that remote calls in Flex are always asynchronous. The reason is that the Flash VM is not multithreaded and remote calls
should not block user interaction. Something like outputMessage.text = helloService.hello(inputName.text) will thus not work, and it is needed to
attach event listeners to the RemoteObject to handle the remote results and faults.
The actual return value of a remote call on a RemoteObject is an AsyncToken object. The MXML syntax result and fault is simply a shorthand
for adding listeners to this token object.
In this short example, there was only one method in the RemoteObject so we could put the event listeners on the RemoteObject itself.
For services having more than one method, we would rather add a different event listener for each method :
<mx:RemoteObject id="helloService"
        destination="hello">
    <mx:operation name="hello"
        result="handleResult(event);"
        fault="handleFault(event);"/>
    <mx:operation name="..."
        result="..."
        fault="..."/>
</mx:RemoteObject>
The last but interesting way of handing the remote result is to bind the AsyncToken property lastResult to some UI component in MXML. The following code
does the same thing than the initial example :
<?xml version="1.0"?>
<mx:Application xmlns:mx="http://www.adobe.com/2006/mxml">

    <!-- Connect to a service destination.-->
    <mx:RemoteObject id="helloService" destination="hello"/>

    <!-- Provide input data for calling the service. -->
    <mx:TextInput id="inputName"/>

    <!-- Call the web service, use the text in a TextInput control as input data.-->
    <mx:Button click="helloService.hello(inputName.text)"/>

    <!-- Display results data in the user interface using binding on the lastResult property of AsyncToken. -->
    <mx:Label id="outputMessage" text="{helloService.hello.lastResult}"/>
</mx:Application>
It is possible to use more complex data types as arguments or as result values. It is then necessary to create an equivalent ActionScript 3 class for each Java data class. You can refer to the mapping section to see how to do this in detail. Also see how you can use the Gas3 code generator to do this for you.
package com.myapp.model;

public class Person {

	private String name;

	public String getName() {
		return name;
	}
	public void setName(String name) {
		this.name = name;
	}
}
package com.myapp.model {
[RemoteClass(alias="com.myapp.model.Person")]
public class Person {
public var name:String;
}
}public class PeopleService {
public List<Person> findAll(Person examplePerson) {
...
return list;
}
}<?xml version="1.0"?>
<mx:Application xmlns:mx="http://www.adobe.com/2006/mxml">
<!-- Connect to a service destination.-->
<mx:RemoteObject id="peopleService"
destination="people"
result="handleResult(event);"
fault="handleFault(event);"/>
<!-- Provide input data for calling the service. -->
<mx:TextInput id="inputName"/>
<!-- Call the web service, use the text in a TextInput control as input data.-->
<mx:Button click="peopleService.findAll(inputName.text)"/>
<!-- Display results data in the user interface. -->
<mx:DataGrid id="outputGrid" dataProvider="{peopleService.lastResult}"/>
</mx:Application>RemoteObject in ActionScript
Using RemoteObject programmatically is necessary when called from a client controller class in a classic MVC pattern.
package com.myapp.controllers {

 	import mx.rpc.events.ResultEvent;
 	import mx.rpc.events.FaultEvent;
 	import mx.rpc.remoting.mxml.RemoteObject;
 	import mx.controls.Alert;

	public class HelloController {

		private var helloService:RemoteObject;

		public function HelloController():void {
            // Initialize a remote destination
            helloService = new RemoteObject("pojo");
            helloService.addEventListener(ResultEvent.RESULT, resultHandler, false, 0, true);
            helloService.addEventListener(FaultEvent.FAULT, faultHandler, false, 0, true);
        }

        private function resultHandler(event:ResultEvent):void {
            // Handler result
        }

        private function faultHandler(event:FaultEvent):void {
            // Handle fault
        }
    }
}
RemoteObject in ActionScript without services-config.xml file
When there is no services-config.xml (for example when the configuration is defined in the Spring or Seam configuration files), it is necessary
to manually initialize the endpoint for the RemoteObjects.
package com.myapp.controllers {

 	import mx.rpc.events.ResultEvent;
 	import mx.rpc.events.FaultEvent;
 	import mx.rpc.remoting.mxml.RemoteObject;
 	import mx.controls.Alert;

	public class HelloController {

		private var helloService:RemoteObject;

 		public function HelloController():void {
			// Initialize a remote destination
			helloService = new RemoteObject("hello");
			helloService.source = "com.myapp.HelloService";
			// Setup the channel set and endpoint for the RemoteObject
			helloService.channelSet = new ChannelSet();
			helloService.channelSet.addChannel(new AMFChannel("graniteamf",
			     "http://{server.name}:{server.port}/myapp/graniteamf/amf"));
			helloService.addEventListener(ResultEvent.RESULT, resultHandler, false, 0, true);
			helloService.addEventListener(FaultEvent.FAULT, faultHandler, false, 0, true);
		}

		private function resultHandler(event:ResultEvent):void {
			// Handle result
		}

		private function faultHandler(event:FaultEvent):void {
			// Handle fault
		}
    }
}
Using HTTPS
Using HTTPS involves two steps :
-
Configure a
SecureAMFChannelinstead of anAMFChannelinservices-config.xml -
Configure a SSL endpoint in
web.xml
services-config.xml<services>
...
</services>
<channels>
<channel-definition id="graniteamf" class="mx.messaging.channels.SecureAMFChannel">
<endpoint
uri="https://{server.name}:{server.port}/{context.root}/graniteamf/amf"
class="flex.messaging.endpoints.AMFEndpoint"/>
</channel-definition>
</channels>web.xml<security-constraint>
<display-name>AMF access</display-name>
<web-resource-collection>
<web-resource-name>Secure AMF remoting</web-resource-name>
<description>Secure AMF Remoting</description>
<url-pattern>/graniteamf/*</url-pattern>
</web-resource-collection>
<auth-constraint>
<role-name>role1</role-name>
...
</auth-constraint>
<user-data-constraint>
<transport-guarantee>CONFIDENTIAL</transport-guarantee>
</user-data-constraint>
</security-constraint>Using the Tide API
The Tide remoting API is an alternative to the standard RemoteObject. It can be used only programmatically in ActionScript and simplifies the
handling of asynchronous call by hiding AsyncToken and other internal objects. Note that Tide provides much more than just a different API, it will be detailed
in the next chapters.
|
Note
|
This section describes the usage of the Tide API with a standard AMF provider. When the Tide API is used in conjunction with GraniteDS and Tide-enabled server framework adapters, there are some specificities that are described in the chapters concerning each framework integration (EJB3, Spring, Seam 2, CDI). |
Basic remoting
Let’s see the same hello example with Tide. Note the usage of the Tide context object which represents the client application container.
<?xml version="1.0"?>
<mx:Application xmlns:mx="http://www.adobe.com/2006/mxml">
    <mx:Script>
        import org.granite.tide.Tide;
        import org.granite.tide.Context;
        import org.granite.tide.events.TideResultEvent;
        import org.granite.tide.events.TideFaultEvent;

        private var tideContext:Context = Tide.getInstance().getContext();

        private function hello(name:String):void {
            // tideContext.helloService implicitly creates a proxy for the remote destination named helloService
            tideContext.helloService.hello(name, resultHandler, faultHandler);
        }

        private function resultHandler(event:TideResultEvent):void {
            outputMessage.text = event.result as String;
        }

        private function faultHandler(event:TideFaultEvent):void {
            // Handle fault
        }
    </mx:Script>

    <!-- Provide input data for calling the service. -->
    <mx:TextInput id="inputName"/>

    <!-- Call the web service, use the text in a TextInput control as input data.-->
    <mx:Button click="hello(inputName.text)"/>

    <!-- Result message. -->
    <mx:Label id="outputMessage"/>
</mx:Application>
Basic remoting with dependency injection
This example can be cleaned up by using the dependency injection feature of the Tide framework (see here for more details).
Basically you can inject a client proxy for a remote destination with the annotation [In].
<?xml version="1.0"?>
<mx:Application xmlns:mx="http://www.adobe.com/2006/mxml"
    creationComplete="Tide.getInstance().initApplication()">
    <mx:Script>
        import org.granite.tide.Tide;
        import org.granite.tide.events.TideResultEvent;
        import org.granite.tide.events.TideFaultEvent;

        [In]
        public var helloService:Component;

        private function hello(name:String):void {
            helloService.hello(name, resultHandler, faultHandler);
        }

        private function resultHandler(event:TideResultEvent):void {
            outputMessage.text = event.result as String;
        }

        private function faultHandler(event:TideFaultEvent):void {
            // Handle fault
        }
    </mx:Script>

    <!-- Provide input data for calling the service. -->
    <mx:TextInput id="inputName"/>

    <!-- Call the web service, use the text in a TextInput control as input data.-->
    <mx:Button click="hello(inputName.text)"/>

    <!-- Result message. -->
    <mx:Label id="outputMessage"/>
</mx:Application>
Using the ITideResponder interface
In some cases, you may need to pass some value to the result/fault handler to be able to distinguish different calls on the same method.
You can then implement the ITideResponder interface or use the default TideResponder implementation that is able to hold a token object:
public function call():void {
    var responder1:TideResponder = new TideResponder(helloResult, helloFault, "firstCall");
    var responder2:TideResponder = new TideResponder(helloResult, helloFault, "secondCall");
    tideContext.helloWorld.sayHello("Jimi", responder1);
    tideContext.helloWorld.sayHello("Jimi", responder2);
}

private function helloResult(event:TideResultEvent, token:Object):void {
    if (token == "firstCall")
        Alert.show(event.result);
}
In this case, the Alert will show up only once for the first call.
Simplifying asynchronous interactions
The ITideResponder interface has another important use : it makes possible to provide a return object that will be merged with the server result.
It greatly helps working with the asynchronous nature of Flex remoting by limiting the need for result handlers.
private var products:ArrayCollection = new ArrayCollection();

public function call():void {
    tideContext.productService.findAllProducts(
        new TideResponder(resultHandler, null, null, products)
    );
}

private function resultHandler(event:TideResultEvent):void {
   trace("Assert result was merged: " + (event.result === products));
}
<mx:DataGrid dataProvider="{products}">
...
</mx:DataGrid>The result of the remote call will be merged in the provided products collection instance. It is thus necessary to provide a non null object instance,
and this kind of merge will work with real objects and collections but not with simple types (such as String, Number, …).
Note that trying to merge a managed entity will work only if the received entity has the same uid than the source entity. This is a normal behaviour to avoir
breaking existing object associations in the local context. So this merge feature is mostly suitable for retrieving collections so you are sure that the same
instance of the collection is kept in sync.
Server application endpoint initialization
Tide remoting can be used without needing the standard services-config.xml Flex configuration file. In this case, it is necessary to manually define
the remoting channels.
The easiest way is to setup the built-in default ServerSession component implementation in the Tide context, for example in the creationComplete
of the main application.
Tide.getInstance().mainServerSession.serverApp = new SimpleServerApp("/context-root");It is also possible to define serverName, serverPort and use a secure https endpoint with secure=true.
You can completely customize the endpoint initialization by providing your own implementation of IServerApp, for example to fetch the endpoint parameters from a remote url.
You can also customize the channel build by implementing the IChannelBuilder interface.
Client message interceptors
If you need some common behaviour for all remote calls, such as showing/hiding a wait screen at each call or setting custom headers, you can implement a message interceptor that will be called before and after each remote call or message.
public class MyMessageInterceptor implements IMessageInterceptor {
    public function before(msg:IMessage):void {
        showWaitScreen();
        msg.headers['customHeader'] = 'test';
    }

    public function after(msg:IMessage):void {
        var customHeader:String = msg.headers['customHeader'] as String;
        hideWaitScreen();
    }
}
Global exception handling
The server exceptions can be handled on the client-side by defining a fault callback on each remote call. It works fine but it is very tedious and you can always forget a case, in which case the error will be either ignored or result in a Flex error popup that is not very elegant.
To help dealing with server exceptions, it is possible to define common handlers for particular fault codes on the client-side, and exception converters on the server-side, to convert server exceptions to common fault codes.
On the server, you have to define an ExceptionConverter class. For example we could write a converter to handle the JPA EntityNotFoundException
(in fact there is already a built-in converter for all JPA exceptions):
public class EntityNotFoundExceptionConverter implements ExceptionConverter {

    public static final String ENTITY_NOT_FOUND = "Persistence.EntityNotFound";

    public boolean accepts(Throwable t, Throwable finalException) {
        return t.getClass().equals(javax.persistence.EntityNotFoundException.class);
    }

    public ServiceException convert(
        Throwable t, String detail, Map<String, Object> extendedData) {

        ServiceException se = new ServiceException(
            ENTITY_NOT_FOUND, t.getMessage(), detail, t
        );
        se.getExtendedData().putAll(extendedData);
        return se;
    }
}
This class will intercept all EntityNotFound exceptions on the server-side, and convert it to a proper ENTITY_NOT_FOUND fault event.
The argument finalException contains the deepest throwable in the error and can be used to check if some higher level exception converter should
be used to handle the exception. For example, the HibernateExceptionConverter checks if the exception is wrapped in a PersistenceException,
in which case it lets the JPA PersistenceExceptionConverter accept the exception.
This exception converter has to be declared on the GDS server config:
-
When using
scan="true"ingranite-config.xml, ensure that there is aMETA-INF/granite-config.propertiesfile (even empty) in the jar containing the exception converter class. -
When not using automatic scan, you can add this in
granite-config.xml:<exception-converters> <exception-converter type="com.myapp.custom.MyExceptionConverter"/> </exception-converters>
On the Flex side, you then have to define an exception handler class:
public class EntityNotFoundExceptionHandler implements IExceptionHandler {

    public function accepts(emsg:ErrorMessage):Boolean {
        return emsg.faultCode == "Persistence.EntityNotFound";
    }

    public function handle(context:BaseContext, emsg:ErrorMessage):void {
        Alert.show("Entity not found: " + emsg.message);
    }
}-
and register it as an exception handler for the Tide context in a static initializer block to be sure it is registered before anything else happens.
<mx:Application>
    <mx:Script>
        Tide.getInstance().addExceptionHandler(EntityNotFoundExceptionHandler);
    </mx:Script>
</mx:Application>
Miscellaneous features
There are a few other features that are useful when working with remote services :
-
The static property
Tide.showBusyCursorcan enable or disable the busy mouse cursor during execution of remote calls. -
Tide.busyis a bindable property that can be used to determine if there is currently a remote call in progress. -
Tide.disconnectedis a bindable property that can be used to determine if the network connection is currently broken. If becomes false when a network error is detected and set to true after each successful call.
Mapping Java and AS3 objects
When using typed objects, it’s necessary to create an ActionScript 3 class for each Java class that will be marshalled between Flex and Java. However due
to the differences of data types in the ActionScript 3 and Java languages, data conversions are done during serialization/deserialization.
GraniteDS follows the standard conversions specified in the Adobe Flex SDK documentation ,
with an important exception : GDS will neither convert AS3 String to Java numeric types or boolean, nor AS3 numeric types or boolean to String.
You must use AS3 numeric types for Java numeric types and AS3 boolean type for Java boolean types; either primitive or boxed boolean.
long, Long, BigInteger and BigDecimal values may by converted to their respective ActionScript 3 equivalent
(see Big Number Implementations for details).
Externalizers and AS3 code generation
In some cases it can be necessary to serialize private fields of a Java class (for example the @Version field of a JPA entity). Due to the limited capabilities
of the ActionScript 3 reflection API than cannot access private fields, it is necessary to create an externalizable AS3 class
(implementing flash.utils.IExternalizable and its corresponding externalizable Java class. In both classes you have to implement two methods
readExternal and writeExternal that read and write data to the network stream in the exact same order.
This is extremely tedious and unmaintainable, so GraniteDS provides a specific mechanism to handle this almost transparently :
-
On the Java side, GraniteDS can simulate an externalizable class by using Java reflection, so there is no need to implement the interface
java.io.Externalizablemanually. You just have to configure which classes should be processed. -
On the Flex side, the Gas3 generator can automatically generate the
writeExternalandreadExternalmethods.
By means of these two combined mechanisms, it’s possible to serialize any kind of object with minimal effort.
Example of a JPA entity and its corresponding AS3 beans
Let’s say we have a basic entity bean that represents a person. The following code shows its implementation using JPA annotations:
package com.myapp.entity;

import java.io.Serializable;

import javax.persistence.Basic;
import javax.persistence.Entity;
import javax.persistence.GeneratedValue;
import javax.persistence.Id;
import javax.persistence.Version;

@Entity
public class Person implements Serializable {

    private static final long serialVersionUID = 1L;

    @Id @GeneratedValue
    private Integer id;

    @Version
    private Integer version;

    @Basic
    private String firstName;

    @Basic
    private String lastName;

    public Integer getId() {
        return id;
    }

    public String getFirstName() {
        return firstName;
    }
    public void setFirstName(String firstName) {
        this.firstName = firstName;
    }

    public String getLastName() {
        return lastName;
    }
    public void setLastName(String lastName) {
        this.lastName = lastName;
    }
}
This simple entity bean has one read-only property (id), one completely private property (version) and two read/write
properties (firstName, lastName). With standard serialization, we would not be able to send the id and version fields to
the Flex client code. One solution would be to make them public with getters and setters, but this would obviously expose these fields to manual
and erroneous modifications. Another solution would be to make the person bean implement java.io.Externalizable instead of
java.io.Serializable, but it would require implementing and maintaining the readExternal and writeExternal methods.
This is at least an annoyance, a source of errors, and might even be impossible if you do not have access to the source code to the Java entities.
With GraniteDS automated externalization and without any modification made to our bean, we may serialize all properties of the Person class,
private or not. Furthermore, thanks to the Gas3 code generator, we do not even have to write the ActionScript 3 bean by ourselves.
Here is a sample generated bean implementation:
/**
 * Generated by Gas3 v3.0.0 (Granite Data Services).
 *
 * WARNING: DO NOT CHANGE THIS FILE. IT MAY BE OVERWRITTEN EACH TIME YOU USE
 * THE GENERATOR. INSTEAD, EDIT THE INHERITED CLASS (Person.as).
 */

package com.myapp.entity {

    import flash.utils.IDataInput;
    import flash.utils.IDataOutput;
    import flash.utils.IExternalizable;
    import org.granite.collections.IPersistentCollection;
    import org.granite.meta;

    use namespace meta;

    [Bindable]
    public class PersonBase implements IExternalizable {

        private var __initialized:Boolean = true;
        private var __detachedState:String = null;

        private var _firstName:String;
        private var _id:Number;
        private var _lastName:String;
        private var _version:Number;

        meta function isInitialized(name:String = null):Boolean {
            if (!name)
                return __initialized;

            var property:* = this[name];
            return (
                (!(property is Person) || (property as Person).meta::isInitialized()) &&
                (!(property is IPersistentCollection) ||
                  (property as IPersistentCollection).isInitialized())
            );
        }

        public function set firstName(value:String):void {
            _firstName = value;
        }
        public function get firstName():String {
            return _firstName;
        }

        public function get id():Number {
            return _id;
        }

        public function set lastName(value:String):void {
            _lastName = value;
        }
        public function get lastName():String {
            return _lastName;
        }

        public function readExternal(input:IDataInput):void {
            __initialized = input.readObject() as Boolean;
            __detachedState = input.readObject() as String;
            if (meta::isInitialized()) {
                _firstName = input.readObject() as String;
                _id = function(o:*):Number {
                    return (o is Number ? o as Number : Number.NaN) } (input.readObject());
                _lastName = input.readObject() as String;
                _version = function(o:*):Number {
                    return (o is Number ? o as Number : Number.NaN) } (input.readObject());
            }
            else {
                _id = function(o:*):Number {
                    return (o is Number ? o as Number : Number.NaN) } (input.readObject());
            }
        }

        public function writeExternal(output:IDataOutput):void {
            output.writeObject(__initialized);
            output.writeObject(__detachedState);
            if (meta::isInitialized()) {
                output.writeObject(_firstName);
                output.writeObject(_id);
                output.writeObject(_lastName);
                output.writeObject(_version);
            }
            else {
                output.writeObject(_id);
            }
        }
    }
}
This AS3 bean reproduces all properties found in the Java entity, public and private and even includes two extra properties,
(__initialized and __detachedState), that correspond the the JPA internal state for lazy loading. Note that these two fields are present
because the Gas3 generator has detected that our class is a JPA entity annotated with @Entity. For simple Java beans, these two fields would not be
present, but this shows that the pluggable externalizer mechanism in GraniteDS allows to do a lot more than simply serializing public data and value objects.
Note that property accessors (get/set) are exactly the same as those found in the Java entity bean, and while all fields are serialized between
the client and the server, only firstName and lastName are modifiable in ActionScript 3 and id is kept read-only.
|
Note
|
With the externalizer mechanism in GraniteDS, serializing data between Flex and Java is almost as powerful and flexible as pure Java serialization between a Java client and a Java server. |
Standard configuration
In order to externalize the Person.java entity bean, we must tell GraniteDS which classes we want to externalize with a special rule in the
granite-config.xml file:
<?xml version="1.0" encoding="UTF-8"?>

<!DOCTYPE granite-config PUBLIC
    "-//Granite Data Services//DTD granite-config internal//EN"
    "http://www.graniteds.org/public/dtd/3.0.0/granite-config.dtd">

<granite-config>
    <class-getter type="org.granite.hibernate.HibernateClassGetter"/>

    <externalizers>
        <externalizer type="org.granite.hibernate.HibernateExternalizer">
            <include type="com.myapp.entity.Person"/>
        </externalizer>
    </externalizers>
</granite-config>
This instructs GraniteDS to externalize all classes named com.myapp.entity.Person by using the org.granite.hibernate.HibernateExternalizer.
Note that the HibernateClassGetter configuration is necessary to detect Hibernate proxies (lazy-initialized beans).
See more about this feature in the JPA and lazy initialization section.
If you use an abstract entity bean as a parent to all your entity beans you could use this declaration, but note that type in the example above
is replaced by instance-of:
<?xml version="1.0" encoding="UTF-8"?>

<!DOCTYPE granite-config PUBLIC
    "-//Granite Data Services//DTD granite-config internal//EN"
    "http://www.graniteds.org/public/dtd/3.0.0/granite-config.dtd">

<granite-config>
    <class-getter type="org.granite.hibernate.HibernateClassGetter"/>

    <externalizers>
        <externalizer type="org.granite.hibernate.HibernateExternalizer">
            <include instance-of="com.myapp.entity.AbstractEntity"/>
        </externalizer>
    </externalizers>
</granite-config>
This will avoid the need of writing externalization instructions for all your beans, and all instances of AbstractEntity will be automatically externalized.
You may also use an annotated-with attribute as follows:
<?xml version="1.0" encoding="UTF-8"?>

<!DOCTYPE granite-config PUBLIC
    "-//Granite Data Services//DTD granite-config internal//EN"
    "http://www.graniteds.org/public/dtd/3.0.0/granite-config.dtd">

<granite-config>
    <class-getter type="org.granite.hibernate.HibernateClassGetter"/>

    <externalizers>
        <externalizer type="org.granite.hibernate.HibernateExternalizer">
            <include annotated-with="javax.persistence.Entity"/>
            <include annotated-with="javax.persistence.MappedSuperclass"/>
            <include annotated-with="javax.persistence.Embeddable"/>
        </externalizer>
    </externalizers>
</granite-config>
Of course, you may mix these different attributes as you want. Note, however, that there are precedence rules for these three configuration options:
type has precedence over annotated-with and annotated-with has precedence over instance-of.
Playing with rule precedence provides a way to override general rules with more specific rules for particular classes.
Autoscan configuration
Instead of configuring externalizers with the above method, you may use the autoscan feature:
<?xml version="1.0" encoding="UTF-8"?>

<!DOCTYPE granite-config PUBLIC
    "-//Granite Data Services//DTD granite-config internal//EN"
    "http://www.graniteds.org/public/dtd/3.0.0/granite-config.dtd">

<granite-config scan="true"/>
With this very short configuration, GraniteDS will scan at startup all classes available in the classpath, actually all classes found in the classloader
of the GraniteConfig class, and discover all externalizers (classes that implements the GDS Externalizer interface).
The matching rule are defined implicitly by each externalizer, for example the Hibernate externalizer is defined to match all classes annotated with @Entity.
Built-in externalizers
GraniteDS comes with a set of built-in externalizers for the most usual kinds of Java classes:
-
org.granite.messaging.amf.io.util.externalizer.DefaultExternalizer: this externalizer may be used with any POJO bean. -
org.granite.messaging.amf.io.util.externalizer.EnumExternalizer: this externalizer may be used with Javaenumtypes. When autoscan is enabled, it will be automatically used for allenumtypes. -
org.granite.hibernate.HibernateExternalizer: This externalizer may be used with all JPA/Hibernate entities (i.e., all classes annotated with@Entity,@MappedSuperclassor@Embeddableannotations). Includegranite-hibernate.jarin your classpath in order to use this feature. -
org.granite.toplink.TopLinkExternalizer: this externalizer may be used with all JPA/TopLink entities (i.e., all classes annotated with@Entity,@MappedSuperclassor@Embeddableannotations). Includegranite-toplink.jarin your classpath in order to use this feature. -
org.granite.eclipselink.EclipseLinkExternalizer: this externalizer will be used with the new version of TopLink (renamed EclipseLink). Includegranite-eclipselink.jarin your classpath in order to use this feature. -
org.granite.openjpa.OpenJpaExternalizer: this externalizer may be used with all JPA/OpenJPA (formerly WebLogic Kodo) entities. Includegranite-openjpa.jarin your classpath in order to use this feature. -
org.granite.datanucleus.DataNucleusExternalizer: this externalizer may be used with all JPA/DataNucleus entities. Includegranite-datanucleus.jarin your classpath in order to use this feature. -
org.granite.tide.cdi.TideEventExternalizer: this externalizer externalizes classes annotated with theTideEventannotation. -
org.granite.messaging.amf.io.util.externalizer.LongExternalizer: externalizes JavalongorLongvalues. -
org.granite.messaging.amf.io.util.externalizer.BigIntegerExternalizer: externalizes JavaBigIntegervalues. -
org.granite.messaging.amf.io.util.externalizer.BigDecimalExternalizer: externalizes JavaBigDecimalvalues.
Custom externalizers
It is easy to write your own externalizer, you have to implement the org.granite.messaging.amf.io.util.externalizer.Externalizer interface, or extend
the DefaultExternalizer class. There is no particular use case for this extension; it mostly depends on your specific needs and you should look at
the standard externalizer implementations to figure out how to write your custom code.
If you use autoscan configuration, make sure your class is packaged in a jar accessible via the GraniteConfig class loader (granite-server.jar classpath),
put a META-INF/granite-config.properties in your jar, even empty, and put relevant code in the accept method to define which classes your externalizer
should process:
public int accept(Class<?> clazz) {
    return clazz.isAnnotationPresent(MySpecialAnnotation.class) ? 1 : -1;
}
You may, of course, use any kind of conditional expression, based on annotations, inheritance, etc. The returned value is a numeric weight used when GDS
tries to figure out what externalizer it should use when it encounters a Java bean at serialization time: -1 means "do not use this externalizer",
0 or more means "use this externalizer if there is no other externalizer that returns a superior weight for this bean".
DefaultExternalizer has a weight of 0, EnumExternalizer and the built-in JPA externalizers a weight of 1.
If your class would normally be externalized by the HibernateExternalizer, you may, for example, use a weight of 2 when you want to replace the default
serialization for some particular entities.
|
Note
|
Creating your own externalizer generally means that you also need to write a corresponding template for the Gas3 generator with matching
implementations of |
@ExternalizedBean and @Include
Two standard annotations are available that give you more control over the externalization process:
-
@ExternalizedBean: This class annotation may be used to instruct GDS to externalize the annotated bean with theDefaultExternalizeror any other externalizer specified in the type attribute. For example, you could annotate a Java class with:@ExternalizedBean(type=path.to.MyExternalizer.class) public class MyExternalizedBean { ... } -
@Include: This method annotation may be used on a public getter when you want to externalize a property with no corresponding field (i.e., a computed property). For example:public class MyBean { private int value; ... @Include public int getSquare() { return value * value; } }
Of course, this annotation will only be used if the MyBean class is configured for externalization. Note that externalized properties are always
read only: a setSquare(…) will never be used in the client to server serialization.
Note also that Gas3 uses this annotation when it generates ActionScript3 bean so you’ll find an extra square member field in your generated MyBean.as.
Custom class getters
A problem with the default AMF3 serialization is to get the true class name of an object in special cases. For example, a simple myObject.getClass().getName()
with a proxied entity bean would return org.hibernate.proxy.HibernateProxy instead of the underlying entity bean class name.
In order to get through this kind of problem, you must configure a class getter. Other methods of ClassGetter are also used by Tide to determine
some internal properties of the managed objects, such as their JPA internal initialization state.
Class getters are generally used in conjunction with externalizers. For example, the full configuration for an application using Hibernate entities would be (without autoscan):
<?xml version="1.0" encoding="UTF-8"?>

<!DOCTYPE granite-config PUBLIC
    "-//Granite Data Services//DTD granite-config internal//EN"
    "http://www.graniteds.org/public/dtd/3.0.0/granite-config.dtd">

<granite-config>
  <class-getter type="org.granite.hibernate.HibernateClassGetter"/>

  <externalizers>
    <externalizer type="org.granite.hibernate.HibernateExternalizer">
      <include instance-of="test.granite.ejb3.entity.AbstractEntity"/>
    </externalizer>
  </externalizers>
</granite-config>
The org.granite.hibernate.HibernateClassGetter class is used in order to retreive the correct entity class name from a proxy.
You may write and plug your own class getter in a similar way.
Instantiators
At deserialization time, from client to server, GraniteDS must instantiate and populate new JavaBeans with serialized data. The population issue (strictly private field), as we have seen before, is addressed by externalizers. But there is still a problem with classes that do not declare a default constructor. How do we instantiate those classes with meaningful parameters at deserialization time?
When GraniteDS encounters classes without a default constructor, it tries to instantiate them by using the Sun JVM sun.reflect.ReflectionFactory
class that bypasses this limitation. Then, if it can successfully instantiate this kind of class, fields deserialization follows the standard process
with or without externalization. This solution has three serious limitations however: it only works with a Sun JVM, it does not take care of complex
initialization you may have put in your custom contructor, and it cannot work with classes that should be created via a static factory method.
With GraniteDS instantiators, you may control the instantiation process, delaying the actual instantiation of the class after all its serialized data has been read.
Built-in instantiators
Two instantiators come with GDS:
-
org.granite.messaging.amf.io.util.instantiator.EnumInstantiator: This instantiator is used in order to get anEnumconstant value from anEnumclass and value (theStringrepresentation of the constant), by means of thejava.lang.Enum.valueOf(Class<? extends Enum> enumType, String name)method. -
org.granite.hibernate.HibernateProxyInstantiator: It is used when GDS needs to recreate anHibernateProxy. See source code for details.
Note that those instantiators do not require an entry in granite-config.xml, they are respectively used by the EnumExternalizer, HibernateExternalizer,
and TopLinkExternalizer.
Custom instantiators
Let’s say you have a JavaBean like this one:
package org.test;

import java.util.Map;
import java.util.HashMap;
import java.io.UnsupportedEncodingException;
import java.net.URLEncoder;

public class MyBean {

    private final static Map<String, MyBean> beans = new HashMap<String, MyBean>();

    private final String name;
    private final String encodedName;

    protected MyBean(String name) {
        this.name = name;
        try {
            this.encodedName = URLEncoder.encode(name, "UTF-8");
        } catch (UnsupportedEncodingException e) {
            throw new RuntimeException(e);
        }
    }

    public static MyBean getInstance(String name) {
        MyBean bean = null;
        synchronized (beans) {
            bean = beans.get(name);
            if (bean == null) {
                bean = new MyBean(name);
                beans.put(name, bean);
            }
        }
        return bean;
    }

    public String getName() {
        return name;
    }

    public String getEncodedName() {
        return encodedName;
    }
}
With this kind of Java class, even with the help of the GDS DefaultExternalizer and the Sun ReflectionFactory facility, you will not be able to get
the cached instance of your bean and the encodedName field will not be correctly initialized. Instead, a new instance of MyBean would be created
with a simulated default constructor and the name field would be assigned with serialized data.
The solution is to write a custom instantiator that will be used at deserialization time:
package org.test;

import java.util.Collections;
import java.util.List;
import java.util.ArrayList;

import org.granite.messaging.amf.io.util.instantiator.AbstractInstanciator;

public class MyBeanInstanciator extends AbstractInstanciator<MyBean> {

    private static final long serialVersionUID = -1L;

    private static final List<String> orderedFields;
    static {
        List<String> of = new ArrayList<String>(1);
        of.add("name");
        orderedFields = Collections.unmodifiableList(of);
    }

    @Override
    public List<String> getOrderedFieldNames() {
        return orderedFields;
    }

    @Override
    public MyBean newInstance() {
        return MyBean.getInstance((String)get("name"));
    }
}
You should finally use a granite-config.xml file as follows in order to use your instantiator:
<?xml version="1.0" encoding="UTF-8"?>

<!DOCTYPE granite-config PUBLIC
    "-//Granite Data Services//DTD granite-config internal//EN"
    "http://www.graniteds.org/public/dtd/3.0.0/granite-config.dtd">

<granite-config>
  <externalizers>
    <externalizer type="org.granite.messaging.amf.io.util.externalizer.DefaultExternalizer">
      <include type="org.test.MyBean"/>
    </externalizer>
  </externalizers>

  <instanciators>
    <instanciator type="org.test.MyBean">org.test.MyBeanInstanciator</instanciator>
  </instanciators>
</granite-config>
JPA and lazy initialization
In many Java EE applications, persistence is done by using a JPA provider (such as Hibernate). The application directly persists and fetch Java entities, so this could seem natural to transfer these same objects to the client layer instead of adding a extra conversion layer with data transfer objects. However this is not as simple as it seems, in particular when using the lazy loading feature of JPA (and most applications using JPA should use lazy loading).
Usual serialization providers (AMF or not) will either throw exceptions during serialization (because the lazy loaded associations are not available at this time), or load the complete object graph and thus limit the applicability of lazy loading (when using patterns such as Open Session in View).
GraniteDS on the other hand is able to reliably serialize JPA entities with its externalizer mechanism (even detached objects outside of a JPA session)
and supports both kinds of associations: proxy (single-valued associations) and collections (such as List, Set, Bag and Map).
As described in the previous section, it provides built-in support for Hibernate, TopLink/EclipseLink, OpenJPA and DataNucleus.
|
Note
|
It is important to note that as a JPA detached entity can be reliably serialized between Flex and Java, it’s perfectly possible (and even recommended) to directly persist or merge entities sent from the Flex application without any intermediate DTO layer. |
Single-valued associations (proxied or weaved associations)
In your JPA entity bean, you may have a single-valued association like this:
@Entity
public class MyEntity {

    @Id @GeneratedValue
    private Integer id;

    @OneToOne(fetch=FetchType.LAZY)
    private MyOtherEntity other;

    // Skipped code...
}

@Entity
public class MyOtherEntity {

    @Id @GeneratedValue
    private Integer id;

    // Skipped code...
}
If you load a large collection of MyEntity and do not need other references, this kind of declaration prevents unnecessary performance and memory usage
(please refer to Hibernate documention in order to actually fetch these references when you need them).
With GDS, you can keep those uninitialized references as is. For example:
[Bindable]
[RemoteClass(alias="path.to.MyEntity"]
public class MyEntity {

    private var __initialized:Boolean = true;
    private var __detachedState:String = null;

    private var _id:Number;
    private var _other:MyOtherEntity;

    meta function isInitialized(name:String = null):Boolean {
        if (!name)
            return __initialized;

        var property:* = this[name];
        return (
            (!(property is Welcome) || (property as Welcome).meta::isInitialized()) &&
            (!(property is IPersistentCollection) ||
              (property as IPersistentCollection).isInitialized())
        );
    }

    // Skipped code...

    public override function readExternal(input:IDataInput):void {
        __initialized = input.readObject() as Boolean;
        __detachedState = input.readObject() as String;
        if (meta::isInitialized()) {
            _id = function(o:*):Number {
                return (o is Number ? o as Number : Number.NaN) } (input.readObject());
            _other = input.readObject() as MyOtherEntity;
            // read remaining MyEntity fields...
        }
        else
            _id = function(o:*):Number {
                return (o is Number ? o as Number : Number.NaN) } (input.readObject());
    }
}

[Bindable]
[RemoteClass(alias="path.to.MyOtherEntity"]
public class MyOtherEntity {

    private var __initialized:Boolean = true;
    private var __detachedState:String = null;

    private var _id:Number;

    // Skipped code...

    public override function readExternal(input:IDataInput):void {
        __initialized = input.readObject() as Boolean;
        __detachedState = input.readObject() as String;
        if (meta::isInitialized()) {
            _id = input.readObject() as int;
            // read remaining MyOtherEntity fields...
        }
        else
            _id = input.readObject() as int;
    }
}
When the client deserializes your collection of MyEntity's with lazy loaded MyOtherEntity references, it reads a initialized flag set to true
when it encounters a MyEntity instance since MyEntity's are all initialized; so it reads all MyEntity fields including the _other one.
When it deserializes a MyOtherEntity instance referenced by a MyEntity, it reads a initialized flag set to false since MyOtherEntity is lazy loaded,
so it only reads the MyOtherEntity id. Informations put in __initialized, __detachedState and _id are sufficient to restore a
correct HibernateProxy instance when you give back MyEntity objects to the server for update.
Collections (List, Set, Bag, Map)
GDS also provides a way to keep uninitialized collections as is. When the externalizer encounters an uninitialized collection, it does not try to serialize its content and marks it as uninitialized. This information is kept in client beans and when this bean is sent back to the server (e.g., for an update), the externalizer restores a lazy initialized collection in Java. This gives you a good control over serialization depth, as you do not face the risk of serializing the entire graph of your data, and prevents faulty updates (i.e., an empty collection is saved and deletes database data while it was only uninitialized).
For example, in this persistent set:
package com.myapp.entity;

import java.util.HashSet;
import java.util.Set;

...
import javax.persistence.CascadeType;
import javax.persistence.FetchType;
import javax.persistence.OneToMany;

@Entity
public class Person extends AbstractEntity {
    ...
    @OneToMany(cascade=CascadeType.ALL, fetch=FetchType.LAZY, mappedBy="person")
    private Set<Contact> contacts = new HashSet<Contact>();
    ...
    public Set<Contact> getContacts() {
        return contacts;
    }
    public void setContacts(Set<Contact> contacts) {
        this.contacts = contacts;
    }
}

// code for Contact skipped...
package com.myapp.entity {
...
import mx.collections.ListCollectionView;
[Bindable]
[RemoteClass(alias="test.granite.ejb3.entity.Person")]
public class Person implements IExternalizable {
...
private var _contacts:ListCollectionView;
...
public function set contacts(value:ListCollectionView):void {
_contacts = value;
}
public function get contacts():ListCollectionView{
return _contacts;
}
...
public override function readExternal(input:IDataInput):void {
...
_contacts = input.readObject() as ListCollectionView;
...
}
public override function writeExternal(output:IDataOutput):void {
...
output.writeObject(_contacts);
...
}
}
// code for Contact skipped...
}The actual, persistence aware, mx.collections.ListCollectionView implementation is part of a GDS Flex library (granite-essentials.swc) that
contains all AS3 classes you need in order to use the lazy loaded collections feature.
If GDS encounters an uninitialized Set, it is serialized as a org.granite.persistence.PersistentSet that contains some extra data indicating its
initialization state.
Other persistent collections, such as List, Bag, and Map, are handled in a similar manner.
GDS/JPA uses mx.core.IUID for all entity beans. See the the Hibernate forums about
equals/hashCode/collection problems and the use of UUIDs. This is only an implementation choice and you are free to code whatever you want.
|
Note
|
|
Securing remote destinations
Security in Flex applications cannot simply rely on standard web-app security-constraints configured in web.xml.
Generally, you have only one channel-definition, equivalent to a url-pattern in web.xml, and multiple destinations. So, the security must be
destination-based rather than URL-pattern based, and Java EE standard configuration in web.xml does not provide anything like that.
With a configured SecurityService, you will be able to use RemoteObject's setCredentials, setRemoteCredentials and logout methods.
Another important feature in security is to be able to create and expose a java.security.Principal to, for example, an EJB3 session bean backend
so role-based security can be used.
At this time, GraniteDS provides security service implementations for Tomcat5/6/7+, Jetty 6/7+, GlassFish V2+ and V3 and WebLogic 10+ servers. Because JBoss bundles Tomcat by default but may be configured to use Jetty instead, Tomcat or Jetty security services may work as well with JBoss.
When you are using Java Enterprise frameworks such as Seam or Spring together with GraniteDS, you may use specific Seam Security or Spring Security implementations instead of the previous container-based services: please refer to Seam Services or Spring Services for more information.
Configuration
To enable security, you simply put this kind of declaration in your granite-config.xml file:
<?xml version="1.0" encoding="UTF-8"?>
<!DOCTYPE granite-config PUBLIC
    "-//Granite Data Services//DTD granite-config internal//EN"
    "http://www.graniteds.org/public/dtd/3.0.0/granite-config.dtd">
<granite-config>
    ...
    <security type="org.granite.messaging.service.security.TomcatSecurityService"/>
    <!--
    Alternatively for Tomcat 7.x
    <security type="org.granite.messaging.service.security.Tomcat7SecurityService"/>
    Alternatively for Jetty 6.x
    <security type="org.granite.messaging.service.security.Jetty6SecurityService"/>
    For Jetty 7.x/8.x (available at eclipse.org)
    <security type="org.granite.messaging.service.security.Jetty7SecurityService"/>
    For GlassFish 2.x
    <security type="org.granite.messaging.service.security.GlassFishSecurityService"/>
    For GlassFish 3.x
    <security type="org.granite.messaging.service.security.GlassFishV3SecurityService"/>
    For WebLogic
    <security type="org.granite.messaging.service.security.WebLogicSecurityService"/>
    -->
</granite-config>
Some of these implementations (currently only TomcatSecurityService) accept an optional parameter. In the case of the Tomcat service,
it’s the name of the service that will be used to execute the authentication in case you have many services defined in your server.xml.
granite-config.xml<?xml version="1.0" encoding="UTF-8"?>
<!DOCTYPE granite-config PUBLIC
"-//Granite Data Services//DTD granite-config internal//EN"
"http://www.graniteds.org/public/dtd/3.0.0/granite-config.dtd">
<granite-config>
...
<security type="org.granite.messaging.service.security.TomcatSecurityService">
<param name="service" value="your-tomcat-service-name-here"/>
</security>
</granite-config>You may now use role-based security on destination in your services-config.xml file:
services-config.xml<?xml version="1.0" encoding="UTF-8"?>
<services-config>
<services>
<service id="granite-service"
class="flex.messaging.services.RemotingService"
messageTypes="flex.messaging.messages.RemotingMessage">
<destination id="person">
<channels>
<channel ref="my-graniteamf"/>
</channels>
<properties>
<scope>session</scope>
<source>com.myapp.PersonService</source>
</properties>
<security>
<security-constraint>
<auth-method>Custom</auth-method>
<roles>
<role>user</role>
<role>admin</role>
</roles>
</security-constraint>
</security>
</destination>
<destination id="restrictedPerson">
<channels>
<channel ref="my-graniteamf"/>
</channels>
<properties>
<scope>session</scope>
<source>com.myapp.RestrictedPersonService</source>
</properties>
<security>
<security-constraint>
<auth-method>Custom</auth-method>
<roles>
<role>admin</role>
</roles>
</security-constraint>
</security>
</destination>
</service>
</services>
...
</services-config>Here, the person destination can be used by authenticated users with user or admin roles, while the restrictedPerson destination can only be
used by authenticated users with the admin role.
Please refer to Tomcat and JBoss documentation for setting up your users/roles configuration.
SecureRemoteObject
When using the RemoteObject API, the simplest way to use security in your Flex application is to use the org.granite.rpc.remoting.mxml.SecureRemoteObject class.
This class brings advanced event-based security support as shown here:
...
import org.granite.rpc.remoting.mxml.SecureRemoteObject;
import org.granite.events.SecurityEvent;
...
private var srv:SecureRemoteObject = null;
...
public function init():void {
    srv = new SecureRemoteObject("mydestination");
    srv.addEventListener(SecurityEvent.ALL, onSecurityEvent);
    ...
}

public function onSecurityEvent(event:SecurityEvent):void {
    switch (event.type) {
    case SecurityEvent.INVALID_CREDENTIALS:
        // show message "wrong username or pasword"
        break;
    case SecurityEvent.NOT_LOGGED_IN:
        srv.logout(); // reset remote object
        // show login panel...
        break;
    case SecurityEvent.SESSION_EXPIRED:
        srv.logout(); // reset remote object
        // show login panel...
        break;
    case SecurityEvent.ACCESS_DENIED:
        // show message "you don't have rights..."
        break;
    }
}

public function onCredentialsSet(username:String, password:String):void {
    srv.setCredentials(username, password);
    ...
}

public function doLogout():void {
    srv.logout();
    ...
}
...
Note that you must compile your MXML/AS3 classes with the granite.swc or granite-flex45.swc library in order to use SecureRemoteObject.
Fine-grained per-destination security
You may write and configure a specific RemoteDestinationSecurizer in order to add fine grained security checks for specific actions.
public interface RemotingDestinationSecurizer extends DestinationSecurizer {

    public void canExecute(ServiceInvocationContext context)
        throws SecurityServiceException;
}
You then have to tell GraniteDS where to use your securizer:
<services-config>
    <services>
        <service ...>
            <destination id="restrictedDestination">
                ...
                <properties>
                    <securizer>path.to.MyDestinationSecurizer</securizer>
                </properties>
            </destination>
        </service>
    </services>
    ...
</services-config>
Note that securizers, if any, are always called before the standard SecurityService.authorize() method.
Deserialization protection
At Java side, AMF deserialization instantiates classes that are referenced in the binary-encoded request coming from the client. Thus, a malicious AMF3 request can be crafted in order to instantiate an arbitrary Java class (and execute its constructor and setters) that has nothing to do with the expected data exchanged between the client application and the server application.
GraniteDS' fix for this security issue relies on a new configurable option that you can put in your granite-config.xml file.
If you don’t configure anything, you will always see this warning at the startup of the application:
WARN [GraniteConfig] You should configure a deserializer securizer in your granite-config.xml file in order to prevent potential security exploits!
In order to secure your application, you are strongly encouraged to configure a securizer as follows:
<!DOCTYPE granite-config PUBLIC
  "-//Granite Data Services//DTD granite-config internal//EN"
  "http://www.graniteds.org/public/dtd/3.0.0/granite-config.dtd">

<granite-config scan="true">

  <amf3-deserializer-securizer param="
    org\.granite\..* |
    flex\.messaging\..* |
    com\.myapp\.entity\..*
  "/>

  ...
</granite-config>
By default, the securizer uses the org.granite.messaging.amf.io.RegexAMF3DeserializerSecurizer class that, uses a regular expression parameter.
Only classes whose name match one of theses patterns are allowed to be instantiated. Of course, all standard Java types are allowed by default and
you don’t have to explicitely add their package names expressions.
If this default regex-based implementation doesn’t fit your needs, you may write your own securizer implementation.
It only has to implement the org.granite.messaging.amf.io.AMF3DeserializerSecurizer interface and can be specified in granite-config.xml:
<!DOCTYPE granite-config PUBLIC
  "-//Granite Data Services//DTD granite-config internal//EN"
  "http://www.graniteds.org/public/dtd/3.0.0/granite-config.dtd">

<granite-config scan="true">

  <amf3-deserializer-securizer type="com.myapp.MySecurizer"/>
  ...
</granite-config>
AS3 Code Generator
Overview
One of the main interests of using AMF remoting is that is can maintain a strongly typed data model in the Flex application. However that implies that you have to write an AS3 class for each Java class that will be serialized. Writing and maintaining these ActionScript 3 beans is tedious and a source of many errors. In order to solve this problem and accelerate the development of Flex/Java EE applications, GraniteDS comes with an ActionScript 3 code generator that writes AS3 beans for all Java beans. Additionally this generator specifically supports the externalization mechanism of GraniteDS and is able to generate corresponding AS3 classes for externalized Java beans (typically JPA/Hibernate entities) with specific templates.
Finally this ActionScript 3 generator is able to write AS3 typed client proxies for exposed remote services.
Compared to the usual Flex RemoteObject, this can greatly help development by bringing auto-completion and improved
type-safety in Flex when using remote services.
Gas3 may also replicate validation annotations in order to use the Flex side validation framework
(see Bean Validation (JSR-303)) and may also be configured to generate Long, BigInteger
and BigDecimal variable for their Java equivalents (see Big Number Implementations).
The generator (named GAS3) is implemented as an Eclipse plugin and as an Ant task. This Ant task is packaged as an Eclipse Ant plugin but may also be used outside of Eclipse for command line Ant calls. It is also included in the Maven plugin.
The next sections introduce both the Eclipse plugin and Ant task configurations and usages. You may also have a look at the Eclipse Plugins Installation section and at the Hello World revisited tutorial for a sample Eclipse Builder usage.
Generated ActionScript 3 Classes
A common problem with code generators is the potential loss of manual modifications made in generated files. A generated file must be either generated once and only once, allowing for safe manual modifications, but it will not be able to reflect the modifications made in its model (JavaBeans), or regenerated each time its model has been changed, thus preventing safe manual modifications.
Gas3 uses the principle of "Base" and customizable inherited classes that let you add methods to generated classes without facing the risk of losing them when a new generation process is executed. For example, here are the two files generated for a given Java entity bean:
package org.test;

import java.io.Serializable;

import javax.persistence.Basic;
import javax.persistence.Entity;
import javax.persistence.GeneratedValue;
import javax.persistence.Id;

@Entity
public class Welcome implements Serializable {

    private static final long serialVersionUID = 1L;

    @Id @GeneratedValue
    private Integer id;

    @Basic
    private String name;

    public Welcome() {
    }

    public Welcome(String name) {
        this.name = name;
    }

    public Integer getId() {
        return id;
    }

    public String getName() {
        return name;
    }
    public void setName(String name) {
        this.name = name;
    }
}/**
* Generated by Gas3 v3.0.0 (Granite Data Services).
*
* NOTE: this file is only generated if it does not exist. You may safely put
* your custom code here.
*/
package org.test {
[Bindable]
[RemoteClass(alias="org.test.Welcome")]
public class Welcome extends WelcomeBase {
}
}/**
* Generated by Gas3 v3.0.0 (Granite Data Services).
*
* WARNING: DO NOT CHANGE THIS FILE. IT MAY BE OVERWRITTEN EACH TIME YOU USE
* THE GENERATOR. INSTEAD, EDIT THE INHERITED CLASS (Welcome.as).
*/
package org.test {
import flash.utils.IDataInput;
import flash.utils.IDataOutput;
import flash.utils.IExternalizable;
import org.granite.collections.IPersistentCollection;
import org.granite.meta;
use namespace meta;
[Bindable]
public class WelcomeBase implements IExternalizable {
private var __initialized:Boolean = true;
private var __detachedState:String = null;
private var _id:Number;
private var _name:String;
meta function isInitialized(name:String = null):Boolean {
if (!name)
return __initialized;
var property:* = this[name];
return (
(!(property is Welcome) || (property as Welcome).meta::isInitialized()) &&
(!(property is IPersistentCollection) ||
(property as IPersistentCollection).isInitialized())
);
}
public function get id():Number {
return _id;
}
public function set name(value:String):void {
_name = value;
}
public function get name():String {
return _name;
}
public function readExternal(input:IDataInput):void {
__initialized = input.readObject() as Boolean;
__detachedState = input.readObject() as String;
if (meta::isInitialized()) {
_id = function(o:*):Number {
return (o is Number ? o as Number : Number.NaN) } (input.readObject());
_name = input.readObject() as String;
}
else {
_id = function(o:*):Number {
return (o is Number ? o as Number : Number.NaN) } (input.readObject());
}
}
public function writeExternal(output:IDataOutput):void {
output.writeObject(__initialized);
output.writeObject(__detachedState);
if (meta::isInitialized()) {
output.writeObject(_id);
output.writeObject(_name);
}
else {
output.writeObject(_id);
}
}
}
}The recommendations for manual editing are explicit in the header comments of each AS3 classes: while the "Base" class may be regenerated at any time, keeping it sync with its Java model class, the inherited one is only generated when it does not exist and you may safely add custom methods into it.
This two files generation principle is used for all generated classes except interface and enum: these classes are generated without any "Base" class and overwritten each time you have modified their Java counterparts.
|
Warning
|
Note: Do not modify manually generated ActionScript 3 interface or enum classes ! |
Here are the details for (re)generation conditions:
Note that for Java classes, relevant timestamp is the last modified time of the .class file, not the .java file.
| Templates | Conditions for (re)generation |
|---|---|
Dual templates (base + inherited) |
The inherited AS3 class is generated only once if it does not exist. The AS3 base one is generated if it does not exist or if its timestamp (last modified time) is less than the Java class one |
Single template (enums or interfaces) |
Same as above for base, the AS3 class is (re)generated if it does not exist or if its timestamp is less than the Java class one |
Java Classes and Corresponding Templates
Here is the summary of templates used by the generator depending on the kind of Java class it encounters:
| Type of Java Class | Template | Base Template |
|---|---|---|
Standard Java beans |
bean.gsp |
beanBase.gsp |
JPA entities: all classes annotated with |
entity.gsp |
entityBase.gsp |
Java enums |
enum.gsp |
(none) |
Java interfaces |
interface.gsp |
(none) |
Java services: all classes annotated with |
remote.gsp |
remoteBase.gsp |
Java events (CDI): all classes annotated with |
bean.gsp |
beanBase.gsp |
Note that all these templates are bundled in the granite-generator.jar archive, in the
org.granite.generator.template package and accessible as resources via the class loader.
Known Limitations
Gas3 does not support inner classes except of enum type. You must declare your classes in separated source files if you want them to be correctly handled by the generator.
Gas3 never deletes any file. However, when you remove or rename a Java class which is in the scope of the generator,
the corresponding AS3 classes are renamed to <ClassName>[Base].as.<System Current Millis>.hid.
This can lead to helpful Flex compilation errors if these classes where used anywhere else in your Flex source code.
Due to the absence of abstract classes in ActionScript 3, some inheritance models cannot be generated correctly.
Eclipse Plugin
Installation
Download org.granite.builder_\*\*\*.jar and drop it in your Eclipse plugins directory, making sure to remove
any older versions. Then, restart Eclipse.
Adding the GraniteDS Nature and Configuration Wizard
The Add GraniteDS Nature is available for any open Java project. When you want to use the builder with your Java project, right-click on the project in your Eclipse package explorer and select Add GraniteDS Nature:
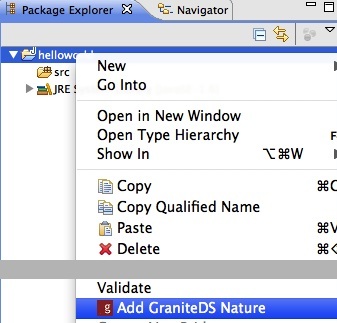
This action should launch a configuration wizard, whose first step is to select Java source folders for which you want code generation (ie. ActionScript 3 beans that mirror your JavaBeans):
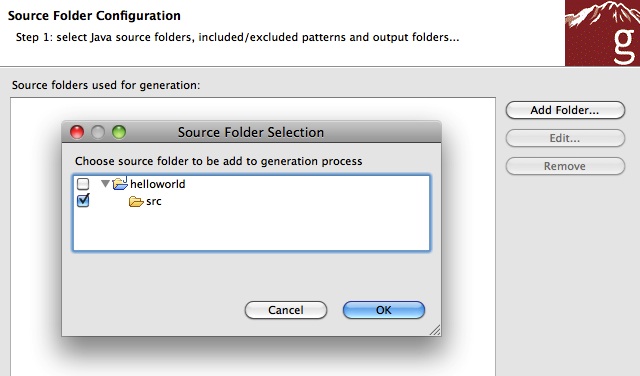
You may select as many Java source folders as you want and configure specific filters and output directories for each of them. Just select one of the Included, Excluded, or Output subnodes and click on the Edit button.
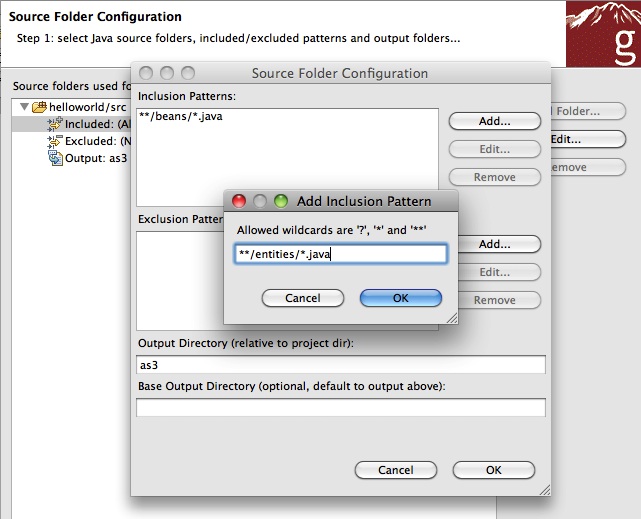
For inclusion/exclusion patterns, the syntax is similar to the Ant include/exclude ones in fileset and the following rules apply:
-
If you do not configure any exclusion and inclusion patterns, all Java classes in the folder are used for the generation.
-
If a class is matched by an exclusion pattern, it will be ignored even if it is matched by another inclusion pattern. In the example,
*\*/*Service\*.javawill match any Java class which contains the Service string in its name and which is in any subdirectory of the selected source folder.
Inclusion patterns let you specify arbitrary parameters which will be passed as a Map<String, String> to the concerned
template (ie. the one which is handling the kind of Java file which matches the include pattern).
For example, you can specify an include pattern as follow: *\*/*Service\*.java\[param1=value1,param2=value2\].
In the template, for each file matching the *\*/*Service\*.java pattern, you will then have access to a specific
variable named fAttributes, a map containing two keys "param1" and "param2", bound to their respective values "value1"
and "values2".
Note that this parameters feature is only available for the Eclipse builder (you can’t use it with the Ant/Maven task).
For each selected Java source folder you may also configure specific output directories:
-
Output Directory: A directory relative to your project directory where generated ActionsScript 3 classes are put. -
Base Output Directory: An optional directory relative to your project directory where so-called "Base" generated ActionsScript 3 classes are put. If left empty, the output directory above is used for both "Base" and inherited ActionScript 3 classes. See here for this distinction.
The next step in the wizard allows you to configure Java project dependencies. This is required when your Java classes make references to other classes declared in other Java projects. Clicking on the Add project button will open a dialog that lists all other open Java projects which have the GraniteDS nature:
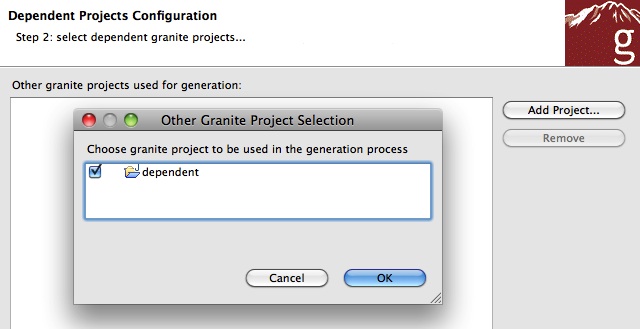
The next step is classpath configuration. If you do not use any custom classes in the Options panel you do not need
to change anything here since the classpath is automatically configured with your current selected source folders.
In the following picture, the helloworld/bin directory, where Eclipse compiles your Java source, is preselected,
as well as all libraries in the build path (eg. Java runtime jars, ejb3-persistence.jar and jboss-ejb3x.jar):
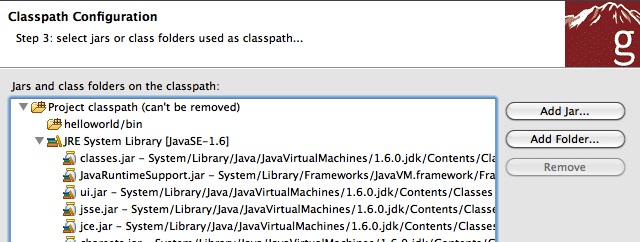
The next panel lets you configure custom generation templates. Those templates are a mix of the JSP syntax and the . If you need specific code generation, you may write your own template, select one template in the displayed tree, and click on the Edit button:
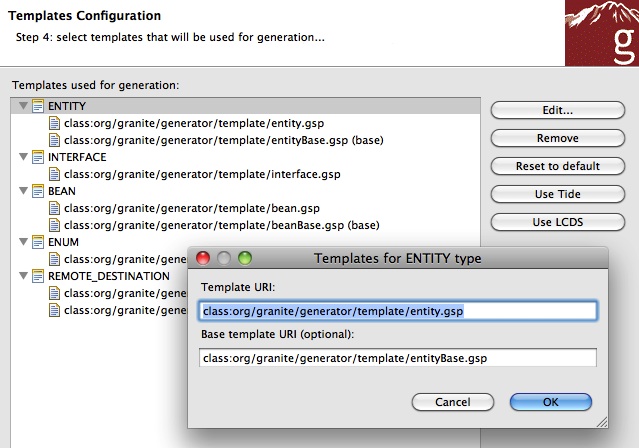
In the above example, a class: protocol is used because all standard templates are available in the classpath.
Alternatively, you may use the file: protocol to load your template from the filesystem. These templates can be
specified either by using absolute paths (eg. file:/absolute/path/to/mytemplate.gsp) or paths relative to your
current Eclipse project root directory (eg. path/to/mytemplate.gsp).
Clicking the Use Tide button will configure Tide specific templates for entity beans. Use it if you are configuring the builder for a Tide project.
Clicking the Use LCDS button will configure Adobe LCDS specific templates for basic beans and entity beans, and
remove all templates for enum and remote destination services. It will also configure a LCDS specific AS3TypeFactory
in the "Options" panel (see picture below).
The LCDS templates generate AS3 beans that can be either [Bindable] (default) or [Managed].
If you need [Managed] beans, use the following parameter with your include pattern: [managed=true].
For example, your include patterns could be:
-
path/to/managed/beans/*.java[managed=true]
-
path/to/bindable/beans/*.java
If you want to use a single file generation policy (ie. no "Base" and inherited files), you can reconfigure the templates
by using class:org/granite/generator/template/lcdsStandaloneBean.gsp as the only template, removing the base template.
|
Warning
|
when switching from dual templates to a single one, be sure to remove and backup any previously generated files. |
The last panel lets you configure various options:
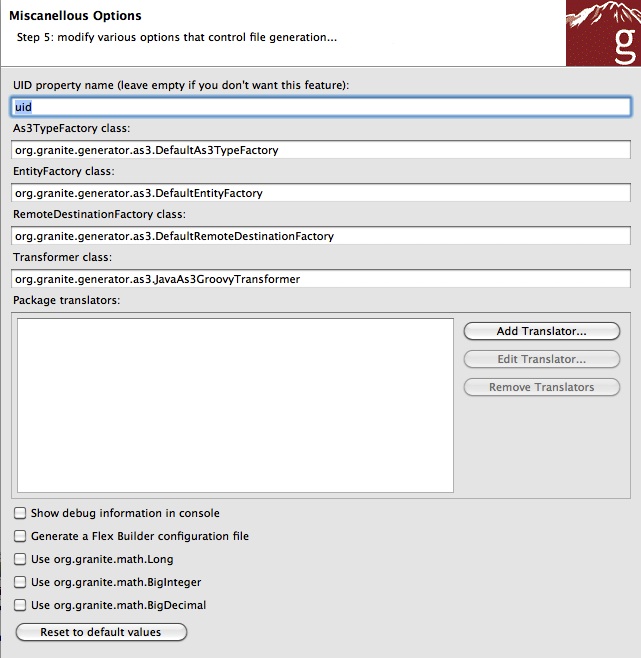
Some explanations:
-
UID Property Name: If you want your AS3 to implementmx.core.IUID, you must tell the generator the name of the Java field that contains this UID; use the same name in all your beans. Default is to search for field nameduid. -
AS3TypeFactory Class: You may use this option to configure a custom factory for special type support. See Handling Custom Data Types for a detailed example. If you configure this, you must add your class in the Classpath panel. -
EntityFactory Class: You may use this option to configure a custom factory for special entity support. Setting this field toorg.granite.generator.as3.BVEntityFactoryis useful if you want to use the GraniteDS validation framework. See Bean Validation (JSR-303) for details. -
RemoteDestinationFactory Class: You may use this option to configure a custom factory for special service support. You could for example implement a specific factory to analyze services for a particular framework. -
"Show debug informations in console": If enabled, Gas3 will display more information during the generation process. -
"Generate a Flex Builder configuration file": If enabled, Gas3 will generate agranite-flex-config.xmlthat may be used in your compiler options. Useful to make sure that all generated AS3 beans will be included in your SWF. Note that all AS3 files present in a Gas3 output directory (even those which are not generated) will be added to the config file. -
"Use org.granite.math.Long": If enabled, Gas3 will generate AS3Longproperties for JavalongorLongproperties. See Big Number Implementations for details. -
"Use org.granite.math.BigInteger": If enabled, Gas3 will generate AS3BigIntegerproperties for JavaBigIntegerproperties. See Big Number Implementations for details. -
"Use org.granite.math.BigDecimal": If enabled, Gas3 will generate AS3BigDecimalproperties for JavaBigDecimalproperties. See Big Number Implementations for details.
When you have finished with the wizard, a first generation process will start and you should see something like this in the Eclipse console:

The GraniteDS Project Properties Panel
If you need to change your configuration later, you can right-click on your project, select the Properties item, and you’ll be able to modify all GraniteDS Eclipse Builder configuration options:
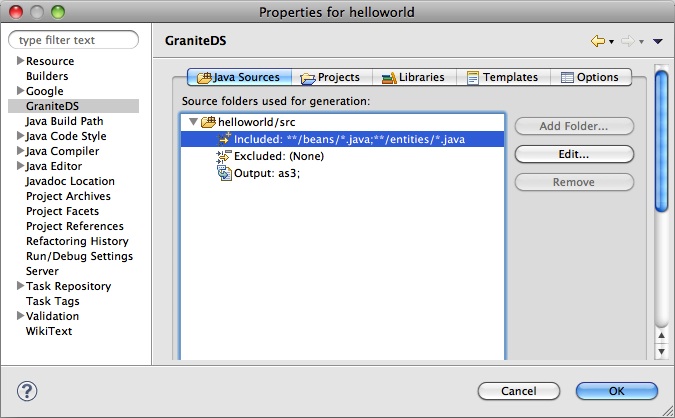
The panels are exactly the same as those of the wizard and the above documentation applies.
Using the GraniteDS Builder Together with Flex/Flash Builder
You can use the GraniteDS builder with Flash Builder provided that the three builders (Java, Granite, and Flex) are configured in the correct order. It will work without modification if you first create a Java project, add the Flex project nature, and then the GraniteDS nature; the builder will make sure that builders are setup in the correct order. Otherwise, you may have to change this order. Right-click on your project, select the Properties item, and select the Builders entry:
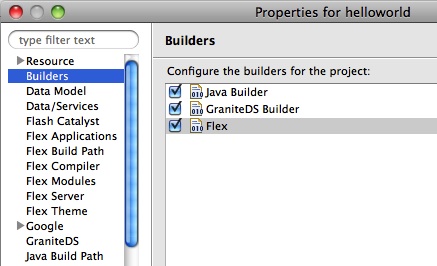
The order (Java / Granite / Flex) in the above picture is the correct one.
Removing the GraniteDS Nature
When you have configured your project to use the GraniteDS Eclipse Builder, you may cancel any further generation processes by removing the nature:
Note that the hidden configuration file .granite in your project is not removed by this action and you must delete it manually.
Otherwise, it will be reused whenever you add the nature again.
Java file deletion / renaming
The main purpose of the builder is to generate AS3 files based on Java sources which are added or modified. When a Java source file is deleted or renamed, the builder will append to the name of all potentially AS3 generated files a suffix composed of a dot, the current system millisecond since epoch (1/1/1970) and an additional extension ".hid". The idea behind these renaming operations is to make sure that the Flex compilation will detect errors if these classes are used in the project (easing refactoring) and to ensure that any manual editing you have made in these classes is recoverable.
Ant Task
Installation in Eclipse
Download org.granite.builder_\*\*\*.jar, and drop it in your Eclipse plugins directory (remove any older version and restart Eclipse).
The Add GraniteDS Nature option should now be available if you right-click on your Java project and the gas3 Ant task should be ready to use in your
build.xml file under Eclipse.
Standalone Installation
Extract the tools folder from the distribution in a directory (say gas3libs at the root of you harddrive).
In your build.xml, you must declare the Gas3 ant task as follows:
<taskdef name="gas3" classname="org.granite.generator.ant.AntJavaAs3Task"/>To launch a build process with Gas3 targets, you should go to your Java source root directory and type something like:
$ ant -lib /gas3libs -f build.xml {target}
...
in your PATH environment variable.
Basic Usage
After installation, you may use the Gas3 Ant task in any target of an Ant build file. A working example of Gas3 usage is available in the
examples/graniteds_ejb3 sample application.
For example:
<target name="generate.as3">
    <gas3 outputdir="as3">
        <classpath>
            <pathelement location="classes"/>
        </classpath>
        <fileset dir="classes">
            <include name="com/myapp/entity/**/*.class"/>
        </fileset>
    </gas3>
</target>
As you can notice, Gas3 generates AS3 beans from Java compiled classes. You may use multiple Ant filesets in order to specify for which JPA classes you
want to generate AS3 beans. The classpath node is used for fileset class loading, and you may reference extra jars or classes needed by your beans class loading.
The outputdir attribute lets you instruct Gas3 in which directory AS3 beans will be generated (e.g., ./as3).
This path is relative to your current project directory and Gas3 will create subdirectories for packages.
AS3 beans will by default have the same package hierarchy as Java classes, with the same subdirectories as well.
For each JPA entity (say com.myapp.entity.MyEntity), Gas3 will generate two AS3 beans:
-
org.entity.MyEntityBase.as: This bean mainly contains fields, getters, setters, andIExternalizablemethods (readExternal/writeExternal). This file is generated if it does not exist or if it is outdated. -
org.entity.MyEntity.as: This bean inherits from the "Base" one and is only generated if it does not exist. While you should not modify the "Base" file, since your modifications may be lost after another generation process, you may safely add your code to the inherited bean.You can also use Ant ++zipfileset++s if you want to generate AS3 classes from an existing jar. Note that the jar must be in the classpath:
<target name="generate.as3">
    <gas3 outputdir="as3">
        <classpath>
            <pathelement location="lib/myclasses.jar"/>
        </classpath>
        <zipfileset src="lib/myclasses.jar">
            <include name="com/myapp/entity/**/*.class"/>
        </zipfileset>
    </gas3>
</target>
Packages Translations
You may tell Gas3 to generate AS3 classes with a different package and directory structure than the corresponding Java classes ones.
<gas3 ...>
    <classpath .../>
    <fileset .../>

    <translator
        java="path.to.my.java.class"
        as3="path.to.my.as3.class" />
    <translator
        java="path.to.my.java.class.special"
        as3="otherpath.to.my.as3.class.special" />
  ...
</gas3>
Gas3 uses these translators with a "best match" principle; all Java classes within the path.to.my.java.class package,
and subpackages as well, will be translated to path.to.my.as3.class, while path.to.my.java.class.special
will use a specific translation (otherpath.to.my.as3.class.special).
|
Note
|
If you use a special |
Groovy Templates
Gas3 generation relies on Groovy templates. You may plug your own templates in by using one of the advanced options attributes below.
For example, you could add a entitytemplate="/absolute/path/to/my/groovy/entityTemplate.gsp" attribute to the gas3 node. You can also specify paths
to your custom templates relative to the current Ant project basedir directory.
If you want to see the Groovy code of the default templates, just unpack granite-generator.jar in the lib directory of the plugin, and look
for org/granite/generator/template/\*\[Base\].gsp files.
Advanced Options (Gas3 XML Attributes)
Here is the complete list of Gas3 node attributes:
-
outputdirandbaseoutputdir: We have already seen theoutputdirattribute in basic usage.baseoutputdirlets you define a custom output directory for your "Base" generated files. The default is to use the same directory as specified by theoutputdirattribute. -
uid: If you want your AS3 to implementmx.core.IUID, you must tell the generator the name of the Java field that contains this UID. By default, Gas3 will search for a field nameduid. You may change this by adding auid="myUid"attribute to thegas3node. If Gas3 does not find thisuid, it will be silently ignored. -
tide: Should we use a Tide specific template instead of the standard base template used for entity beans (trueorfalse, defaut isfalse). Setting this attribute has no effect if you use a custom entity base template. See below. -
entitytemplateandentitybasetemplate: Templates used for classes annotated with@Entityor@MappedSuperclass. -
interfacetemplate: Template used for Java interfaces. -
beantemplateandbeanbasetemplate: Templates used for other Java classes including@Embeddable. -
enumtemplate: Template used forjava.lang.Enumtypes. -
remotetemplateandremotebasetemplate: Templates used for server services (EJB3, Spring or Seam services). -
as3typefactory: You can plug your ownorg.granite.generator.as3.As3TypeFactoryimplementation in order to add support for custom types. For example, if you have configured a custom Joda time converter, you may extend Gas3 accordingly for this custom type. Just extend theorg.granite.generator.as3.DefaultAs3TypeFactoryclass and returnorg.granite.generator.as3.As3Type.DATEwhen you encounter a JodaDateTimeinstance. See Handling Custom Data Types for a detailed example. -
entityfactory: Class used to introspect specific entity properties or metadata (default isorg.granite.generator.as3.DefaultEntityFactory). You may also use the built-inorg.granite.generator.as3.BVEntityFactoryin order to replicate bean validation annotations into your AS3 model Bean Validation (JSR-303). -
remotedestinationfactory: Class used to introspect specific service properties or metadata (default isorg.granite.generator.as3.DefaultRemoteDestinationFactory). -
transformer: Class used to control the generation process (very advanced use). -
externalizelong: should we write AS3Longvariables (see Big Number Implementations). Default isfalse. -
externalizebiginteger: should we write AS3BigIntegervariables (see Big Number Implementations). Default isfalse. -
externalizebigdecimal: should we write AS3BigDecimalvariables (see Big Number Implementations). Default isfalse.
For example:
<target name="generate.as3">
    <gas3
        outputdir="as3"
        baseoutputdir="base_as3"
        uid="myUidFieldName"
        entitytemplate="/myEntityTemplate.gsp"
        entitybasetemplate="/myEntityBaseTemplate.gsp"
        interfacetemplate="/myInterfaceTemplate.gsp"
        beantemplate="/myBeanTemplate.gsp"
        beanbasetemplate="/myBeanBaseTemplate.gsp"
        enumtemplate="/myEnumTemplate.gsp"
        remotetemplate="/myRemoteTemplate.gsp"
        remotebasetemplate="/myRemoteBaseTemplate.gsp"
        tide="true"
        as3typefactory="path.to.MyAs3TypeFactory"
        entityfactory="path.to.MyEntityFactory"
        remotedestinationfactory="path.to.MyRDFactory"
        transformer="path.to.MyTransformer"
        externalizelong="true"
        externalizebiginteger="true"
        externalizebigdecimal="true">
        <classpath>
            <pathelement location="classes"/>
        </classpath>
        <fileset dir="classes">
            <include name="test/granite/ejb3/entity/**/*.class"/>
        </fileset>
    </gas3>
</target>
Note that when using a custom as3typefactory, entityfactory, remotedestinationfactory or transformer attribute, you must configure the classpath
in order to make your custom classes available to the Gas3 engine; either use the classpath attribute in the taskdef declaration or in the gas3 call.
Maven Plugin (Flexmojos)
The Gas3 generator is used as the default code generation tool in the Flexmojos plugin. To use it, you need to add the following part to your maven POM :
<build>
    ...
    <pluginManagement>
        <plugins>
            <plugin>
                <groupId>org.sonatype.flexmojos</groupId>
                <artifactId>flexmojos-maven-plugin</artifactId>
                <version>${flexmojos.version}</version>
            </plugin>
        </plugins>
    </pluginManagement>

    <plugins>
        <plugin>
            <groupId>org.sonatype.flexmojos</groupId>
            <artifactId>flexmojos-maven-plugin</artifactId>
            <version>${flexmojos.version}</version>
            <extensions>true</extensions>
            <executions>
                <execution>
                    <goals>
                        <goal>generate</goal>
                    </goals>
                    <configuration>
                        <generatorToUse>graniteds21</generatorToUse>
                        <baseOutputDirectory>${project.build.directory}/generated-sources</baseOutputDirectory>
                        <outputDirectory>${project.build.directory}/../src/main/flex</outputDirectory>
                        <extraOptions>
                            <tide>true</tide>
                            <uid>uid</uid>
                            <entityFactory>org.granite.generator.as3.BVEntityFactory</entityFactory>
                            <outputEnumToBaseOutputDirectory>false</outputEnumToBaseOutputDirectory>
                        </extraOptions>
                        <includeJavaClasses>
                            <include>${package}.entities.**</include>
                            <include>${package}.services.*Service</include>
                        </includeJavaClasses>
                    </configuration>
                </execution>
            </executions>
            <dependencies>
                <dependency>
                    <groupId>javax.persistence</groupId>
                    <artifactId>persistence-api</artifactId>
                    <version>1.0</version>
                </dependency>
                <dependency>
                    <groupId>javax.validation</groupId>
                    <artifactId>validation-api</artifactId>
                    <version>1.0.0.GA</version>
                </dependency>
                <dependency>
                    <groupId>javax.jdo</groupId>
                    <artifactId>jdo2-api</artifactId>
                    <version>2.3-eb</version>
                </dependency>
                <dependency>
                    <groupId>org.codehaus.groovy</groupId>
                    <artifactId>groovy</artifactId>
                    <version>1.6.0</version>
                </dependency>
                <dependency>
                    <groupId>antlr</groupId>
                    <artifactId>antlr</artifactId>
                    <version>2.7.7</version>
                </dependency>
                <dependency>
                    <groupId>asm</groupId>
                    <artifactId>asm</artifactId>
                    <version>2.2.3</version>
                </dependency>
                <dependency>
                    <groupId>com.thoughtworks.xstream</groupId>
                    <artifactId>xstream</artifactId>
                    <version>1.2.2</version>
                </dependency>
                <dependency>
                    <groupId>org.graniteds</groupId>
                    <artifactId>granite-core</artifactId>
                    <version>${graniteds.version}</version>
                </dependency>
                <dependency>
                    <groupId>org.graniteds</groupId>
                    <artifactId>granite-generator-share</artifactId>
                    <version>${graniteds.version}</version>
                </dependency>
                <dependency>
                    <groupId>org.graniteds</groupId>
                    <artifactId>granite-generator</artifactId>
                    <version>${graniteds.version}</version>
                </dependency>
            </dependencies>
        </plugin>
        ...
    </plugins>
    ...
</build>
Template Language
Gas3 templates are based on a specific implementation of . As such, all Groovy template documentation should apply.
The reason why the standard Groovy implementation was not used was the lack of comments support (<%-- … --%>) and some formatting issues,
especially with platform specific carriage returns. This may now be fixed but it was not at that time.
While the language itself is already documented on Groovy site, there are two specific bindings (ie. global variables used in Gas3 templates) that should be referenced.
Template execution is a two-phase process. First, the template is transformed to a standard Groovy script (mainly with expressions like print(…));
second, the Groovy script is compiled and executed.
Of course, the result of the first transformation and the compiled script is cached, so further executions with the same template are much faster.
Template Bindings
There are two bindings available in Gas3 templates:
| Name | Type | Description |
|---|---|---|
|
|
Version number of the generator, e.g., "3.0.0" |
|
Implementation of the |
An object describing the Java class for which the generator is writting an ActionScript 3 class |
|
|
A map which contains key-value pairs, as specified in include patterns (Eclipse builder only) |
JavaType implementations (passed as the jClass parameter) can be of the following types:
| Type | Description |
|---|---|
|
A class defining a JPA entity bean (ie. a class annotated with a |
|
A class defining a Java |
|
A class defining a Java interface |
|
A class defining a remote service annotated with |
|
A class defining all other Java classes |
The two bindings gVersion and jClass can be used in your templates as any other Groovy script variables. For example:
// Generated by Gas3 v.${gVersion}.

package ${jClass.as3Type.packageName} {

    public class ${jClass.as3Type.name} {
        ...
    }
}
If you execute this template with Gas3 version 2.3.2 and a Java class named com.myapp.MyClass, the output will be:
// Generated by Gas3 v.2.3.2.

package com.myapp {

    public class MyClass {
        ...
    }
}
If you plan to write custom templates, you should have a look at the standard GraniteDS templates and API documentation of the JavaType implementations
listed above.
Sample Template
Let’s have a look to the standard GraniteDS template for Java interfaces. You may also see all templates :
<%--
  GRANITE DATA SERVICES
  Copyright (C) 2007-2008 ADEQUATE SYSTEMS SARL

  This file is part of Granite Data Services.

  Granite Data Services is free software; you can redistribute it and/or modify
  it under the terms of the GNU Lesser General Public License as published by
  the Free Software Foundation; either version 3 of the License, or (at your
  option) any later version.

  Granite Data Services is distributed in the hope that it will be useful, but
  WITHOUT ANY WARRANTY; without even the implied warranty of MERCHANTABILITY or
  FITNESS FOR A PARTICULAR PURPOSE. See the GNU Lesser General Public License
  for more details.

  You should have received a copy of the GNU Lesser General Public License
  along with this library; if not, see <http://www.gnu.org/licenses/>.
--%><%
    Set as3Imports = new TreeSet();

    for (jImport in jClass.imports) {
        if (jImport.as3Type.hasPackage() &&
jImport.as3Type.packageName != jClass.as3Type.packageName)
            as3Imports.add(jImport.as3Type.qualifiedName);
    }

%>/**
 * Generated by Gas3 v${gVersion} (Granite Data Services).
 *
 * WARNING: DO NOT CHANGE THIS FILE. IT MAY BE OVERWRITTEN EACH TIME YOU USE
 * THE GENERATOR. INSTEAD, EDIT THE INHERITED INTERFACE (${jClass.as3Type.name}.as).
 */

package ${jClass.as3Type.packageName} {<%

    ///////////////////////////////////////////////////////////////////////////
    // Write Import Statements.

    if (as3Imports.size() > 0) {%>
<%
    }
    for (as3Import in as3Imports) {%>
    import ${as3Import};<%
    }

    ///////////////////////////////////////////////////////////////////////////
    // Write Interface Declaration.%>

    public interface ${jClass.as3Type.name}Base<%

    if (jClass.hasSuperInterfaces()) {
        %> extends <%
        boolean first = true;
        for (jInterface in jClass.superInterfaces) {
            if (first) {
                first = false;
            } else {
                %>, <%
            }
            %>${jInterface.as3Type.name}<%
        }
    }

    %> {<%

    ///////////////////////////////////////////////////////////////////////////
    // Write Public Getter/Setter.

    for (jProperty in jClass.properties) {

        if (jProperty.readable || jProperty.writable) {%>
<%
            if (jProperty.writable) {%>
        function set ${jProperty.name}(value:${jProperty.as3Type.name}):void;<%
            }
            if (jProperty.readable) {%>
        function get ${jProperty.name}():${jProperty.as3Type.name};<%
            }
        }
    }%>
    }
}
The code for this template is rather simple, but it can be very tricky to distinguish between JSP-like expressions, Groovy code, and ActionScript 3 code output.
The first block, enclosed with <%-- --%>, is a template comment: it will be completely ignored at transformation (Groovy template to Groovy script) time.
The second block, enclosed with <% %>, is plain Groovy code and will be outputed as is at transformation time.
Its purpose is to collect and sort all references to other classes so we can later write ActionScript 3 import statements.
Then, the ActionsScript 3 code template really begins with a comment (Gas3 version and warning) and is followed by a package and interface definition with superinterfaces, if any, and finally, by a loop over interface getters/setters. Note that comments like:
///////////////////////////////////////////////////////////////////////////
// Write Import Statements.-
are Groovy script comments. They will be in the Groovy script but you will not find them in the outputted ActionScript3 file.
After the first transformation (Groovy template to Groovy script), the rendered code will be as follows:
Set as3Imports = new TreeSet();
for (jImport in jClass.imports) {
if (jImport.as3Type.hasPackage() &&
jImport.as3Type.packageName != jClass.as3Type.packageName)
as3Imports.add(jImport.as3Type.qualifiedName);
}
print("/**\n");
print(" * Generated by Gas3 v${gVersion} (Granite Data Services).\n");
print(" *\n");
print(" * WARNING: DO NOT CHANGE THIS FILE. IT MAY BE OVERWRITTEN EACH TIME YOU USE\n");
print(" * THE GENERATOR. INSTEAD, EDIT THE INHERITED INTERFACE
(${jClass.as3Type.name}.as).\n");
print(" */\n");
print("\n");
print("package ${jClass.as3Type.packageName} {");
///////////////////////////////////////////////////////////////////////////
// Write Import Statements.
if (as3Imports.size() > 0) {
print("\n");
}
for (as3Import in as3Imports) {
print("\n");
print(" import ${as3Import};");
}
///////////////////////////////////////////////////////////////////////////
// Write Interface Declaration.
print("\n");
print("\n");
print(" public interface ${jClass.as3Type.name}Base");
if (jClass.hasSuperInterfaces()) {
print(" extends ");
boolean first = true;
for (jInterface in jClass.superInterfaces) {
if (first) {
first = false;
} else {
print(", ");
}
print("${jInterface.as3Type.name}");
}
}
print(" {");
///////////////////////////////////////////////////////////////////////////
// Write Public Getter/Setter.
for (jProperty in jClass.properties) {
if (jProperty.readable || jProperty.writable) {
print("\n");
if (jProperty.writable) {
print("\n");
print(" function set ${jProperty.name}(value:${jProperty.as3Type.name}):void;");
}
if (jProperty.readable) {
print("\n");
print(" function get ${jProperty.name}():${jProperty.as3Type.name};");
}
}
}
print("\n");
print(" }\n");
print("}");
</programlisting>
<para>
As you can notice, <literal>${...}</literal> expressions are resolved by the Groovy engine rather than the JSP-like engine.
It would have been possible to use expressions like <literal><%= ... %></literal>, that will result in a script where:
</para>
<programlisting role="JAVA">
print("package ${jClass.as3Type.packageName} {");
</programlisting>
<para>
.. would have been split into three lines:
</para>
<programlisting role="JAVA">
print("package ");
print(jClass.as3Type.packageName);
print(" {");
</programlisting>
<para>
This is just informative, as it does not change anything in the final result.
</para>
<para>
Then, for this Java source code:
</para>
<programlisting role="JAVA">
package com.myapp.entity.types;
public interface NamedEntity {
public String getFirstName();
public void setFirstName(String firstName);
public String getLastName();
public void setLastName(String lastName);
public String getFullName();
}-
you will get this output:
/**
 * Generated by Gas3 v3.0.0 (Granite Data Services).
 *
 * WARNING: DO NOT CHANGE THIS FILE. IT MAY BE OVERWRITTEN EACH TIME YOU USE
 * THE GENERATOR. INSTEAD, EDIT THE INHERITED INTERFACE (NamedEntity.as).
 */

package com.myapp.entity.types {

    public interface NamedEntityBase {

        function set firstName(value:String):void;
        function get firstName():String;

        function get fullName():String;

        function set lastName(value:String):void;
        function get lastName():String;
    }
}
Template Compilation and Execution Errors
Because of the two transformation steps of the template (Groovy template to Groovy script source, then Groovy script source to pre-compiled Groovy script), there are two possible sources of error:
-
JSP-like syntax errors (first transformation): e.g., unclosed
<%expression. -
Groovy syntax errors (second transformation): e.g.,
now TreeSet(); instead ofnew TreeSet();
However, since Groovy is an interpreted language, you may get some other errors at execution time:
-
Mispelled expressions: e.g.,
jClass.nemeinstead ofjClass.name. -
Runtime exceptions: e.g., 0 / 0.
Whenever these kinds of errors occur, you’ll find comprehensive error log in your Shell or Eclipse console.
Note that when the error occurs after the first transformation, the Groovy script is printed with line numbers, as well as the Groovy compiler message. It is easy to find the erroneous line in the printed Groovy script, but you have to figure out the corresponding line in the original template:
[gas3]   Generating: /dev/workspace/graniteds_ejb3/as3/com/myapp/entity/types/NamedEntityBase.as (output file is outdated)
[gas3] org.granite.generator.exception.TemplateCompilationException:Could not compile template: /interfaceBase.gsp
[gas3]    1 |
[gas3]    2 |     Set as3Imports = now TreeSet();
[gas3]    3 |
[gas3]    4 |     for (jImport in jClass.imports) {
[gas3]    5 |         if (jImport.as3Type.hasPackage() && jImport.as3Type.packageName != jClass.as3Type.packageName)
[gas3]    6 |             as3Imports.add(jImport.as3Type.qualifiedName);
[gas3]    7 |     }
[gas3]    8 |
[gas3]    9 |
[gas3]   10 | print("/**\n");
[gas3]   11 | print(" * Generated by Gas3 v${gVersion} (Granite Data Services).\n");
[gas3]   12 | print(" *\n");
[gas3]   13 | print(" * WARNING: DO NOT CHANGE THIS FILE. IT MAY BE OVERWRITTEN EACH TIME YOU USE\n");
[gas3]   14 | print(" * THE GENERATOR. INSTEAD, EDIT THE INHERITED INTERFACE (${jClass.as3Type.name}.as).\n");
[gas3]   15 | print(" */\n");
[gas3]   16 | print("\n");
[gas3]   17 | print("package ${jClass.as3Type.packageName} {");
[gas3]   18 |
[gas3]   19 |
[gas3]   20 |     ///////////////////////////////////////////////////////////////////////////
[gas3]   21 |     // Write Import Statements.
[gas3]   22 |
[gas3]   23 |     if (as3Imports.size() > 0) {
[gas3]   24 | print("\n");
[gas3]   25 |
[gas3]   26 |     }
[gas3]   27 |     for (as3Import in as3Imports) {
[gas3]   28 | print("\n");
[gas3]   29 | print("    import ${as3Import};");
[gas3]   30 |
[gas3]   31 |     }
[gas3]   32 |
[gas3]   33 |     ///////////////////////////////////////////////////////////////////////////
[gas3]   34 |     // Write Interface Declaration.
[gas3]   35 | print("\n");
[gas3]   36 | print("\n");
[gas3]   37 | print("    public interface ${jClass.as3Type.name}Base");
[gas3]   38 |
[gas3]   39 |
[gas3]   40 |     if (jClass.hasSuperInterfaces()) {
[gas3]   41 |
[gas3]   42 | print(" extends ");
[gas3]   43 |
[gas3]   44 |       boolean first = true;
[gas3]   45 |       for (jInterface in jClass.superInterfaces) {
[gas3]   46 |           if (first) {
[gas3]   47 |               first = false;
[gas3]   48 |           } else {
[gas3]   49 |
[gas3]   50 | print(", ");
[gas3]   51 |
[gas3]   52 |           }
[gas3]   53 |
[gas3]   54 | print("${jInterface.as3Type.name}");
[gas3]   55 |
[gas3]   56 |       }
[gas3]   57 |     }
[gas3]   58 |
[gas3]   59 |
[gas3]   60 | print(" {");
[gas3]   61 |
[gas3]   62 |
[gas3]   63 |     ///////////////////////////////////////////////////////////////////////////
[gas3]   64 |     // Write Public Getter/Setter.
[gas3]   65 |
[gas3]   66 |     for (jProperty in jClass.properties) {
[gas3]   67 |
[gas3]   68 |         if (jProperty.readable || jProperty.writable) {
[gas3]   69 | print("\n");
[gas3]   70 |
[gas3]   71 |             if (jProperty.writable) {
[gas3]   72 | print("\n");
[gas3]   73 | print("        function set ${jProperty.name}(value:${jProperty.as3Type.name}):void;");
[gas3]   74 |
[gas3]   75 |             }
[gas3]   76 |             if (jProperty.readable) {
[gas3]   77 | print("\n");
[gas3]   78 | print("        function get ${jProperty.name}():${jProperty.as3Type.name};");
[gas3]   79 |
[gas3]   80 |             }
[gas3]   81 |         }
[gas3]   82 |     }
[gas3]   83 | print("\n");
[gas3]   84 | print("    }\n");
[gas3]   85 | print("}");
[gas3]
[gas3]  at org.granite.generator.gsp.GroovyTemplate.compile(GroovyTemplate.java:143)
[gas3]  at org.granite.generator.gsp.GroovyTemplate.execute(GroovyTemplate.java:157)
[gas3]  at org.granite.generator.as3.JavaAs3GroovyTransformer.generate(JavaAs3GroovyTransformer.java:119)
[gas3]  at org.granite.generator.as3.JavaAs3GroovyTransformer.generate(JavaAs3GroovyTransformer.java:1)
[gas3]  at org.granite.generator.Transformer.generate(Transformer.java:71)
[gas3]  at org.granite.generator.Generator.generate(Generator.java:83)
[gas3]  at org.granite.generator.ant.AntJavaAs3Task.execute(AntJavaAs3Task.java:327)
[gas3]  at org.apache.tools.ant.UnknownElement.execute(UnknownElement.java:288)
[gas3]  at sun.reflect.NativeMethodAccessorImpl.invoke0(Native Method)
[gas3]  at sun.reflect.NativeMethodAccessorImpl.invoke(NativeMethodAccessorImpl.java:39)
[gas3]  at sun.reflect.DelegatingMethodAccessorImpl.invoke(DelegatingMethodAccessorImpl.java:25)
[gas3]  at java.lang.reflect.Method.invoke(Method.java:597)
[gas3]  at org.apache.tools.ant.dispatch.DispatchUtils.execute(DispatchUtils.java:105)
[gas3]  at org.apache.tools.ant.Task.perform(Task.java:348)
[gas3]  at org.apache.tools.ant.Target.execute(Target.java:357)
[gas3]  at org.apache.tools.ant.Target.performTasks(Target.java:385)
[gas3]  at org.apache.tools.ant.Project.executeSortedTargets(Project.java:1329)
[gas3]  at org.apache.tools.ant.Project.executeTarget(Project.java:1298)
[gas3]  at org.apache.tools.ant.helper.DefaultExecutor.executeTargets(DefaultExecutor.java:41)
[gas3]  at org.eclipse.ant.internal.ui.antsupport.EclipseDefaultExecutor.executeTargets(EclipseDefaultExecutor.java:32)
[gas3]  at org.apache.tools.ant.Project.executeTargets(Project.java:1181)
[gas3]  at org.eclipse.ant.internal.ui.antsupport.InternalAntRunner.run(InternalAntRunner.java:423)
[gas3]  at org.eclipse.ant.internal.ui.antsupport.InternalAntRunner.main(InternalAntRunner.java:137)
[gas3] Caused by: org.codehaus.groovy.control.MultipleCompilationErrorsException: startup failed,Script1.groovy: 2: expecting EOF, found 'TreeSet' @ line 2, column 26.
[gas3] 1 error
The error at line 2, column 26 is:
[gas3] 2 | Set as3Imports = now TreeSet();
Finding the corresponding line in the original template should be straightforward.
Messaging (Gravity)
Granite Data Services provides a real-time messaging service, code name Gravity. It currently provides a -like implementation with AMF3 data polling over HTTP and a based implementation. Both can be used with the same producer/consumer based API.
The Comet implementation is freely inspired from the protocol specification and adapted from the Jetty 6.1.x implementation of a cometd server.
The WebSocket server implementation uses the native WebSocket capabilities of the deployment application server when available (Tomcat 7.0.29+, GlassFish 3.1.2+, Jetty 8.1.1+) or can alternatively use an embedded Jetty server.
The Flex WebSocket client is a modified version of the Flash WebSocket client developed by Hiroshi Ichikawa (gimite) that can be found .
Example usage with Consumer/Producer
GraniteDS messaging relies on two main AS3 components on the Flex side: org.granite.gravity.Consumer and org.granite.gravity.Producer.
These classes reproduce almost exactly the original Adobe Flex
and with the specific internal implementation of GraniteDS.
The only differences are that you must use topic instead of subtopic due to a change introduced in Flex 3.
Here is a quick example of GDS ++Consumer++/++Producer++ usage:
...
import org.granite.gravity.Consumer;
import org.granite.gravity.Producer;
...
private var consumer:Consumer = null;
private var producer:Producer = null;

private function connect():void {
    consumer = new Consumer();
    consumer.destination = "gravity";
    consumer.topic = "discussion";
    consumer.subscribe();
    consumer.addEventListener(MessageEvent.MESSAGE, messageHandler);

    producer = new Producer();
    producer.destination = "gravity";
    producer.topic = "discussion";
}

private function disconnect():void {
    consumer.unsubscribe();
    consumer.disconnect();
    consumer = null;

    producer.disconnect();
    producer = null;
}

private function messageHandler(event:MessageEvent):void {
    var msg:AsyncMessage = event.message as AsyncMessage;
    trace("Received message: " + (msg.body as String));
}

private function send(message:String):void {
    var msg:AsyncMessage = new AsyncMessage();
    msg.body = message;
    producer.send(msg);
}
...
In this code, the producer sends String messages, which could of course be of any type, and the producer receives String messages as well.
These Strings are sent in AsyncMessage envelopes, which is the only envelope type allowed in GDS.
This example can work with either a Comet or a WebSocket channel implementation. The channel definition for Comet would be, assuming the Comet servlet
is mapped to /gravityamf/\* (which is the default recommended url mapping):
<channels>
	<channel-definition id="gravityamf" class="org.granite.gravity.channels.GravityChannel">
	    <endpoint
	        uri="http://{server.name}:{server.port}/{context.root}/gravityamf/amf"
	        class="flex.messaging.endpoints.AMFEndpoint"/>
	</channel-definition>
</channels>
For a WebSocket channel, assuming the WebSocket servlet is mapped to /websocketamf/\* (recommended default):
<channels>
	<channel-definition id="gravityamf" class="org.granite.gravity.channels.WebSocketChannel">
	    <endpoint
	        uri="http://{server.name}:{server.port}/{context.root}/websocketamf/amf"
	        class="flex.messaging.endpoints.AMFEndpoint"/>
	</channel-definition>
</channels>
Topics and Selectors
By default all messages sent by a producer are transmitted to all subscribed consumers. In most cases you will want to more finely control how the messages are routed. There are two main ways of doing this: the easiest is the topic and the most advanced is by using selectors.
Topics are a way to divide the destination in many parts. When a producer sends a message on a particular topic, only the consumers attached to this topic will receive the message. For example, if you have a destination for quotes, you could have a topic for each country:
var producer:Producer = new Producer();
producer.destination = "quotes";
producer.topic = "/germany";
producer.send(message);

var consumerGermany:Consumer = new Consumer();
consumerGermany.destination = "quotes";
consumerGermany.topic = "/germany";
consumerGermany.subscribe();

var consumerFrance:Consumer = new Consumer();
consumerFrance.destination = "quotes";
consumerFrance.topic = "/france";
consumerFrance.subscribe();
It is necessary to call subscribe again after changing the selector value on the Consumer so the server subscription is correctly updated.
Here only consumerGermany will receive the messages published by the producer. Note the slash (/) to start the name of the topic.
You can define more sections for the topic name and use wildcards () and (*) to match a part of the topic.
For example you could define a hierarchy /europe/germany, /europe/france, /america/US, and define a consumer for the topic /europe/* that
will receive only messages for Germany and France. Finally a consumer with /\*\* will receive everything, whatever topic is used by the producer.
|
Note
|
The JMS adapter currently does not support this filtering by topic as this is not a standard feature of JMS and many JMS providers do not support this concept. The ActiveMQ adapter however does support it. |
Topics are a simple way of filtering the message, but in some cases you may want to use more sophisticated rules to route the messages from producers to consumers. Gravity uses the concept of message selectors from JMS to do this. It works by defining a SQL-like select string that will define the criteria that a consumer wants on the message headers.
A consumer can specify its message selector before it subscribes to the destination:
var consumerFrance:Consumer = new Consumer();
consumerFrance.destination = "quotes";
consumerFrance.selector = "COUNTRY = 'France'";
consumerFrance.subscribe();
This consumer will receive all messages that have a header named COUNTRY with the value France. Many header values can be combined in the selector with
AND and OR, and you can use operators. See for details.
It is necessary to call subscribe again after changing the selector value on the Consumer so the server subscription is correctly updated.
Common configuration
There are three main steps to configure Gravity in an application:
-
Declare the Gravity servlet implementation for your target server in
web.xml -
Declare a messaging service and destination in
services-config.xml, mapped to a specific channel definition of typeGravityChannel
<web-app version="2.5" ...>
    ...
    <listener>
        <listener-class>org.granite.config.GraniteConfigListener</listener-class>
    </listener>

    <servlet>
        <servlet-name>GravityServlet</servlet-name>
        <servlet-class>org.granite.gravity.tomcat.GravityTomcatServlet</servlet-class>
    </servlet>
    <servlet-mapping>
        <servlet-name>GravityServlet</servlet-name>
        <url-pattern>/gravityamf/*</url-pattern>
    </servlet-mapping>
    ...
</web-app>
This declaration is the one specific to the Tomcat application server. See below for all available Gravity servlet implementations.
|
Note
|
The servlet listener definition is important to ensure proper startup and shutdown of the Gravity services, in particular cleanup of used resources. |
<services-config>
    <services>
        <service id="messaging-service"
            class="flex.messaging.services.MessagingService"
            messageTypes="flex.messaging.messages.AsyncMessage">
            <adapters>
                <adapter-definition
                    id="default"
                    class="org.granite.gravity.adapters.SimpleServiceAdapter"
                    default="true"/>
            </adapters>

            <destination id="topic">
                <channels>
                    <channel ref="my-gravityamf"/>
                </channels>
            </destination>
        </service>
    </services>

    <channels>
        <channel-definition
            id="my-gravityamf"
            class="org.granite.gravity.channels.GravityChannel">
            <endpoint
                uri="http://{server.name}:{server.port}/{context.root}/gravityamf/amf"
                class="flex.messaging.endpoints.AMFEndpoint"/>
        </channel-definition>
    </channels>
</services-config>
Here, we define a GravityChannel (gravityamf) and we use it in the destination named topic.
See above destination usage in Consumer/Producer usage.
The topic we have defined uses the default Gravity adapter SimpleServiceAdapter that is a simple fast in-memory message bus. If you need more advanced
features such as persistent messages or clustering, you should consider using a dedicated messaging implementation such as
.
The simple adapter exposes two configuration properties:
-
no-local: default istrue, if set tofalsethe client producing messages will receive their own messages -
session-selector: this is an advanced option and instructs Gravity to store the message selector string in the user session. This allows the server part of the application to override the selector string defined by the clientConsumerfor security reasons or other purpose.
Supported application servers for Comet/long polling
GraniteDS provides a generic servlet implementation that can work in any compliant servlet container. However it will use blocking I/O and thus will provide relatively limited scalability.
Before the release of the Servlet 3.0 specification, there was no standard way of writing asynchronous non blocking servlets and each server provided
its own specific API (for example Tomcat CometProcessor or Jetty continuations). GraniteDS thus provides implementations of non blocking messaging for
the most popular application servers.
Here is the table of the supported implementations:
| Application server | Servlet class | Specific notes |
|---|---|---|
Tomcat 6.0.18+ |
|
Only with APR/NIO enabled (APR highly recommended) |
JBoss 4.2.x |
|
APR/NIO, disable |
Jetty 6.1.x |
|
Jetty 7 not supported, Jetty 8 using Servlet 3 API |
Supported application servers for WebSocket
There is no standard way before the release of the Servlet 3.1 specification to use WebSockets in Java EE application servers thus GraniteDS provides support for native WebSocket implementations on some application servers.
Here is the table of the supported implementations:
| Application server | Servlet class | Specific notes |
|---|---|---|
Tomcat 7.0.29+ |
|
Only with APR/NIO enabled (APR highly recommended) |
Jetty 8.1.1+ |
|
Jetty 7 not supported |
GlassFish 3.1.2+ |
|
|
Any other |
Embedded Jetty 8.1.1+ |
Requires another TCP port, not webapp dependent |
Flash Policy server for WebSocket
The Flash WebSocket implementation requires the use of a Flash socket policy server for security reasons (see ).
GraniteDS includes a basic Flash policy server than can be started by simply adding the following snippet to your web.xml:
<context-param>
    <param-name>flashPolicyFileServer-allowDomains</param-name>
    <param-value>*:*</param-value>
</context-param>
<listener>
    <listener-class>org.granite.gravity.websocket.PolicyFileServerListener</listener-class>
</listener>
The server accepts two properties:
-
flashPolicyFileServer-port: the port on which the server listens (by default 843). -
flashPolicyFileServer-allowDomains: a list of allowed domains separated by commas. It is used to build the requestedcross-domain-policyresponse file.
Advanced configuration
Whichever Gravity servlet implementation is used in your application, the advanced configuration is done in granite-config.xml.
Here is a sample Gravity configuration with all default options:
<?xml version="1.0" encoding="UTF-8"?>

<!DOCTYPE granite-config PUBLIC "-//Granite Data Services//DTD granite-config internal//EN"
    "http://www.graniteds.org/public/dtd/3.0.0/granite-config.dtd">

<granite-config>

    <gravity
        factory="org.granite.gravity.DefaultGravityFactory"
        channel-idle-timeout-millis="1800000"
        long-polling-timeout-millis="20000"
        reconnect-interval-millis="30000"
        reconnect-max-attempts="60">

        <thread-pool
            core-pool-size="5"
            maximum-pool-size="20"
            keep-alive-time-millis="10000"
            queue-capacity="2147483647" />

    </gravity>

</granite-config>
This <gravity> section is purely optional and you may omit it if you accept default values.
Some explanations about these options:
-
channel-idle-timeout-millis: the elapsed time after which an idle channel (pure producer or dead client) may be silently unsubscribed and removed by Gravity. Default is 30 minutes. -
long-polling-timeout-millis: the elapsed time after which an idle connect request is closed, asking the client to reconnect. Default is 20 seconds. Note that setting this value isn’t supported in Tomcat/APR configurations. -
thread-poolattributes: all options are standard parameters for the GravityThreadPoolExecutorinstance.
All other configuration options are for advanced use only and you should keep default values.
Tomcat and JBoss/Tomcat specific configuration tips
GraniteDS messaging for Tomcat relies on the org.apache.catalina.CometProcessor interface. In order to enable Comet support in Tomcat, you must configure
an .
At least for now, APR is the easiest to configure and the most reliable. To configure APR, see documentation
.
On Windows®, it’s simply a matter of downloading a native and putting it in your WINDOWS/system32 directory
- while other and better configurations are possible. For more recent versions of Tomcat such as the one embedded in JBoss 5 or 6, or Tomcat 7 you will need
the latest APR library, see .
For JBoss 4.2.*, you must comment out a specific filter in the default global web.xml (<JBOSS_HOME>/server/default/deploy/jboss-web.deployer/conf/web.xml):
...
<!-- Comment this out!
<filter>
  <filter-name>CommonHeadersFilter</filter-name>
  <filter-class>org.jboss.web.tomcat.filters.ReplyHeaderFilter</filter-class>
  <init-param>
    <param-name>X-Powered-By</param-name>
    <param-value>...</param-value>
  </init-param>
</filter>

<filter-mapping>
  <filter-name>CommonHeadersFilter</filter-name>
  <url-pattern>/*</url-pattern>
</filter-mapping>
-->
...
See above for Tomcat configuration.
For JBoss 5+ servers, you must use a specific servlet. JBoss 5 implements its own version of Tomcat, named JBossWeb:
<web-app version="2.5" ...>
    ...
    <servlet>
        <servlet-name>GravityServlet</servlet-name>
        <servlet-class>org.granite.gravity.jbossweb.GravityJBossWebServlet</servlet-class>
        ... (see Tomcat configuration above for options)
    </servlet>
    ...
</web-app>
Note that you do not need to comment out the CommonHeadersFilter with JBoss 5, but you still need to enable APR.
Integration with JMS
The default messaging engine of GraniteDS is embedded in SimpleServiceAdapter and has many limitations. In particular it does not support clustering or
persistent messages.
For more robust messaging, it is possible and recommended to integrate with a robust messaging engine such as Apache ActiveMQ. When deploying your application
in a full Java EE application server, you may also want to configure Gravity to integrate with the built-in messaging engine of your application server
(such as HornetQ in JBoss AS 7).
The GraniteDS JMS adapter configuration follows as closely as possible the standard Adobe Flex configuration for the JMS adapter. See .
Here is a sample configuration for a default JBoss installation with a brief description of the different options:
<adapters>
  <adapter-definition id="jms" class="org.granite.gravity.adapters.JMSServiceAdapter"/>
</adapters>

<destination id="chat-jms">
  <properties>
    <jms>
      <destination-type>Topic</destination-type>
      <!-- Optional: forces usage of simple text messages
      <message-type>javax.jms.TextMessage</message-type>
      -->
      <connection-factory>ConnectionFactory</connection-factory>
      <destination-jndi-name>topic/testTopic</destination-jndi-name>
      <destination-name>TestTopic</destination-name>
      <acknowledge-mode>AUTO_ACKNOWLEDGE</acknowledge-mode>
      <transacted-sessions>false</transacted-sessions>
      <!-- Optional JNDI environment. Specify the external JNDI configuration to access
        a remote JMS provider. Sample for a remote JBoss server.
      -->
      <initial-context-environment>
        <property>
          <name>Context.SECURITY_PRINCIPAL</name>
          <value>guest</value>
        </property>
        <property>
          <name>Context.SECURITY_CREDENTIALS</name>
          <value>guest</value>
        </property>
        <property>
          <name>Context.PROVIDER_URL</name>
          <value>http://my.host.com:1099</value>
        </property>
        <property>
          <name>Context.INITIAL_CONTEXT_FACTORY</name>
          <value>org.jnp.interfaces.NamingContextFactory</value>
        </property>
        <property>
          <name>Context.URL_PKG_PREFIXES</name>
          <value>org.jboss.naming:org.jnp.interfaces</value>
        </property>
      </initial-context-environment>
    </jms>
    ...
  </properties>
  ...
  <adapter ref="jms"/>
</destination>
Comments on configuration options:
-
destination-typemust beTopicfor the moment. Queues may be supported later. -
message-typemay be forced to simple text messages by specifyingjavax.jms.TextMessage. -
connection-factoryanddestination-jndi-nameare the JNDI names respectively of the JMSConnectionFactoryand of the JMS topic. -
destination-nameis just a label but still required. -
acknowledge-modecan have the standard values accepted by any JMS provider:AUTO_ACKNOWLEDGE,CLIENT_ACKNOWLEDGE, andDUPS_OK_ACKNOWLEDGE. -
transacted-sessionsallows the use of transactions in sessions when set totrue. -
initial-context-environment: Theinitial-contextparameters allow to access a remote JMS server by setting the JNDI context options.
|
Note
|
The JMS headers are always copied between client and JMS messages |
|
Warning
|
Durable subscriptions are not yet supported |
Using an Embedded ActiveMQ
In the case of a simple Tomcat/Jetty installation without JMS provider, or to allow client-to-client messaging with advanced capabilities such as durable messages,
Gravity can be integrated with an embedded Apache ActiveMQ instance.
To enable ActiveMQ, just put the activemq-xx.jar in your WEB-INF/lib directory. The necessary message broker will be lazily created on first use, except if the
property create-broker is set to false. The uri of the created ActiveMQ broker will be vm://adapterId.
Here is a sample configuration to use an embedded ActiveMQ provider:
<adapters>
  <adapter-definition
    id="activemq"
    class="org.granite.gravity.adapters.ActiveMQServiceAdapter"/>
</adapters>

<destination id="chat-activemq">
  <properties>
    <jms>
      <destination-type>Topic</destination-type>
      <!-- Optional: forces usage of simple text messages
      <message-type>javax.jms.TextMessage</message-type>
      -->
      <connection-factory>ConnectionFactory</connection-factory>
      <destination-jndi-name>topic/testTopic</destination-jndi-name>
      <destination-name>TestTopic</destination-name>
      <acknowledge-mode>AUTO_ACKNOWLEDGE</acknowledge-mode>
      <transacted-sessions>false</transacted-sessions>
    </jms>

    <server>
      <durable>true</durable>
      <file-store-root>/var/activemq/data</file-store-root>
      <create-broker>true</create-broker>
      <wait-for-start>false</wait-for-start>
    </server>
  </properties>
  ...
  <adapter ref="activemq"/>
</destination>
And a sample configuration to use an external ActiveMQ provider:
<adapters>
  <adapter-definition
    id="activemq"
    class="org.granite.gravity.adapters.ActiveMQServiceAdapter"/>
</adapters>

<destination id="chat-activemq">
  <properties>
    <jms>
      <destination-type>Topic</destination-type>
      <!-- Optional: forces usage of simple text messages
      <message-type>javax.jms.TextMessage</message-type>
      -->
      <connection-factory>ConnectionFactory</connection-factory>
      <destination-jndi-name>topic/testTopic</destination-jndi-name>
      <destination-name>TestTopic</destination-name>
      <acknowledge-mode>AUTO_ACKNOWLEDGE</acknowledge-mode>
      <transacted-sessions>false</transacted-sessions>
    </jms>

    <server>
      <broker-url>tcp://activemq-server:61616</broker-url>
    </server>
  </properties>
  ...
  <adapter ref="activemq"/>
</destination>
Comments on some configuration options:
-
The main parameters (
<jms>;…</jms>) are identical to those used in the default JMS configuration. See above. -
durable, if set totrue, allows for durable messages, stored in the filesystem. The data store directory of ActiveMQ can be specified by thefile-store-rootparameter. -
create-brokeris optional, as well as the dependantwait-for-startattribute. Whencreate-brokerisfalse, creation of the broker is not automatic and has to be done by the application itself. In this case,wait-for-startset totruetells theActiveMQConnectionFactoryto wait for the actual creation of the broker. Please refer to the ActiveMQ documentation for more details on these options.
Server to client publishing
There are mostly two kinds of requirements for messaging: client-to-client interactions, that can be easily handled by the Consumer/Producer pattern,
and server-to-client push that can be done with either the low-level Gravity API or directly using the JMS API when the JMS adapter is used.
Server to client messaging with the low-level Gravity API
If you use the SimpleAdapter, the message sending will have to be done at a lower level and you will need a compilation dependency on the Gravity API.
It’s also possible but not recommended to use this low-level API with the JMS and ActiveMQ adapters.
It first requires to get the Gravity object from the ServletContext. It is set as an attribute named org.granite.gravity.Gravity.
When using Spring, Seam 2 or CDI, you can also get this object by injection (see the corresponding documentation).
Then you can send messages of type flex.messaging.messages.Message by calling the method gravity.publish(message);.
Gravity gravity = GravityManager.getGravity(servletContext);
AsyncMessage message = new AsyncMessage();
message.setDestination("my-gravity-destination");
message.setHeader(AsyncMessage.SUBTOPIC_HEADER, "my-topic");
message.setBody("Message content");
gravity.publishMessage(message);
It you need to simulate a publish from the client subscribed in the current session, you can get the clientId in the session attribute named
Server to Client Messaging with JMS
Sending messages from the server to clients simply consists of sending JMS messages to the corresponding JMS topic.
Text messages are received as simple text on the client side, object messages are serialized in AMF3 and deserialized and received as typed objects.
The Gravity messaging channel supports lazily loaded collections and objects, exactly as the remoting channel.
Here is an example on an EJB3 sending a message:
@Stateless
@Local(Test.class)
public class TestBean implements Test {

    @Resource
    SessionContext ctx;

    @Resource(mappedName="java:/ConnectionFactory")
    ConnectionFactory jmsConnectionFactory;

    @Resource(mappedName="topic/testTopic")
    Topic jmsTopic;


    public TestBean() {
       super();
    }

    public void notifyClient(Object object) {
        try {
            Connection connection = jmsConnectionFactory.createConnection();
            Session session = connection.createSession(false, Session.AUTO_ACKNOWLEDGE);
            javax.jms.Message jmsMessage = session.createObjectMessage(person);
            MessageProducer producer = session.createProducer(jmsTopic);
            producer.send(jmsMessage);
            session.close();
            connection.close();
        }
        catch (Exception e) {
            log.error("Could not publish notification", e);
        }
    }
}
Here is an example on a Seam 2 component sending a message:
@Stateless
@Local(Test.class)
@Name("test")
public class TestBean implements Test {

    private static Logger log = Logger.getLogger(TestBean.class.getName());

    @In
    private TopicPublisher testTopicPublisher;
    @In
    private TopicSession topicSession;

    public void notifyClient(Serializable object) {
        try {
            testTopicPublisher.publish(topicSession.createObjectMessage(object));
        }
        catch (Exception e) {
            log.error("Could not publish notification", e);
        }
    }
}
Server to client messaging with Embedded ActiveMQ
The only difference with standard JMS is that you can get a ConnectionFactory a bit more easily. Also ActiveMQ supports subtopics.
The name of the topic is built with the following rule:
-
Without subtopic, the name of the ActiveMQ destination should be the same as defined in the
jms/destination-nameconfiguration parameter. -
With subtopic, the name is the concatenation of the
destination-nameparameter with thesubtopic. Wildcards are supported in thesubtopicfollowing Flex convention and are converted to the ActiveMQ format (see ), meaning thattoto.*\*is converted tototo.>.
public class Test throws JMSException {
    // adapterId should be the id of the JMS adapter as defined in services-config.xml
    ConnectionFactory f = new ActiveMQConnectionFactory("vm://adapterId");
    Connection connection = jmsConnectionFactory.createConnection();
    Session session = connection.createSession(false, Session.AUTO_ACKNOWLEDGE);

    ActiveMQTopic activeMQTopic= new ActiveMQTopic("destination");
    javax.jms.Message jmsMessage = session.createObjectMessage(person);
    MessageProducer producer = session.createProducer(activeMQTopic);
    producer.send(jmsMessage);

    session.close();
    connection.close();
}
Securing Messaging Destinations
Securing messaging destination is very similar to security remoting destinations (see here) and most concepts apply to messaging services as well as remoting services.
You can for example setup role-based security on a Gravity destination with the following definition in services-config.xml:
<?xml version="1.0" encoding="UTF-8"?>
<services-config>
    <services>
        <service id="messaging-service"
            class="flex.messaging.services.MessagingService"
            messageTypes="flex.messaging.messages.AsyncMessage">
            <adapters>
                <adapter-definition
                    id="default"
                    class="org.granite.gravity.adapters.SimpleServiceAdapter"
                    default="true"/>
            </adapters>

            <destination id="restrictedTopic">
                <channels>
                    <channel ref="my-gravityamf"/>
                </channels>
                <security>
                    <security-constraint>
                        <auth-method>Custom</auth-method>
                        <roles>
                            <role>admin</role>
                        </roles>
                    </security-constraint>
                </security>
            </destination>
        </service>
    </services>
    ...
</services-config>
In this case, only users with the role admin will be able to subscribe to the topic restrictedTopic.
Fine-grained per-destination security
You may write and configure a specific GravityDestinationSecurizer in order to add fine grained security checks for specific actions.
In particular you can control who can subscribe or publish messages to a particular topic.
public interface GravityDestinationSecurizer extends DestinationSecurizer {
    public void canSubscribe(GravityInvocationContext context)
        throws SecurityServiceException;
    public void canPublish(GravityInvocationContext context)
        throws SecurityServiceException;
}
You then have to tell GraniteDS where to use your securizer:
<services-config>
    <services>
        <service ...>
            <destination id="restrictedDestination">
                ...
                <properties>
                    <securizer>path.to.MyDestinationSecurizer</securizer>
                </properties>
            </destination>
        </service>
    </services>
    ...
</services-config>
Your custom implementation of this interface is expected to throw a SecurityServiceException when the user has no right to execute the requested action
(subscription or publishing).
You can also override the subscription message in the method canSubcribe if for example you want to force a particular subtopic or selector depending
on the user access rights and not only rely on the client to define the subscription parameters.
public class CustomDestinationSecurizer implements GravityDestinationSecurizer {

    public void canSubscribe(GravityInvocationContext context) throws SecurityServiceException {
        String profile = getProfileForCurrentUser();
        if (profile.equals("limited"))
            throws new SecurityServiceException("Access denied");

        if (profile.equals("restricted"))
            ((CommandMessage)context.getMessage()).getHeaders().put("DSSubtopic", "forcedCustomTopic");
    }

    public void canPublish(GravityInvocationContext context) throws SecurityServiceException {
        String profile = getProfileForCurrentUser();
        if (profile.equals("limited"))
            throws new SecurityServiceException("Access denied");
    }
}
If you have configured a security service, the current thread has already been authenticated at this point, so you are able to get user information
depending your security implementation. For example, with Spring Security, you can use SecurityContextHolder.getContext().getAuthentication().
Integration with EJB3
EJB 3 are an important part of the . They provide a powerful framework for managing and securing enterprise services in an application server (session beans) as well as an powerful persistence and query language system (JPA).
GraniteDS provides access to EJB 3 services via either the RemoteObject API or the Tide API for Session Beans methods calls, and fully supports
serialization of JPA entities from and to your Flex application, taking care of lazily loaded associations; both collections and proxies.
This support for JPA entity beans is covered in the section JPA and lazy initialization, so this section will only describe how to call remotely
stateless and stateful session beans from a Flex application. GraniteDS also integrates with container security for authentication and role-based authorization.
GraniteDS provides access to EJB 3 services via either the RemoteService API or the Tide API for Session Beans methods calls, and fully supports serialization
of JPA entities from and to your Java client application, taking care of lazily loaded associations; both collections and proxies.
This support for JPA entity beans is covered in the section JPA and lazy initialization, so this section will only describe how to call remotely
stateless and stateful session beans from a Java client application.
GraniteDS also integrates with container security for authentication and role-based authorization.
For a basic example with GraniteDS and EJB 3 (stateless and stateful session beans, and entity beans) working together, have a look to the graniteds_ejb3
example project in the examples folder of the GraniteDS distribution graniteds-*\*\*.zip and import it as a new Eclipse project.
You may also have a look at the "Hello, world" Revisited tutorial for another basic example application using EJB 3 technologies together with Granite Eclipse Builder.
Using the RemoteObject APIUsing the RemoteService API
The Flex-side usage of the RemoteObject API is completely independent of the server technology, so everything described in the Remoting
chapter applies for EJBs. This section will only describe the particular configuration required in various use cases of EJB services.
Configuring remoting for EJB 3 services simply requires adding the org.granite.messaging.service.EjbServiceFactory service factory in services-config.xml
and specifying its JNDI lookup string property.
Basic Remoting Example
All remoting examples from the Remoting chapter apply for EJBs, here is a basic example:
public interface HelloService {

    public String hello(String name);
}

@Stateless
@Local(HelloService.class)
@RemoteDestination(id="helloService")
public class HelloServiceBean implement HelloService {

    public String hello(String name) {
        return "Hello " + name;
    }
}
Common configuration
The main part of the configuration is the factory declaration in the file services-config.xml :
<?xml version="1.0" encoding="UTF-8"?>

<services-config>

    <services>
        <service
            id="granite-service"
            class="flex.messaging.services.RemotingService"
            messageTypes="flex.messaging.messages.RemotingMessage">
            <destination id="personService">
                <channels>
                    <channel ref="my-graniteamf"/>
                </channels>
                <properties>
                    <factory>ejbFactory</factory>
                </properties>
            </destination>
        </service>
    </services>

    <factories>
        <factory id="ejbFactory" class="org.granite.messaging.service.EjbServiceFactory">
            <properties>
                <lookup>myapp.ear/{capitalized.destination.id}Bean/local</lookup>
            </properties>
        </factory>
    </factories>

    <channels>
        <channel-definition id="my-graniteamf" class="mx.messaging.channels.AMFChannel">
            <endpoint
                uri="http://{server.name}:{server.port}/{context.root}/graniteamf/amf"
                class="flex.messaging.endpoints.AMFEndpoint"/>
        </channel-definition>
    </channels>

</services-config>
Two elements are important in this configuration :
-
The EJB service factory declaration and the reference to in in our destination
-
The JNDI lookup string defined in the
lookupproperty of the factory
|
Note
|
In Java EE 6 compliant application servers such as JBoss 6 and GlassFish 3, you can use the standard global naming specification :
|
The JNDI lookup string is common for all EJB 3 destinations, and thus contains placeholders that will be replaced at runtime depending on the destination
that is called. {capitalized.destination.id} will be replaced by the destination id with the first letter in capital,
for example personService will become myApp/PersonServiceBean/local.
{destination.id} can alternatively be used. Note that some Java EE servers do not expose EJB local interfaces in the global JNDI context, so you will have
to use a local JNDI reference and add an ejb-local-ref section in web.xml for each EJB exposed to JNDI.
<ejb-local-ref>
    <ejb-ref-name>myapp.ear/PeopleServiceBean</ejb-ref-name>
    <ejb-ref-type>Session</ejb-ref-type>
    <local-home/>
    <local>com.myapp.service.PeopleService</local>
</ejb-local-ref>
<factory id="ejbFactory" class="org.granite.messaging.service.EjbServiceFactory">
<properties>
<lookup>java:comp/env/myapp.ear/{capitalized.destination.id}Bean</lookup>
</properties>
</factory>Of course you can share the same factory with many EJB destinations.
<destination id="person">
    <channels>
        <channel ref="my-graniteamf"/>
    </channels>
    <properties>
        <factory>ejbFactory</factory>
    </properties>
</destination>

<destination id="product">
    <channels>
        <channel ref="my-graniteamf"/>
    </channels>
    <properties>
        <factory>ejbFactory</factory>
    </properties>
</destination>
Configuration for Remote EJBs
By default GraniteDS will lookup the bean in JNDI with the default InitialContext. To access remote EJB services you have to specify the JNDI context
environment that will be used for remote lookup in the factory definition of services-config.xml.
The parameters generally depend on the remote application server. Please refer to the standard and to the documentation of your application server for more details.
...
<factory id="ejbFactory" class="org.granite.messaging.service.EjbServiceFactory">
    <properties>
        <lookup>myApp/{capitalized.destination.id}Bean/local</lookup>

        <!-- InitialContext parameters -->
        <initial-context-environment>
            <property>
                <name>Context.PROVIDER_URL</name>
                <value>...</value>
            </property>
            <property>
                <name>Context.INITIAL_CONTEXT_FACTORY</name>
                <value>...</value>
            </property>
            <property>
                <name>Context.URL_PKG_PREFIXES</name>
                <value>...</value>
            </property>
            <property>
                <name>Context.SECURITY_PRINCIPAL</name>
                <value>...</value>
            </property>
            <property>
                <name>Context.SECURITY_CREDENTIALS</name>
                <value>...</value>
            </property>
        </initial-context-environment>
    </properties>
</factory>
...
For JBoss Application Server for example this declaration looks like this:
...
<factory id="ejbFactory" class="org.granite.messaging.service.EjbServiceFactory">
    <properties>
        <lookup>myApp/{capitalized.destination.id}Bean/local</lookup>

        <!-- InitialContext parameters -->
        <initial-context-environment>
            <property>
                <name>Context.PROVIDER_URL</name>
                <value>jnp://remotehostname:1099</value>
            </property>
            <property>
                <name>Context.INITIAL_CONTEXT_FACTORY</name>
                <value>org.jnp.interfaces.NamingContextFactory</value>
            </property>
            <property>
                <name>Context.URL_PKG_PREFIXES</name>
                <value>org.jboss.naming:org.jnp.interfaces</value>
            </property>
        </initial-context-environment>
    </properties>
</factory>
...
Automatic Configuration of EJB Destinations
This is annoying to have to declare each and every EJB exposed to Flex remoting in services-config.xml. To avoid this step, it is possible to
instruct GraniteDS to search EJB services in the application classpath.
Note however that this cannot work with remote EJBs as GraniteDS will obviously not have access to the remote classpath.
To enable automatic destination discovery, you simply have to enable the scan property in granite-config.xml:
<?xml version="1.0" encoding="UTF-8"?>
<!DOCTYPE granite-config PUBLIC
    "-//Granite Data Services//DTD granite-config internal//EN"
    "http://www.graniteds.org/public/dtd/3.0.0/granite-config.dtd">

<granite-config scan="true">
   ...
</granite-config>
Then you have to add a simple marker file (even empty) META-INF/services-config.properties in every EJB jar (or in WEB-INF/classes if you are using EJB 3.1
packaged in a war). Then GraniteDS will scan these jars at startup and look for EJB classes annotated with @RemoteDestination.
The annotation can be put either on the EJB interface or on the EJB implementation, but it’s recommended to put it on the EJB interface.
@Stateless
@Local(PersonService.class)
@RemoteDestination(id="person", securityRoles={"user","admin"})
public class PersonServiceBean implements PersonService {
    ...
}
The @RemoteDestination annotation additionally supports the following attributes:
-
idis mandatory and is the destination name -
serviceis optional if there is only one service forRemotingMessagedefined inservices-config.xml. Otherwise this should be the name of the service. -
channelis optional if there is only one channel defined inservices-config.xml. Otherwise this should be the id of the target channel. -
channelsmay be used instead of channel to define a failover channel. -
factoryis optional if there is only one factory inservices-config.xml. Otherwise this should be the factory id. -
securityRolesis an array of role names for securing the destination.
As shown below, the service, factory and channel sections are still required in your services-config.xml file, but the service part will not contain
any destination. So, with any number of EJBs annotated this way, the services-config.xml file may be defined as follows:
<?xml version="1.0" encoding="UTF-8"?>

<services-config>
    <services>
        <service
            id="granite-service"
            class="flex.messaging.services.RemotingService"
            messageTypes="flex.messaging.messages.RemotingMessage">
            <!-- no need to declare destinations here -->
        </service>
    </services>

    <factories>
        <factory id="ejbFactory" class="org.granite.messaging.service.EjbServiceFactory">
            <properties>
                <lookup>myApp/{capitalized.destination.id}Bean/local</lookup>
            </properties>
        </factory>
    </factories>

    <channels>
        <channel-definition id="my-graniteamf" class="mx.messaging.channels.AMFChannel">
            <endpoint
                uri="http://{server.name}:{server.port}/{context.root}/graniteamf/amf"
                class="flex.messaging.endpoints.AMFEndpoint"/>
        </channel-definition>
    </channels>
</services-config>
As the destinations are not defined in services-config.xml any more, you will have to setup the RemoteObject endpoint manually in ActionScript
(see here for details).
Configuration for Stateful EJBs
Most of what has been described for stateless beans also applies for stateful beans, however stateful beans have a different lifecycle.
GraniteDS stores the reference of stateful EJBs retrieved from JNDI in the HTTP session so it can keep the correct instance between remote calls. Take care that the timeout for HTTP session expiration should be consistent with the timeout for EJB3 stateful beans expiration.
GraniteDS has to know a bit more information about stateful beans than for stateless beans, here is an example of services-config.xml for the following EJB:
package com.myapp.services;

import javax.ejb.Local;
import javax.ejb.Remove;
import javax.ejb.Stateful;

@Stateful
@Local(PositionService.class)
public class PositionServiceBean implements PositionService {

    int x = 300;

    public int getX() {
        return x;
    }

    public void saveX(int x) {
        this.x = x;
    }

    @Remove
    public void remove() {
    }
}
<destination id="position">
<channels>
<channel ref="my-graniteamf"/>
</channels>
<properties>
<factory>ejbFactory</factory>
<!-- Specific for stateful beans -->
<ejb-stateful>
<remove-method>
<signature>remove</signature>
<retain-if-exception>false</retain-if-exception>
</remove-method>
</ejb-stateful>
</properties>
</destination>The configuration of the destination is similar to the one used for stateless beans, except for the additional ejb-stateful subsection.
The presence of this ejb-stateful node, even empty, informs GDS that this EJB 3 is stateful and should be managed as such.
Otherwise, the bean will be considered stateless and only one instance will be shared between all users.
The inner remove-method node contains information about the remove() methods of your stateful bean:
-
signature: This is the name of the method, optionally followed by a parameter list. If yourremove()method has arguments, the signature should follow the conventions used injava.lang.reflect.Method.toString(). For example, with the followingremove()method:@Remove public int remove(boolean arg1, Integer arg2, String[] arg3) {...}-
you should write this signature:
<signature>remove(boolean,java.lang.Integer,java.lang.String[])</signature>
-
-
retain-if-exception(optional): This is the equivalent of the@Removeannotation attribute; the default isfalse.
You may of course add multiple remove-method nodes in the same ejb-stateful node if necessary.
When using automatic configuration with classpath scanning, stateful EJBs are automatically detected with the @Stateful annotation and properly configured.
Security
You can easily protect access to your EJB destinations with destination-based security. Please refer to the security chapter.
GraniteDS will then pass the user credentials from the Flex RemoteObject to the EJB security context, making possible to use role-based authorization
with the EJB destination.
GraniteDS will then pass the user credentials from the client RemotingChannel to the EJB security context, making possible to use role-based authorization
with the EJB destination.
Here is an example configuration in services-config.xml:
<destination id="personService">
    <channels>
        <channel ref="my-graniteamf"/>
    </channels>
    <properties>
        <factory>ejbFactory</factory>
    </properties>
    <security>
        <security-constraint>
            <auth-method>Custom</auth-method>
            <roles>
                <role>user</role>
                <role>admin</role>
            </roles>
        </security-constraint>
    </security>
</destination>
@Stateless
@Local(PersonService.class)
public class PersonServiceBean implements PersonService {
@PersistenceContext
protected EntityManager manager;
public List<Person> findAllPersons() {
return manager.createQuery("select distinct p from Person p").getResultList();
}
@RolesAllowed({"admin"})
public Person createPerson(Person person) {
return manager.merge(person);
}
@RolesAllowed({"admin"})
public Person modifyPerson(Person person) {
return manager.merge(person);
}
@RolesAllowed({"admin"})
public void deletePerson(Person person) {
person = manager.find(Person.class, person.getId());
manager.remove(person);
}
}With this configuration, only authenticated users having either the user or admin roles will be able to call the EJB remotely from the client.
Then the EJB container will enforce the particular access on each method due to the @RolesAllowed annotation and may throw a EJBAccessException.
Using the Tide API
Most of what is described in the Tide Remoting section applies for EJB 3, however GraniteDS also provides an improved integration with EJB 3 services.
Configuration
There are a few noticeable differences in the configuration in this case.
-
It is mandatory to use automatic classpath scanning as Tide needs to have access to the actual implementation of the EJB and not only to its interface. Consequently this is currently not possible to use remote EJBs as Tide-enabled destinations.
-
You can define in the
tide-annotationssection ofgranite-config.xmlthe conditions used to enable remote access to EJB destinations (for example all EJBs annotated with a particular annotation). -
You have to configure the specific Tide/EJB3
org.granite.tide.ejb.EjbServiceFactoryservice factory inservices-config.xml. -
You have to configure a unique Tide/EJB3 destination named
ejbinservices-config.xml -
You have to retrieve the Tide context in Flex with
Ejb.getInstance().getEjbContext()instead ofTide.getInstance().getContext().
Here is a default configuration suitable for most cases:
<granite-config scan="true">
    ...

    <tide-components>
        <tide-component annotated-with="org.granite.messaging.service.annotations.RemoteDestination"/>
    </tide-components>

</granite-config>
<services-config>
<services>
<service id="granite-service"
class="flex.messaging.services.RemotingService"
messageTypes="flex.messaging.messages.RemotingMessage">
<!--
! Use "tideEjbFactory" and "my-graniteamf" for "server" destination (see below).
! The destination must be "server" when using Tide with default configuration.
!-->
<destination id="server">
<channels>
<channel ref="my-graniteamf"/>
</channels>
<properties>
<factory>tideEjbFactory</factory>
<entity-manager-factory-jndi-name>java:/DefaultEMF</entity-manager-factory-jndi-name>
</properties>
</destination>
</service>
</services>
<!--
! Declare tideEjbFactory service factory.
!-->
<factories>
<factory id="tideEjbFactory" class="org.granite.tide.ejb.EjbServiceFactory">
<properties>
<lookup>myapp.ear/{capitalized.component.name}Bean/local</lookup>
</properties>
</factory>
</factories>
<!--
! Declare my-graniteamf channel.
!-->
<channels>
<channel-definition id="my-graniteamf" class="mx.messaging.channels.AMFChannel">
<endpoint
uri="http://{server.name}:{server.port}/{context.root}/graniteamf/amf"
class="flex.messaging.endpoints.AMFEndpoint"/>
</channel-definition>
</channels>
</services-config>The destination named ejb will be the one and only destination required for all EJB destinations.
The property lookup of the factory defines the lookup string used by Tide to lookup the EJBs in JNDI. The example above is suitable for JBoss,
please refer to your application server documentation for other servers. Placeholders can be defined in this lookup string that will be replaced at runtime
for each EJB: {capitalized.component.name} is the name used on the client.
|
Note
|
In Java EE 6 compliant application servers such as JBoss 6 and GlassFish 3, you can use the standard global naming specification:
|
|
Note
|
In many JEE servers (GlassFish v2 for example, but not JBoss), EJB local interfaces are not published in the global JNDI. To be able to call them through Tide,
you will have to specify |
<ejb-local-ref>
    <ejb-ref-name>myapp/PeopleServiceBean</ejb-ref-name>
    <ejb-ref-type>Session</ejb-ref-type>
    <local-home/>
    <local>com.myapp.service.PeopleService</local>
</ejb-local-ref>
<factory id="tideEjbFactory" class="org.granite.tide.ejb.EjbServiceFactory">
<properties>
<lookup>java:comp/env/myapp/{capitalized.component.name}Bean</lookup>
</properties>
</factory>The property entity-manager-factory-name is necessary only when using transparent remote lazy loading of collections. It should be the JNDI name that GraniteDS
can use to lookup the EntityManagerFactory in JNDI. Alternatively you can instead specify entity-manager-name, then GraniteDS will lookup for an EntityManager.
JBoss server can expose these two elements in the global JNDI by adding these lines in persistence.xml:
<persistence-unit name="ejb-pu">
    ...
    <properties>
        ...
        <property name="jboss.entity.manager.factory.jndi.name" value="java:/DefaultEMF"/>
        <property name="jboss.entity.manager.jndi.name" value="java:/DefaultEM"/>
    </properties>
</persistence-unit>
For other application servers that does not expose the persistence unit in JNDI, you will have to use a local name and add persistence-unit-ref in web.xml.
<persistence-unit-ref>
    <persistence-unit-ref-name>ejb-pu</persistence-unit-ref-name>
</persistence-unit-ref>
<destination id="server">
<channels>
<channel ref="graniteamf"/>
</channels>
<properties>
<factory>tideEjbFactory</factory>
<entity-manager-factory-jndi-name>java:comp/env/ejb-pu</entity-manager-factory-jndi-name>
</properties>
</destination>Basic remoting with dependency injection
When using EJB3, the only difference on the client is that you have to use the Ejb singleton. Here is a simple example of remoting with an injected client proxy
for an EJB service:
<?xml version="1.0"?>
<mx:Application xmlns:mx="http://www.adobe.com/2006/mxml"
    creationComplete="Ejb.getInstance().initApplication()">
    <mx:Script>
        import org.granite.tide.ejb.Ejb;
        import org.granite.tide.events.TideResultEvent;
        import org.granite.tide.events.TideFaultEvent;

        [In]
        public var helloService:Component;

        private function hello(name:String):void {
            helloService.hello(name, resultHandler, faultHandler);
        }

        private function resultHandler(event:TideResultEvent):void {
            outputMessage.text = event.result as String;
        }

        private function faultHandler(event:TideFaultEvent):void {
            // Handle fault
        }
    </mx:Script>

    <!-- Provide input data for calling the service. -->
    <mx:TextInput id="inputName"/>

    <!-- Call the web service, use the text in a TextInput control as input data.-->
    <mx:Button click="hello(inputName.text)"/>

    <!-- Result message. -->
    <mx:Label id="outputMessage"/>
</mx:Application>
This is almost identical to the standard Tide API described in the Tide remoting section, and all other methods apply for EJB.
Typesafe remoting with dependency injection
You can benefit from the capability of the Gas3 code generator (see here) to generate a strongly typed ActionScript 3 client proxy
from the Spring interface when it is annotated with @RemoteDestination. In this case, you can inject a typesafe reference to your service and get better
compile time error checking and auto completion in your IDE:
<?xml version="1.0"?>
<mx:Application xmlns:mx="http://www.adobe.com/2006/mxml"
    creationComplete="Spring.getInstance().initApplication()">
    <mx:Script>
        import org.granite.tide.spring.Spring;
        import org.granite.tide.events.TideResultEvent;
        import org.granite.tide.events.TideFaultEvent;
        import com.myapp.service.HelloService;

        [In]
        public var helloService:HelloService;

        private function hello(name:String):void {
            helloService.hello(name, resultHandler, faultHandler);
        }
        ...
    </mx:Script>

    ...
</mx:Application>
It is possible to benefit from even more type safety by using the annotation [Inject] instead of In. When using this annotation, the full class name
is used to find the target bean in the Spring context instead of the bean name.
<?xml version="1.0"?>
<mx:Application xmlns:mx="http://www.adobe.com/2006/mxml"
    creationComplete="Spring.getInstance().initApplication()">
    <mx:Script>
        import org.granite.tide.spring.Spring;
        import org.granite.tide.events.TideResultEvent;
        import org.granite.tide.events.TideFaultEvent;
        import com.myapp.service.HelloService;

        [Inject]
        public var myService:HelloService;

        private function hello(name:String):void {
            myService.hello(name, resultHandler, faultHandler);
        }
        ...
    </mx:Script>

    ...
</mx:Application>
Security
GraniteDS provides a client-side component named identity that ensures the integration between the client RemoteObject credentials and the server-side
container security. It additionally includes an easy-to-use API to define runtime authorization checks on the Flex UI.
The EJB identity component (of class org.granite.tide.ejb.Identity) predictably provides two methods login() and logout() that can be used as
any Tide remote call:
private var tideContext:Context = Ejb.getInstance().getEjbContext();

public function login(username:String, password:String):void {
    tideContext.identity.login(username, password, loginResult, loginFault);
}

private function loginResult(event:TideResultEvent):void {
    Alert.show(event.context.identity.loggedIn);
}

private function loginFault(event:TideFaultEvent):void {
    Alert.show(event.fault);
}

public function logout():void {
    tideContext.identity.logout();
}
Or with dependency injection:
[In]
public var identity:Identity;

public function login(username:String, password:String):void {
    identity.login(username, password, loginResult, loginFault);
}

private function loginResult(event:TideResultEvent):void {
    Alert.show(event.context.identity.loggedIn);
}

private function loginFault(event:TideFaultEvent):void {
    Alert.show(event.fault);
}

public function logout():void {
    identity.logout();
}
The identity component also exposes the bindable property loggedIn that represents the current authentication state. As it is bindable, it can be used
to choose between different views, for example to switch between a login form and the application view with a Flex ViewStack component:
<mx:ViewStack id="main" selectedIndex="{identity.loggedIn ? 1 : 0}">
    <views:LoginView id="loginView"/>
    <views:MainView id="mainView"/>
</mx:ViewStack>
Finally the identity component is integrated with server-side role-based security and can be used to get information or show/hide UI depending on
the user access rights:
<mx:Button id="deleteButton"
    label="Delete"
    enabled="{identity.hasRole('admin')}"
    click="myService.deleteEntity(myEntity)"/>
With this declaration, this button labeled Delete will be enabled only if the user has the role admin. Another possibility is to completely hide the
button with the properties visible and includeInLayout, or any other property relevant for the UI component.
This can also be used as any remote class with result and fault handlers:
public function checkRole(role:String):void {
   identity.hasRole(role, checkRoleResult, checkRoleFault);
}

private function checkRoleResult(event:TideResultEvent, role:String):void {
   if (role == 'admin') {
       if (event.result)
           trace("User has admin role");
       else
           trace("User does not have admin role");
   }
}
You can notice that the result and fault handlers have a second argument so you can use the same handler for many access check calls.
|
Warning
|
|
It is important to note that identity caches the user access rights so only the first call to hasRole() will be remote. If the user rights have changed
on the server, or if you want to enforce security more than once per user session, you can clear the security cache manually with identity.clearSecurityCache(),
for example periodically in a Timer.
Integration with Spring
The is one if not the most popular Java enterprise frameworks. It integrates on a common platform all the necessary services for building enterprise applications: persistence, transactions, security…
GraniteDS provides out-of-the-box integration with Spring 2.5+ and 3.0+ via either the RemoteObject API or the Tide API to remotely call Spring services,
and fully supports serialization of JPA entities from and to your Flex application, taking care of lazily loaded associations.
The support for JPA entity beans is covered in the section JPA and lazy initialization, so this section will only describe how to call
Spring beans from a Flex application. GraniteDS also fully supports Acegi Security / Spring Security 2.x / Spring Security 3.x.
The support for Spring is included in the library granite-spring.jar, so you always have to include this library in either WEB-INF/lib
(or lib for an ear packaging).
Note that to provide a more native experience for Spring developers, the Spring support in GraniteDS can be configured directly in the Spring configuration
files (applicationContext.xml). Most features of GraniteDS can be configured this way, and it is still possible to fall back to the default
GraniteDS configuration files services-config.xml and granite-config.xml for unsupported features.
Spring MVC setup
It is perfectly possible to use the default setup for the GraniteDS servlet in web.xml, but the recommended way when using Spring is to configure a
Spring MVC dispatcher servlet and handle incoming AMF requests. This will in particular allow configuring GraniteDS in the Spring application context.
You also need to setup the Spring request and application listeners but this is standard Spring configuration. Note that this works only for the
remoting servlet, but you still have to configure the Gravity servlet in the default way because the Spring MVC dispatcher servlets cannot support
non blocking I/O.
web.xml<!-- Path to Spring config file -->
<context-param>
<param-name>contextConfigLocation</param-name>
<param-value>
/WEB-INF/conf/application-context.xml
</param-value>
</context-param>
<!-- Spring application listener -->
<listener>
<listener-class>org.springframework.web.context.ContextLoaderListener</listener-class>
</listener>
<!-- Spring listener for web-scopes (request, session) -->
<listener>
<listener-class>org.springframework.web.context.request.RequestContextListener</listener-class>
</listener>
<!-- Spring MVC dispatcher servlet for AMF remoting requests -->
<servlet>
<servlet-name>dispatcher</servlet-name>
<servlet-class>org.springframework.web.servlet.DispatcherServlet</servlet-class>
<load-on-startup>1</load-on-startup>
</servlet>
<servlet-mapping>
<servlet-name>dispatcher</servlet-name>
<url-pattern>/graniteamf/*</url-pattern>
</servlet-mapping>You also have to add an empty file WEB-INF/dispatcher-servlet.xml:
<?xml version="1.0" encoding="UTF-8"?>
<beans
  xmlns="http://www.springframework.org/schema/beans"
  xsi:schemaLocation="
       http://www.springframework.org/schema/beans
           http://www.springframework.org/schema/beans/spring-beans-3.0.xsd>
</beans>
Using the RemoteObject APIUsing the RemoteService API
The Flex-side usage of the RemoteObject API is completely independent of the server technology, so everything described in
the Remoting chapter applies for Spring beans. This section will only describe the particular configuration required in various
use cases of Spring services.
Basic remoting example
All remoting examples from the Remoting chapter apply for Spring beans, here is a basic example with an annotated Spring service:
public interface HelloService {

    public String hello(String name);
}

@Service("helloService")
@RemoteDestination(id="helloService", source="helloService")
public class HelloServiceImpl implement HelloService {

    public String hello(String name) {
        return "Hello " + name;
    }
}
<?xml version="1.0"?>
<mx:Application xmlns:mx="http://www.adobe.com/2006/mxml">
<mx:Script>
import mx.rpc.events.ResultEvent;
import mx.rpc.events.FaultEvent;
import mx.controls.Alert;
public function resultHandler(event:ResultEvent):void {
// Display received message
outputMessage.text = event.result as String;
}
public function faultHandler(event:FaultEvent):void {
// Show error alert
Alert.show(event.fault.faultString);
}
</mx:Script>
<!-- Connect to a service destination.-->
<mx:RemoteObject id="helloService"
destination="helloService"
source="helloService"
result="handleResult(event);"
fault="handleFault(event);"/>
<!-- Provide input data for calling the service. -->
<mx:TextInput id="inputName"/>
<!-- Call the Spring service, use the text in a TextInput control as input data.-->
<mx:Button click="helloService.hello(inputName.text)"/>
<!-- Display results data in the user interface. -->
<mx:Label id="outputMessage"/>
</mx:Application>The main thing to note is the use of the source property in both the RemoteObject definition and in the @RemoteDestination annotation that should
match the name of the Spring bean (here in @Service).
Configuration with a MVC setup
Besides configuring the dispatcher servlet (see here), configuring GraniteDS in the Spring context just requires adding the graniteds
namespace and adding a server-filter element:
<?xml version="1.0" encoding="UTF-8"?>
<beans
    xmlns="http://www.springframework.org/schema/beans"
    xmlns:xsi="http://www.w3.org/2001/XMLSchema-instance"
    xmlns:aop="http://www.springframework.org/schema/aop"
    xmlns:tx="http://www.springframework.org/schema/tx"
    xmlns:context="http://www.springframework.org/schema/context"
    xmlns:graniteds="http://www.graniteds.org/config"
    xsi:schemaLocation="
        http://www.springframework.org/schema/beans http://www.springframework.org/schema/beans/spring-beans-3.0.xsd
        http://www.springframework.org/schema/context http://www.springframework.org/schema/context/spring-context-3.0.xsd
        http://www.springframework.org/schema/tx http://www.springframework.org/schema/tx/spring-tx-3.0.xsd
        http://www.springframework.org/schema/aop http://www.springframework.org/schema/aop/spring-aop-3.0.xsd
        http://www.graniteds.org/config http://www.graniteds.org/public/dtd/3.0.0/granite-config-3.0.xsd">

    ...

    <graniteds:server-filter url-pattern="/*"/>

</beans>
The actual url that will be listened to by the AMF processor is the combination of the url-pattern in the Spring context and the servlet-mapping
of the dispatcher servlet in web.xml. The configuration described here maps GraniteDS on /graniteamf/\* and is suitable in almost all cases.
When necessary, this configuration can be overriden or completed by the default configuration in services-config.xml described in
the next section. In this case, the implicit configuration created by the MVC setup contains the following elements :
-
a remoting service named
granite-service -
a remoting service factory named
spring-factory -
a remoting channel named
graniteamf
The MVC setup automatically enables component scanning, so you can just annotate your Spring services with @RemoteDestination and put an empty
META-INF/services-config.properties file in your services jar or folder to tell GraniteDS where to look for services.
See last paragraph Automatic Configuration of Destinations.
Alternatively you can also declare the remote destinations manually in the Spring context:
<graniteds:remote-destination id="personService" source="personService"/>You can also specify a secure destination by adding the list of roles required to access the destination:
<graniteds:remote-destination id="personService" source="personService">
    <graniteds:roles>
        <graniteds:role>ROLE_ADMIN</graniteds:role>
    </graniteds:roles>
</graniteds:remote-destination>
The support for Spring Security is automatically enabled when Spring Security is installed in the application and the version of Spring Security
is automatically detected. However if you have configured more than one AuthenticationManagers, it will be necessary to instruct GraniteDS which
one should be used for authentication by adding the following line to your Spring configuration :
<graniteds:security-service authentication-manager="myAuthenticationManager"/>With this declaration you can also provide various configuration elements for the Spring 3 security service implementation (have a look at the Spring Security documentation for explanations on these various elements):
<graniteds:security-service
		authentication-manager="myAuthenticationManager"
    	allow-anonymous-access="true"
    	authentication-trust-resolver="com.myapp.MyAuthenticationTrustResolver"
    	session-authentication-strategy="com.myapp.MySessionAuthenticationStrategy"
        security-context-repository="com.myapp.MySecurityContextRepository"
        security-interceptor="com.myapp.MySecurityInterceptor"
        password-encoder="com.myapp.MyPasswordEncoder"
/>
Finally remember that as there is no services-config.xml, you will have to manually initialize the endpoints for your client RemoteObjects
(also see here) :
srv.destination = "personService";
srv.source = "personService";
srv.channelSet = new ChannelSet();
srv.channelSet.addChannel(new AMFChannel("graniteamf",
    "http://{server.name}:{server.port}/{context.root}/graniteamf/amf"));
Default configuration
Configuring remoting for Spring services simply requires using the org.granite.spring.SpringServiceFactory service factory in services-config.xml:
<?xml version="1.0" encoding="UTF-8"?>

<services-config>
    <services>
        <service
            id="granite-service"
            class="flex.messaging.services.RemotingService"
            messageTypes="flex.messaging.messages.RemotingMessage">
            <destination id="testBean">
                <channels>
                    <channel ref="graniteamf"/>
                </channels>
                <properties>
                    <factory>springFactory</factory>
                    <source>springBean</source>
                </properties>
                <security>
                    <security-constraint>
                        <auth-method>Custom</auth-method>
                        <roles>
                            <role>ROLE_USER</role>
                            <role>ROLE_ADMIN</role>
                        </roles>
                    </security-constraint>
                </security>
            </destination>
        </service>
    </services>

    <factories>
        <factory id="springFactory" class="org.granite.spring.SpringServiceFactory" />
    </factories>

    <channels>
        <channel-definition id="graniteamf" class="mx.messaging.channels.AMFChannel">
            <endpoint
                uri="http://{server.name}:{server.port}/{context.root}/graniteamf/amf"
                class="flex.messaging.endpoints.AMFEndpoint"/>
        </channel-definition>
    </channels>

</services-config>
The only thing that should be noted for Spring destinations is that you have to specify a source property specifying the name of the remote Spring bean.
Automatic configuration of destinations
It is possible to instruct GraniteDS to automatically search for Spring destinations in the classpath by:
-
Enabling scanning in
granite-config.xml(scanning is always enabled with a MVC setup).<granite-config scan="true"/> -
Adding an empty
META-INF/services-config.propertiesmarker file in all jars containing Spring services -
Annotating the Spring service (or preferably its interface) with
org.granite.messaging.service.annotations.RemoteDestination@RemoteDestination(id="personService", source="personService", securityRoles={"user","admin"}) public interface PersonService { } @Service("personService") public class PersonServiceBean implements PersonService { ... }
The annotation supports the following attributes:
-
idis mandatory and is the name of the destination as used from Flex -
sourceis mandatory and should be the name of the Spring bean -
serviceis optional when there is only one service forRemotingMessagedefined inservices-config.xml. Otherwise this should be the name of the service. -
channelis optional if there is only one channel defined inservices-config.xml. Otherwise this should be the id of the target channel. -
channelsmay be used instead ofchannelto define a failover channel. -
factoryis optional if there is only one factory inservices-config.xml. Otherwise this should be the factory id. -
securityRolesis an array of role names for securing the destination.
Using scanning allows simplifying your services-config.xml file, however it is recommended to use the MVC setup, so you don’t even need one !
Integration with Spring Security
When not using the Spring MVC setup, you have to manually configure the integration of Spring Security in granite-config.xml.
Depending on the version of Spring Security you are using, you can use one of the 3 available security services:
<granite-config>
   ...
   <!--
    ! Use Spring based security service.
    !-->
    <security type="org.granite.spring.security.SpringSecurity3Service"/>

</granite-config><granite-config>
...
<!--
! Use Spring based security service.
!-->
<security type="org.granite.messaging.service.security.SpringSecurityService"/>
</granite-config><granite-config>
...
<!--
! Use Spring based security service.
!-->
<security type="org.granite.messaging.service.security.AcegiSecurityService"/>
</granite-config>You may then secure your GraniteDS destinations as shown earlier. Please refer to or documentation for specific configuration details.
Note however that there are two main ways of securing the GraniteDS AMF endpoint:
-
Apply the Spring Security Web filter on the dispatcher servlet. This is the most secure and can be necessary if you share the same web application between a rich client and an HTML client or if you want to use a HTML login form to protect access to the swf resource, but note that as the request credentials are encoded in the AMF request and decoded by the servlet, the request will have to be authenticated as anonymous between the Spring Security filter and the AMF service processor. That means that you have to enable the anonymous support in Spring Security, and that other Web filters will not have access to the authenticated user.
-
Let GraniteDS handle security and simply configure a secure remoting destination. This is the recommended way if your application only has a rich client.
Using the Tide API
Most of what is described in the Tide Remoting section applies for Spring, however GraniteDS also provides an improved integration with Spring services.
Configuration with a MVC setup
This is by far the easiest way to use Tide with Spring, it just consists in declaring the GraniteDS flex filter in the Spring context:
<?xml version="1.0" encoding="UTF-8"?>
<beans
    xmlns="http://www.springframework.org/schema/beans"
    xmlns:xsi="http://www.w3.org/2001/XMLSchema-instance"
    xmlns:aop="http://www.springframework.org/schema/aop"
    xmlns:tx="http://www.springframework.org/schema/tx"
    xmlns:context="http://www.springframework.org/schema/context"
    xmlns:graniteds="http://www.graniteds.org/config"
    xsi:schemaLocation="
        http://www.springframework.org/schema/beans http://www.springframework.org/schema/beans/spring-beans-3.0.xsd
        http://www.springframework.org/schema/context http://www.springframework.org/schema/context/spring-context-3.0.xsd
        http://www.springframework.org/schema/tx http://www.springframework.org/schema/tx/spring-tx-3.0.xsd
        http://www.springframework.org/schema/aop http://www.springframework.org/schema/aop/spring-aop-3.0.xsd
        http://www.graniteds.org/config http://www.graniteds.org/public/dtd/3.0.0/granite-config-3.0.xsd">

        ...

    <graniteds:server-filter url-pattern="/*" tide="true"/>
</beans>
The server-filter declaration will setup an AMF processor for the specified url pattern, and the tide attribute specifies that you want a
Tide-enabled service factory. Note that the actual url that will be listened to by GraniteDS is the combination of this url-pattern
with the servlet-mapping defined in web.xml for the dispatcher servlet.
Other configurations can be done with server-filter:
-
tide-annotationsis equivalent totide-component annotated-with=""ingranite-config.xml. It allows to define the list of annotation names that enable remote access to Spring beans.@RemoteDestinationis always declared by default, but you can use any other one if you don’t want a compilation dependency on the GraniteDS libraries. -
tide-rolesallows to define a list of security roles that are required to access the Tide remote destination. In general it is not necessary to define this destination-wide security and only rely on Spring security for fine-grained access to individual beans. -
security-serviceallows to specify the security service implementation. -
exception-convertersallows to define a list of server-side exception converters. It’s the equivalent toexception-convertersingranite-config.xml. -
amf3-message-interceptorallows to define a message interceptor that will be called before and after the processing of each incoming message. You have to define the bean name of an existing bean implementingAMFMessageInterceptor.
Additional elements can also be configured in the Spring beans file:
-
tide-identityallows to declare the identity bean. When using Spring Security ACL you can define here the necessary attributesacl-service,sid-retrieval-strategyandobject-identity-retrieval-strategy. -
tide-persistenceallows to declare the persistence implementation for your application. It is not necessary when you have only one SpringtransactionManager, otherwise just specify the name of the transaction manager to use. Tide/Spring will automatically determine the type of transaction management it should use (JTA, JPA or Hibernate API).
Note that in addition to these manual elements, any Spring bean implementing one of the GraniteDS interfaces SecurityService, ExceptionConverter,
AMFMessageInterceptor or TidePersistenceManager will be automatically picked up and registered in the GraniteDS configuration.
Default configuration
If you don’t use the MVC setup, you will have to use the standard GraniteDS configuration files instead of the Spring context, and setup these elements manually. You can safely skip this section if you chose the recommended MVC setup.
-
You can define in the
tide-annotationssection ofgranite-config.xmlthe conditions used to enable remote access to Spring destinations (for example all beans annotated with a particular annotation). -
You have to configure the specific Tide/Spring
org.granite.tide.spring.SpringServiceFactoryservice factory inservices-config.xml. -
You have to configure a unique Tide/Spring destination named
serverinservices-config.xml -
You have to retrieve the Tide context in Flex with
Spring.getInstance().getSpringContext()instead ofTide.getInstance().getContext(). -
You must use the destination named
serverwhen creating theServerSession.
Here is a default configuration suitable for most cases:
<granite-config scan="true">
    ...

    <tide-components>
        <tide-component annotated-with="org.granite.messaging.service.annotations.RemoteDestination"/>
    </tide-components>

</granite-config>
<services-config>
<services>
<service id="granite-service"
class="flex.messaging.services.RemotingService"
messageTypes="flex.messaging.messages.RemotingMessage">
<!--
! Use "tideSpringFactory" and "graniteamf" for "server" destination (see below).
! The destination must be "server" when using Tide with default configuration.
!-->
<destination id="server">
<channels>
<channel ref="graniteamf"/>
</channels>
<properties>
<factory>tideSpringFactory</factory>
</properties>
</destination>
</service>
</services>
<!--
! Declare tideSpringFactory service factory.
!-->
<factories>
<factory id="tideSpringFactory" class="org.granite.tide.spring.SpringServiceFactory"/>
</factories>
<!--
! Declare graniteamf channel.
!-->
<channels>
<channel-definition id="graniteamf" class="mx.messaging.channels.AMFChannel">
<endpoint
uri="http://{server.name}:{server.port}/{context.root}/graniteamf/amf"
class="flex.messaging.endpoints.AMFEndpoint"/>
</channel-definition>
</channels>
</services-config>The destination named server will be the one and only destination required for all Spring remoting destinations.
You should also define the correct Spring security service in granite-config.xml, see here for details.
You can use the property entity-manager-factory-bean-name to specify an EntityManagerFactory bean that will be used for transparent remote
lazy loading of collections.
Here is an example with a Spring JPA/Hibernate configuration:
<persistence-unit name="spring-pu">
    ...
</persistence-unit>
<bean id="dataSource" class="org.springframework.jdbc.datasource.DriverManagerDataSource">
<property name="driverClassName">
<value>org.hsqldb.jdbcDriver</value>
</property>
<property name="url">
<value>jdbc:hsqldb:mem:springds</value>
</property>
<property name="username">
<value>sa</value>
</property>
<property name="password">
<value></value>
</property>
</bean>
<bean id="entityManagerFactory"
class="org.springframework.orm.jpa.LocalContainerEntityManagerFactoryBean">
<property name="dataSource" ref="dataSource" />
<property name="persistenceUnitName" value="spring-pu" />
<property name="jpaVendorAdapter">
<bean
class="org.springframework.orm.jpa.vendor.HibernateJpaVendorAdapter">
<property name="showSql" value="false" />
<property name="generateDdl" value="true" />
<property name="databasePlatform" value="org.hibernate.dialect.HSQLDialect" />
</bean>
</property>
</bean>
<bean id="transactionManager" class="org.springframework.orm.jpa.JpaTransactionManager">
<property name="entityManagerFactory" ref="entityManagerFactory" />
<property name="dataSource" ref="dataSource" />
</bean>If you use a plain Hibernate session instead of JPA, you cannot use entity-manager-factory-bean-name, you have to configure a specific Tide
persistence manager in the Spring context (assuming the bean name of the Hibernate session factory is sessionFactory):
<!-- All this AOP stuff is to ensure the Tide persistence manager will be transactional -->
  <aop:config>
    <aop:pointcut id="tidePersistenceManagerMethods"
        expression="execution(* org.granite.tide.ITidePersistenceManager.*(..))"/>
    <aop:advisor advice-ref="tidePersistenceManagerMethodsTxAdvice"
        pointcut-ref="tidePersistenceManagerMethods"/>
  </aop:config>

  <tx:advice id="tidePersistenceManagerMethodsTxAdvice"
    transaction-manager="transactionManager">
    <tx:attributes>
      <tx:method name="*" propagation="REQUIRED" read-only="true"/>
    </tx:attributes>
  </tx:advice>

  <bean id="tidePersistenceManager"
    class="org.granite.tide.hibernate.HibernateSessionManager" scope="request">
    <constructor-arg>
      <ref bean="sessionFactory"/>
    </constructor-arg>
  </bean>
Basic remoting with dependency injection
When using Spring, the only difference on the client is that you have to use the Spring singleton. Here is a simple example of remoting with an injected
client proxy for a Spring service:
<?xml version="1.0"?>
<mx:Application xmlns:mx="http://www.adobe.com/2006/mxml"
    creationComplete="Spring.getInstance().initApplication()">
    <mx:Script>
        import org.granite.tide.spring.Spring;
        import org.granite.tide.events.TideResultEvent;
        import org.granite.tide.events.TideFaultEvent;

        [In]
        public var helloService:Component;

        private function hello(name:String):void {
            helloService.hello(name, resultHandler, faultHandler);
        }

        private function resultHandler(event:TideResultEvent):void {
            outputMessage.text = event.result as String;
        }

        private function faultHandler(event:TideFaultEvent):void {
            // Handle fault
        }
    </mx:Script>

    <!-- Provide input data for calling the service. -->
    <mx:TextInput id="inputName"/>

    <!-- Call the web service, use the text in a TextInput control as input data.-->
    <mx:Button click="hello(inputName.text)"/>

    <!-- Result message. -->
    <mx:Label id="outputMessage"/>
</mx:Application>
This is almost identical to the standard Tide API described in the Tide remoting section, and all other methods apply for Spring.
Typesafe remoting with dependency injection
You can benefit from the capability of the Gas3 code generator (see here) to generate a strongly typed ActionScript 3 client proxy
from the Spring interface when it is annotated with @RemoteDestination. In this case, you can inject a typesafe reference to your service and get
better compile time error checking and auto completion in your IDE:
<?xml version="1.0"?>
<mx:Application xmlns:mx="http://www.adobe.com/2006/mxml"
    creationComplete="Spring.getInstance().initApplication()">
    <mx:Script>
        import org.granite.tide.spring.Spring;
        import org.granite.tide.events.TideResultEvent;
        import org.granite.tide.events.TideFaultEvent;
        import com.myapp.service.HelloService;

        [In]
        public var helloService:HelloService;

        private function hello(name:String):void {
            helloService.hello(name, resultHandler, faultHandler);
        }
        ...
    </mx:Script>

    ...
</mx:Application>
It is possible to benefit from even more type safety by using the annotation [Inject] instead of [In]. When using this annotation, the full class name
is used to find the target bean in the Spring context instead of the bean name.
<?xml version="1.0"?>
<mx:Application xmlns:mx="http://www.adobe.com/2006/mxml"
    creationComplete="Spring.getInstance().initApplication()">
    <mx:Script>
        import org.granite.tide.spring.Spring;
        import org.granite.tide.events.TideResultEvent;
        import org.granite.tide.events.TideFaultEvent;
        import com.myapp.service.HelloService;

        [Inject]
        public var myService:HelloService;

        private function hello(name:String):void {
            myService.hello(name, resultHandler, faultHandler);
        }
        ...
    </mx:Script>

    ...
</mx:Application>
Integration with Spring Security
GraniteDS provides a client-side component named identity that ensures the integration between the client Channel credentials and the server-side
container security. It additionally includes an easy-to-use API to define runtime authorization checks on the UI.
Enabling support for the client identity component requires to configure the corresponding server-side component in the Spring context:
<graniteds:tide-identity/>If you want to integrate with Spring Security ACL authorizations, you will have to specify the name of the ACL service and optionally the Object ID retrieval strategy and SID retrieval strategy (see details on Spring Security ACL ):
<graniteds:tide-identity acl-service="myAclService"
     object-identity-retrieval-strategy="myObjectIdentityRetrievalStrategory"
     sid-retrieval-strategy="mySIDRetrievalStrategy"/>
The Flex identity component for Spring (of class org.granite.tide.spring.Identity) predictably provides two methods login() and logout()
that can be used as any Tide remote call:
private var tideContext:Context = Spring.getInstance().getSpringContext();

public function login(username:String, password:String):void {
    tideContext.identity.login(username, password, loginResult, loginFault);
}

private function loginResult(event:TideResultEvent):void {
    Alert.show(event.context.identity.loggedIn);
}

private function loginFault(event:TideFaultEvent):void {
    Alert.show(event.fault);
}

public function logout():void {
    tideContext.identity.logout();
}
Or with dependency injection:
[Inject]
public var identity:Identity;

public function login(username:String, password:String):void {
    identity.login(username, password, loginResult, loginFault);
}

private function loginResult(event:TideResultEvent):void {
    Alert.show(event.context.identity.loggedIn);
}

private function loginFault(event:TideFaultEvent):void {
    Alert.show(event.fault);
}

public function logout():void {
    identity.logout();
}
The identity component also exposes the bindable property loggedIn that represents the current authentication state. As it is bindable, it can be
used to choose between different views, for example to switch between a login form and the application view with a Flex ViewStack component:
<mx:ViewStack id="main" selectedIndex="{identity.loggedIn ? 1 : 0}">
    <views:LoginView id="loginView"/>
    <views:MainView id="mainView"/>
</mx:ViewStack>
Finally the identity component is integrated with server-side role-based security and can be used to get information or show/hide UI depending on the
user access rights. It provides methods similar to the Spring Security jsp tags sec:ifAllGranted, sec:ifAnyGranted, sec:ifNotGranted and sec:hasPermission.
<mx:Button id="deleteCategoryButton"
    label="Delete Category"
    enabled="{identity.ifAllGranted('ROLE_ADMIN')}"
    click="productService.deleteCategory(category)"/>

<mx:Button id="deleteProductButton" label="Delete Product"
    enabled="{productGrid.selectedItem}"
    visible="{identity.hasPermission(productGrid.selectedItem, '8,16')}"
    click="productService.deleteProduct(productGrid.selectedItem)"/>
With these declaration, the button labeled Delete Category will be enabled only if the user has the role ROLE_ADMIN and the button Delete Product
only if the user has the ACL permissions DELETE (code 8) or ADMINISTER (code 16) for the selected product.
Another possibility is to completely hide the button with the properties visible and includeInLayout, or any other property relevant for the display
of the UI component.
The three methods are:
-
ifAllGranted/ifAnyGranted: the user should have the specified role -
ifNotGranted: the user should not have the specified role -
hasPermission: the user should have the specified permission for the specified entity
This can also be used as any remote class with result and fault handlers:
 public function checkRole(role:String):void {
    identity.ifAllGranted(role, checkRoleResult, checkRoleFault);
 }

 private function checkRoleResult(event:TideResultEvent, role:String):void {
    if (role == 'ROLE_ADMIN') {
        if (event.result)
            trace("User has admin role");
        else
            trace("User does not have admin role");
    }
 }
You can notice that the result and fault handlers have a second argument so you can use the same handler for many access check calls.
|
Warning
|
|
It is important to note that identity caches the user access rights so only the first call to ifAllGranted() will be remote. If the user rights
have changed on the server, or if you want to enforce security more than once per user session, you can clear the security cache manually with
identity.clearSecurityCache(), for example periodically with a Timer.
Messaging with Spring (Gravity)
It is possible to configure the three kinds of Gravity topics directly in the Spring context instead of services-config.xml:
<graniteds:messaging-destination id="myTopic"/>This declaration supports the properties no-local and session-selector (see the Messaging Configuration section).
You can also define a secure destination by specifying a list of roles required to access the topic:
<graniteds:messaging-destination id="myTopic">
    <graniteds:roles>
        <graniteds:role>ROLE_ADMIN</graniteds:role>
    </graniteds:roles>
<graniteds:messaging-destination/><graniteds:jms-messaging-destination id="myTopic"
connection-factory="ConnectionFactory"
destination-jndi-name="topic/MyTopic"
transacted-sessions="true"
acknowledge-mode="AUTO_ACKNOWLEDGE"/>This declaration supports all properties of the default JMS declaration in services-config.xml except for non local initial context environments
(see the JMS Integration section).
<graniteds:activemq-messaging-destination id="myTopic"
    connection-factory="ConnectionFactory"
    destination-jndi-name="topic/MyTopic"
    transacted-sessions="true"
    acknowledge-mode="AUTO_ACKNOWLEDGE"
    broker-url="vm://localhost"
    create-broker="true"
    wait-for-start="true"
    durable="true"
    file-store-root="/opt/activemq/data"/>
This declaration supports all properties of the default ActiveMQ declaration in services-config.xml except for non local initial context environments
(see the ActiveMQ Integration section).
Finally note that the Gravity singleton that is needed to push messages from the server (see here) is available as a bean
in the Spring context and can be autowired by type with @Inject or @Autowired :
@Inject
private Gravity gravity;
Integration with Seam 2.2
The is a powerful Java enterprise framework. It integrates on a common platform all the necessary services for building enterprise applications: persistence, transactions, security…
GraniteDS provides out-of-the-box integration with Seam 2.2 via either the RemoteObject API or the Tide API to remotely call Seam components, and fully supports
serialization of JPA entities from and to your Flex application, taking care of lazily loaded associations. The support for JPA entity beans is covered in
the section JPA and lazy initialization, so this section will only describe how to call Seam components from a Flex application.
GraniteDS also fully supports Seam Security for authentication and authorization.
The support for JBoss Seam 2.2 is included in the library granite-seam21.jar, so you always have to include this library in either WEB-INF/lib or lib
for an ear packaging. As you have maybe noticed in the name of the jar, it can be used with any version of Seam since 2.1 but it is recommended to use
Seam 2.2+ with Flex and GraniteDS.
Note that to provide a more native experience for Seam developers, the Seam support in GraniteDS can be configured directly in the Seam configuration files
(components.xml). Most features of GraniteDS can be configured this way, and it is still possible to fall back to the default GraniteDS configuration
files services-config.xml and granite-config.xml for unsupported features.
Seam 2 Native Setup
It is perfectly possible to use the default setup for GraniteDS servlet in web.xml, but the recommended way when using Seam is to use the Seam filter to
handle incoming AMF requests. This will in particular allow configuring GraniteDS in the Seam configuration.
Note that this works only for the remoting servlet, but you still have to configure the Gravity servlet in the default way because the Seam filter does
support non blocking I/O.
<web-app version="2.5" ...>
    ...
    <!-- Seam global listener -->
    <listener>
        <listener-class>org.jboss.seam.servlet.SeamListener</listener-class>
    </listener>

    <!-- Seam Web filter -->
    <filter>
        <filter-name>SeamFilter</filter-name>
        <filter-class>org.jboss.seam.servlet.SeamFilter</filter-class>
    </filter>
    <filter-mapping>
        <filter-name>SeamFilter</filter-name>
        <url-pattern>/*</url-pattern>
    </filter-mapping>
    ...
</web-app>
You also have to add an empty file WEB-INF/seam.properties.
|
Warning
|
You must not use the standard |
Using the RemoteObject API
The Flex-side usage of the RemoteObject API is completely independent of the server technology, so everything described in the Remoting
chapter applies for Seam components. This section will only describe the particular configuration required in various use cases of Seam components.
Basic Remoting Example
All remoting examples from the <<remoting.remoteobject,Remoting>> chapter apply for Seam components, here is a basic example:
@Name("helloService")
@RemoteDestination(id="helloService")
public class HelloService {

    public String hello(String name) {
        return "Hello " + name;
    }
}
<?xml version="1.0"?>
<mx:Application xmlns:mx="http://www.adobe.com/2006/mxml">
<mx:Script>
import mx.rpc.events.ResultEvent;
import mx.rpc.events.FaultEvent;
import mx.controls.Alert;
public function resultHandler(event:ResultEvent):void {
// Display received message
outputMessage.text = event.result as String;
}
public function faultHandler(event:FaultEvent):void {
// Show error alert
Alert.show(event.fault.faultString);
}
</mx:Script>
<!-- Connect to a service destination.-->
<mx:RemoteObject id="helloService"
destination="helloService"
source="helloService"
result="handleResult(event);"
fault="handleFault(event);"/>
<!-- Provide input data for calling the service. -->
<mx:TextInput id="inputName"/>
<!-- Call the Seam component, use the text in a TextInput control as input data.-->
<mx:Button click="helloService.hello(inputName.text)"/>
<!-- Display results data in the user interface. -->
<mx:Label id="outputMessage"/>
</mx:Application>The main thing to note is the use of the source property in both the RemoteObject definition and in the @RemoteDestination annotation that should
match the name of the Seam component.
RemoteObject with Seam Conversations
One of the interesting features of Seam is that its support for conversations that are a kind of temporary session. GraniteDS can be integrated with Seam
conversations by using the client component SeamRemoteObject instead of a simple RemoteObject. SeamRemoteObject can also be maintain a taskId
when using the Seam integration with jBPM.
public dynamic class SeamRemoteObject extends SecureRemoteObject {
    ...
    public function get conversation():Conversation {...}
    public function set conversation(conversation:Conversation):void {...}

    public function get task():Task {...}
    public function set task(task:Task):void {...}
    ...
}
Basically, Conversation and Task only encapsulate an id. Since SeamRemoteObject extends SecureRemoteObject, you may use all security
features as explained here.
It’s also necessary to use the specific SeamOperation class with SeamRemoteObject to ensure proper serialization of the parameters:
...
import org.granite.seam.SeamRemoteObject;
import org.granite.seam.SeamOperation;
...
srv = new SeamRemoteObject("myDestination");
var operation:SeamOperation = new SeamOperation();
operation.name = "myMethod";
operation.addEventListener(ResultEvent.RESULT, onMyMethodResult);
srv.operations = {myMethod: operation};
...
Configuration with the Seam XML
Besides configuring the Seam filter (see here), configuring GraniteDS in the Seam configuration just requires adding the
graniteds namespace and adding a server-filter element:
<components xmlns="http://jboss.com/products/seam/components"
	xmlns:core="http://jboss.com/products/seam/core"
	xmlns:security="http://jboss.com/products/seam/security"
	xmlns:transaction="http://jboss.com/products/seam/transaction"
	xmlns:persistence="http://jboss.com/products/seam/persistence"
	xmlns:framework="http://jboss.com/products/seam/framework"
	xmlns:bpm="http://jboss.com/products/seam/bpm"
	xmlns:jms="http://jboss.com/products/seam/jms"
	xmlns:web="http://jboss.com/products/seam/web"
	xmlns:graniteds="http://www.graniteds.org/config"
	xmlns:xsi="http://www.w3.org/2001/XMLSchema-instance"
	xsi:schemaLocation=
	    "http://jboss.com/products/seam/core http://jboss.com/products/seam/core-2.0.xsd
	     http://jboss.com/products/seam/transaction http://jboss.com/products/seam/transaction-2.0.xsd
	     http://jboss.com/products/seam/persistence http://jboss.com/products/seam/persistence-2.0.xsd
	     http://jboss.com/products/seam/web http://jboss.com/products/seam/web-2.0.xsd
	     http://jboss.com/products/seam/jms http://jboss.com/products/seam/jms-2.0.xsd
	     http://jboss.com/products/seam/security http://jboss.com/products/seam/security-2.0.xsd
	     http://jboss.com/products/seam/bpm http://jboss.com/products/seam/bpm-2.0.xsd
	     http://jboss.com/products/seam/components http://jboss.com/products/seam/components-2.0.xsd
	     http://jboss.com/products/seam/framework http://jboss.com/products/seam/framework-2.0.xsd
	     http://www.graniteds.org/config http://www.graniteds.org/public/dtd/3.0.0/granite-config-3.0.xsd">

	...

    <graniteds:server-filter url-pattern="/graniteamf/*"/>

</components>
The url-pattern should be contained within the url mapping of the Seam filter as defined in web.xml. The configuration described here maps
GraniteDS on /graniteamf/\* and is suitable in almost all cases.
When necessary, this configuration can be overriden or completed by the default configuration in services-config.xml described in the
next section. In this case, the implicit configuration created by the native setup contains the following elements :
-
a remoting service named
granite-service -
a remoting service factory named
seam-factory -
a remoting channel named
graniteamfThe native setup automatically enables component scanning, so you can just annotate your Seam components with@RemoteDestinationand put an emptyMETA-INF/services-config.propertiesfile in your services jar or folder to tell GraniteDS where to look for services. See last paragraph Automatic Configuration of Destinations.
Alternatively you can also declare the remote destinations manually in the Seam configuration:
<graniteds:remote-destination id="personService" source="personService"/>You can also specify a secure destination by adding the list of roles required to access the destination:
<graniteds:remote-destination id="personService" source="personService">
    <graniteds:roles>
        <graniteds:role>admin</graniteds:role>
    </graniteds:roles>
</graniteds:remote-destination>
Finally remember that as there is no services-config.xml, you will have to manually initialize the endpoints for your client RemoteObjects
(also see here) :
srv.destination = "personService";
srv.source = "personService";
srv.channelSet = new ChannelSet();
srv.channelSet.addChannel(new AMFChannel("graniteamf",
    "http://{server.name}:{server.port}/{context.root}/graniteamf/amf"));
Default Configuration
Configuring remoting for Seam components simply requires using the org.granite.seam.SeamServiceFactory service factory in services-config.xml:
<?xml version="1.0" encoding="UTF-8"?>

<services-config>
    <services>
        <service
            id="granite-service"
            class="flex.messaging.services.RemotingService"
            messageTypes="flex.messaging.messages.RemotingMessage">
            <destination id="testComponent">
                <channels>
                    <channel ref="graniteamf"/>
                </channels>
                <properties>
                    <factory>seamFactory</factory>
                    <source>seamComponent</source>
                </properties>
                <security>
                    <security-constraint>
                        <auth-method>Custom</auth-method>
                        <roles>
                            <role>ROLE_USER</role>
                            <role>ROLE_ADMIN</role>
                        </roles>
                    </security-constraint>
                </security>
            </destination>
        </service>
    </services>

    <factories>
        <factory id="seamFactory" class="org.granite.seam.SeamServiceFactory" />
    </factories>

    <channels>
        <channel-definition id="graniteamf" class="mx.messaging.channels.AMFChannel">
            <endpoint
                uri="http://{server.name}:{server.port}/{context.root}/graniteamf/amf"
                class="flex.messaging.endpoints.AMFEndpoint"/>
        </channel-definition>
    </channels>

</services-config>
The only thing that should be noted for Seam destinations is that you have to specify a source property specifying the name of the remote Seam component.
Automatic Configuration of Destinations
It is possible to instruct GraniteDS to automatically search for Seam destinations in the classpath by:
-
Enabling scanning in
granite-config.xml(scanning is always enabled with a native setup).<granite-config scan="true"/> -
Adding an empty
META-INF/services-config.propertiesmarker file in all jars containing Seam destinations -
Annotating the Seam component or its interface with
org.granite.messaging.service.annotations.RemoteDestination
@Name("personService")
@RemoteDestination(id="person", source="personService", securityRoles={"user","admin"})
public class PersonAction {
  ...
}
The annotation supports the following attributes:
-
idis mandatory and is the name of the destination as used from Flex -
sourceis mandatory and should be the name of the Seam component -
serviceis optional when there is only one service forRemotingMessagedefined inservices-config.xml. Otherwise this should be the name of the service. -
channelis optional if there is only one channel defined inservices-config.xml. Otherwise this should be the id of the target channel. -
channelsmay be used instead ofchannelto define a failover channel. -
factoryis optional if there is only one factory inservices-config.xml. Otherwise this should be the factory id. -
securityRolesis an array of role names for securing the destination.
Using scanning allows to simplify your services-config.xml file, however it is recommended to use the native setup, so you don’t even need one !
Integration with Seam Security
When not using the Seam native setup, you have to manually configure the integration of Seam Security in +granite-config.xml+.
<granite-config>
   ...
   <!--
    ! Use Seam 2.1+ based security service.
    !-->
    <security type="org.granite.seam21.security.Seam21SecurityService"/>

</granite-config>
You may then secure your Flex destinations as shown earlier. Please refer to documentation for specific configuration details.
Using the Tide API
Most of what is described in the Tide Remoting section applies for Seam 2.x, however GraniteDS also provides a much improved integration with the Seam framework when using the Tide client API.
Configuration with a Native Setup
This is by far the easiest way to use Tide with Seam, it just consists in declaring the GraniteDS server filter in the Seam configuration:
<?xml version="1.0" encoding="UTF-8"?>
<components xmlns="http://jboss.com/products/seam/components"
            xmlns:core="http://jboss.com/products/seam/core"
            xmlns:security="http://jboss.com/products/seam/security"
            xmlns:transaction="http://jboss.com/products/seam/transaction"
            xmlns:xsi="http://www.w3.org/2001/XMLSchema-instance"
            xmlns:graniteds="http://www.graniteds.org/config"
            xsi:schemaLocation=
                "http://jboss.com/products/seam/core
                     http://jboss.com/products/seam/core-2.1.xsd
                 http://jboss.com/products/seam/transaction
                     http://jboss.com/products/seam/transaction-2.1.xsd
                 http://jboss.com/products/seam/security
                     http://jboss.com/products/seam/security-2.1.xsd
                 http://jboss.com/products/seam/components
                     http://jboss.com/products/seam/components-2.1.xsd
                 http://www.graniteds.org/config
                     http://www.graniteds.org/public/dtd/3.0.0/granite-config-3.0.xsd">

    <core:init .../>

    ...

    <graniteds:server-filter url-pattern="/graniteamf/*" tide="true"/>
</components>
The server-filter declaration will setup an AMF processor for the specified url pattern, and the tide attribute specifies that you want a
Tide-enabled service factory. Note that you have to ensure that the url pattern defined here is mapped to the Seam filter define in web.xml.
Other configurations can be done within server-filter:
-
tide-annotationsis equivalent totide-component annotated-with=""ingranite-config.xml. It allows to define the list of annotation names that enable remote access to Seam components.@RemoteDestinationand@TideEnabledare always declared by default, but you can use any other one if you don’t want a compilation dependency on the GraniteDS libraries. -
tide-rolesallows to define a list of security roles that are required to access the Tide remote destination. In general it is not necessary to define this destination-wide security and you can only rely on Seam security for fine-grained access to individual components. -
exception-convertersallows to define a list of server-side exception converters. It’s the equivalent toexception-convertersingranite-config.xml. -
amf3-message-interceptorallows to define a message interceptor. You have to define an EL expression referencing an existing component implementingAMFMessageInterceptor. It’s highly recommended to subclassSeam21Interceptorand callsuper.beforeandsuper.afterin your implementation.
Default Configuration
If you don’t use the native setup, you will have to use the standard GraniteDS configuration files instead of the Seam configuration, and setup these elements manually. You can safely skip this section if you choose the native setup.
-
You can define in the
tide-annotationssection ofgranite-config.xmlthe conditions used to enable remote access to Seam destinations (for example all components annotated with a particular annotation). -
You have to configure the specific Tide/Seam
org.granite.tide.seam.SeamServiceFactoryservice factory inservices-config.xml. -
You have to configure a unique Tide/Seam destination named
seaminservices-config.xml -
You have to retrieve the Tide context in Flex with
Seam.getInstance().getSeamContext()instead ofTide.getInstance().getContext().
Here is a default configuration suitable for most cases:
<granite-config scan="true">
    ...

    <tide-components>
        <tide-component annotated-with="org.granite.messaging.service.annotations.RemoteDestination"/>
        <tide-component annotated-with="org.granite.tide.annotations.TideEnabled"/>
    </tide-components>

</granite-config>
<services-config>
<services>
<service id="granite-service"
class="flex.messaging.services.RemotingService"
messageTypes="flex.messaging.messages.RemotingMessage">
<!--
! Use "tideSeamFactory" and "graniteamf" for "server" destination (see below).
! The destination must be "server" when using Tide with default configuration.
!-->
<destination id="server">
<channels>
<channel ref="graniteamf"/>
</channels>
<properties>
<factory>tideSeamFactory</factory>
</properties>
</destination>
</service>
</services>
<!--
! Declare tideSeamFactory service factory.
!-->
<factories>
<factory id="tideSeamFactory" class="org.granite.tide.seam.SeamServiceFactory"/>
</factories>
<!--
! Declare graniteamf channel.
!-->
<channels>
<channel-definition id="graniteamf" class="mx.messaging.channels.AMFChannel">
<endpoint
uri="http://{server.name}:{server.port}/{context.root}/graniteamf/amf"
class="flex.messaging.endpoints.AMFEndpoint"/>
</channel-definition>
</channels>
</services-config>The destination named server will be the one and only destination required for all Seam destinations.
You should also define the correct Seam security service in granite-config.xml, see here for details.
Basic Remoting with Dependency Injection
When using Seam, the only difference on the client is that you have to use the Seam singleton. Here is a simple example of remoting with an injected
client proxy for an Seam component:
<?xml version="1.0"?>
<mx:Application xmlns:mx="http://www.adobe.com/2006/mxml"
    creationComplete="Seam.getInstance().initApplication()">
    <mx:Script>
        import org.granite.tide.seam.Seam;
        import org.granite.tide.events.TideResultEvent;
        import org.granite.tide.events.TideFaultEvent;

        [In]
        public var helloService:Component;

        private function hello(name:String):void {
            helloService.hello(name, resultHandler, faultHandler);
        }

        private function resultHandler(event:TideResultEvent):void {
            outputMessage.text = event.result as String;
        }

        private function faultHandler(event:TideFaultEvent):void {
            // Handle fault
        }
    </mx:Script>

    <!-- Provide input data for calling the service. -->
    <mx:TextInput id="inputName"/>

    <!-- Call the web service, use the text in a TextInput control as input data.-->
    <mx:Button click="hello(inputName.text)"/>

    <!-- Result message. -->
    <mx:Label id="outputMessage"/>
</mx:Application>
This is almost identical to the standard Tide API described in the <<remoting.tideremoting,Tide remoting>> section, and all other methods apply for Seam.
Using Context Variables
Seam components are usually stateful and get their data by injection from context variables instead of arguments of method invocations. The Context object
replicates provides a means of invoking remote components and also serves as a container for variables that will be serialized and sent to the server.
<fwk:entity-query name="contacts" results="5">
  <fwk:ejbql>from Contact</fwk:ejbql>
  <fwk:order>lastName</fwk:order>
  <fwk:restrictions>
    <value>lower(firstName) like lower(concat(#{exampleContact.firstName}, '%'))</value>
    <value>lower(lastName) like lower(concat(#{exampleContact.lastName}, '%'))</value>
  </fwk:restrictions>
</fwk:entity-query>

<component name="exampleContact" class="org.jboss.seam.example.contactlist.Contact"/>
(1) tideContext.exampleContact = new Contact();
tideContext.exampleContact.firstName = 'Jimi';
tideContext.exampleContact.lastName = 'Hendrix';
(2) tideContext.contacts.getResultList(getContactsHandler);
...-
The context variable
exampleContactis set with a newContactentity, and populated with some values. -
The Seam component named
contactsis called. As theContexthas intercepted the previous context variable assignments, it sends these variables along with the remote call. In general, all assignments to context variables made between remote calls are scheduled for update to resynchronize the server context on the next remote call. Updates of properties on context variables that are entities or collections of entities are also tracked.
This means that it is the Flex client job to populate the context variables that need to be injected in the server component before calling it.
In some cases, notably when using context variables with the client framework (see corresponding section Tide Client Framework),
it can be useful to disable the synchronization between client and server for certain variables.
This is possible by using Seam.getInstance().setComponentRemoteSync(variableName, false) expressions.
Note that remote synchronization of all variables received from the server is enabled by default.
Variables that are outjected from client components can be remote-enabled with [Out(remote="true")].
Integration with Variable Outjection
Now that we are able to setup the server context from our client, we would like to be able to get the updated context variables from the server.
This is automatically managed by the Tide server interceptor, which detects all outjected objects from the component call, even through server event propagation, and schedules them for retrieval for the next remote call.
That allows, for example, to do things like (extract from the Seam booking sample):
@Stateful
@Name("hotelBooking")
@Restrict("#{identity.loggedIn}")
public class HotelBookingAction implements HotelBooking {
   ...
   @In
   private User user;

   @In(required=false) @Out
   private Hotel hotel;

   @In(required=false)
   @Out(required=false)
   private Booking booking;
   ...

   public void bookHotel() {
       booking = new Booking(hotel, user);
       Calendar calendar = Calendar.getInstance();
       booking.setCheckinDate( calendar.getTime() );
       calendar.add(Calendar.DAY_OF_MONTH, 1);
       booking.setCheckoutDate( calendar.getTime() );
   }
   ...
}public function bookHotel(hotel:Hotel):void {
(1) tideContext.hotel = hotel;
(2) tideContext.hotelBooking.bookHotel(bookResult);
}
private function bookResult(event:TideResultEvent):void {
(3) var booking:Booking = event.context.booking as Booking;
}-
We set the context variable
hotelwhich will be injected in the component namedhotelBooking. -
We call the method
bookHotelon the component namedhotelBooking. -
The result handler gets the outjected object named
bookingfrom the result context.
All objects outjected during the component call are intercepted and available through the client context after the remote invocation. This allows a very simple reuse of existing server components.
If you need to resynchronize the last updated server context variables with the Flex client but do not have a particular remote component method to call, you can use the following method of the context:
tideContext.meta_resync(resultHandler, faultHandler);You can also simplify the client code by using dependency injection on the Flex controller (see here):
[In]
public var booking:Booking;

[Out(remote="true")]
public var hotel:Hotel;

[In]
public var hotelBooking:Component;

public function bookHotel(hotel:Hotel):void {
(1) this.hotel = hotel;
(2) hotelBooking.bookHotel(bookResult);
}

private function bookResult(event:TideResultEvent):void {
(3) Alert.show("Booking processed: " + booking.toString());
}
It is also interesting to note that even the Seam events triggering other components outjection are intercepted, thus allowing full support for complex server-side interactions.
If, for some reason, some outjected variables should not be sent back to the client, it is possible to define a list of disabled component names
in granite-config.xml, in the section tide-components:
<tide-components>
    <component annotatedwith="com.myapp.some.annotation.for.disabling.Components" disabled="true"/>
    <component type="com\.myapp\..*" disabled="true"/>
</tide-components>
The supported component definitions are the same as for enabling components (name, type, annotated-with, instance-of). This is relatively
flexible and allows to finely control what part of the context may be shared between server and client.
Integration with DataModels
Tide+Seam intercepts injection and outjection of standard JSF DataModels. This is not particularly useful in a Flex environment, except for reusing
existing Seam components, and this is roughly equivalent to using @In and @Out. There is no support for custom data binding.
@Stateful
@Scope(SESSION)
@Name("bookingList")
@Restrict("#{identity.loggedIn}")
@TransactionAttribute(REQUIRES_NEW)
public class BookingListAction implements BookingList, Serializable {
   ...
   @DataModel
   private List<Booking> bookings;
   @DataModelSelection
   private Booking booking;
   ...
}
public function cancelBooking(booking:Booking):void {
(1) tideContext.bookingList.booking = booking;
(2) tideContext.bookingList.cancel(cancelBookingResult);
}
private function cancelBookingResult(event:TideResultEvent):void {
(3) bookings = event.context.bookings as ArrayCollection;
}-
We prepare the injection of the current selected booking:
bookingis the name of the component property annotated with@DataModelSelection. -
We call the method
cancelof the component namedbookingList. -
We get back the outjected
DataModelArrayCollection++; it is not encapsulated in ActionScript.bookingsfrom the context as an
Integration with Conversations
|
Warning
|
To enable integration with Seam conversations, check that the |
Until now, all client-server communications have been done through the global Tide client context. Tide supports secondary client contexts which represent particular server conversations.
When a remote component call triggers the beginning of a new conversation, the context referenced by the TideResultEvent is a new context object
corresponding to this conversation. Of course many such contexts can exist simultaneously on the Flex client, and correspond to different server conversations.
Variables having less than conversation scope are managed in the corresponding context. Session scoped variables and components are always managed in the global context.
@Stateful
@Name("hotelBooking")
@Restrict("#{identity.loggedIn}")
public class HotelBookingAction implements HotelBooking {
    ...
    @Begin
    public void selectHotel(Hotel selectedHotel) {
        hotel = em.merge(selectedHotel);
    }
    ...
}
public function selectHotel(hotel:Hotel):void {
(1) tideContext.hotelBooking.selectHotel(hotel, selectHotelResult);
}
private function selectHotelResult(event:TideResultEvent):void {
(2) var localContext:Context = event.context as Context;
var hotel:Hotel = localContext.hotel;
}-
The component
hotelBookingis called from the global context. -
The context returned in the result event is a new context instance, corresponding to the newly created server conversation.
All following operations must be then done through the localContext to be executed in the correct server conversation context. That means mainly that
this context object has to be stored somewhere in the application, for example in the MXML corresponding to a particular wizard component.
Optionally, it is also possible to store only the conversationId, and retrieve the context object by:
var localContext:Context = Seam.getInstance().getSeamContext(conversationId)When the conversation ends, the context object returned in the result events remains the local conversation context, to allow the Flex client to get the last call resulting context variables. It is deleted just before the next remote component call on the global context.
|
Warning
|
Nested conversations are not supported in the current version |
Built-in Components for Conversation Management
Tide/Seam provides two specific client components that enable a deeper integration with server conversations.
The component org.granite.tide.seam.framework.ConversationList, always available by tideContext.conversationList or by injection with:
[In]
public var conversationList:ConversationList
ConversationList is a client equivalent of the Seam ConversationList. It gives access to the list of currently existing conversations.
Only conversations that have a description are returned.
The component org.granite.tide.seam.framework.Conversation is a conversation-scoped component that is available in all conversation contexts by
tideContext.conversation or by injection with:
[In]
public var conversation:Conversation
This component has three uses :
-
Set the description before starting a new conversation with:
conversation.description = "Some description"; someConversationalComponent.beginConversation(); -
Set the description of an already existing conversation with:
conversation.setDescription("Some description"); -
Resync the context with an existing server conversation (for example after a browser refresh) with:
conversation.getDescription();
Integration with Events
The Tide client context can register listeners for Seam events triggered on the server-side. The interesting events are sent back along the server response and dispatched at the end of the processing of the result so that the context is correctly synchronized when the event is dispatched.
Here is a simple example:
@Stateful
@Name("hotelBooking")
@Restrict("#{identity.loggedIn}")
public class HotelBookingAction implements HotelBooking {
   ...
   @End
   public void confirm() {
      em.persist(booking);
      facesMessages.add(
          "Thank you, #{user.name}, your confirmation number " +
          "for #{hotel.name} is #{booking.id}"
      );
      log.info("New booking: #{booking.id} for #{user.username}");
      events.raiseTransactionSuccessEvent("bookingConfirmed");
   }
}
Seam.getInstance().getSeamContext().addContextEventListener("bookingConfirmed",
bookingConfirmedHandler, true);
private function bookingConfirmedHandler(event:TideContextEvent):void {
// No need for remote call, event has been dispatched on
// the server and list is outjected.
hotelBookings = ArrayCollection(event.context.bookings);
}The last argument in addContextEventListener must be set to true; it indicates that the event will come from the remote side.
You can simplify the client code by using the Tide Client Framework:
[Name("bookingsCtl")]
public class BookingsCtl {

    [In]
    public var bookings:ArrayCollection;

    [Observer("bookingConfirmed", remote="true")]
    public function bookingConfirmedHandler(event:TideContextEvent):void {
        Alert.show("New booking confirmed: total " + bookings.length);
    }
}
Integration with Asynchronous Events
It is possible to use Gravity to listen to Seam events triggered asynchronously on the server-side. The registered events are received by a client event listener, exactly as synchronous events.
You will first have to configure a Gravity topic named seamAsync either in services-config.xml:
<services-config>
    <services>
        <service id="granite-service"
            class="flex.messaging.services.RemotingService"
            messageTypes="flex.messaging.messages.RemotingMessage">
            <!--
             ! Use "tideSeamFactory" and "graniteamf" for "server" destination (see below).
             !-->
            <destination id="server">
                <channels>
                    <channel ref="graniteamf"/>
                </channels>
                <properties>
                    <factory>tideSeamFactory</factory>
                </properties>
                <security>
                    <security-constraint>
                        <auth-method>Custom</auth-method>
                        <roles>
                            <role>user</role>
                            <role>admin</role>
                        </roles>
                    </security-constraint>
                </security>
            </destination>
        </service>

        <service id="gravity-service"
            class="flex.messaging.services.MessagingService"
            messageTypes="flex.messaging.messages.AsyncMessage">
            <adapters>
                <adapter-definition id="seam"
                    class="org.granite.gravity.adapters.SimpleServiceAdapter"/>
            </adapters>

            <destination id="seamAsync">
                <channels>
                    <channel ref="gravityamf"/>
                </channels>
                <security>
                    <security-constraint>
                        <auth-method>Custom</auth-method>
                        <roles>
                            <role>user</role>
                            <role>admin</role>
                        </roles>
                    </security-constraint>
                </security>
                <adapter ref="seam"/>
            </destination>
        </service>
    </services>

    <!--
     ! Declare Tide+Seam service factory.
     !-->
    <factories>
        <factory id="tideSeamFactory" class="org.granite.tide.seam.SeamServiceFactory"/>
    </factories>

    <!--
     ! Declare granite channels.
     !-->
    <channels>
        <channel-definition id="graniteamf" class="mx.messaging.channels.AMFChannel">
            <endpoint
                uri="http://{server.name}:{server.port}/{context.root}/graniteamf/amf"
                class="flex.messaging.endpoints.AMFEndpoint"/>
        </channel-definition>

        <channel-definition id="gravityamf"
            class="org.granite.gravity.channels.GravityChannel">
            <endpoint
                uri="http://{server.name}:{server.port}/{context.root}/gravityamf/amf"
                class="flex.messaging.endpoints.AMFEndpoint"/>
        </channel-definition>
    </channels>

</services-config>
Or in component.xml (recommended):
<graniteds:messaging-destination name="seamAsync"/>Then the Tide messaging client has to be started and subscribed:
Seam.getInstance().addPlugin(TideAsync.getInstance("seamAsync"));The asynchronous plugin will start a Gravity Consumer which listens to server events dispatched by the Tide server.
|
Note
|
It is important to put this in a static initializer block of the main application. |
Then you can simply register remote observers in any client component:
@Stateless
@Name("test")
public class TestAction implements Test {

   public void test(String text) {
       Events.instance().raiseAsynchronousEvent("myEvent");
   }
}
private function init():void {
Seam.getInstance().getSeamContext().addContextEventListener(
"myEvent", myEventHandler, true);
}
private function myEventHandler(event:TideContextEvent):void {
trace("The event has been received");
}Or with the client framework:
public class TestObserver {

    [Observer("myEvent", remote="true")]
    private function myEventHandler(event:TideContextEvent):void {
        trace("The event has been received");
    }
}
Integration with Messages
The built-in Flex component StatusMessages provides access to the latest status messages received from the server (both global and per control).
-
statusMessages.messagesis a bindable list of global messages. -
statusMessages.keyedMessagesis a bindable map of per-control messages keyed by control id.
public function login():void {
    tideContext.identity.username = 'joseph';
    tideContext.identity.password = 'conrad';
(1) tideContext.identity.login(loginResult);
}
...
private function loginResult(event:TideResultEvent):void {
(2) var welcomeMessage:TideMessage =
        event.context.statusMessages.messages.getItemAt(0) as TideMessage;
    var s:String = welcomeMessage.summary;
}-
The component
identityis called. -
The welcome message produced by the Seam component is retrieved in the current context. The property
messagesof the componentStatusMessagesis anArrayCollectionofTideMessageobjects. TheTideMessageis very similar to the Seam/JSFFacesMessage/StatusMessageand has three properties: +-
severity(can beINFO,WARNING,ERROR,FATAL) -
summary -
detail
-
Per-control messages can be retrieved with:
private function registerResult(event:TideResultEvent):void {
    var messages:ArrayCollection =
        event.context.statusMessages.keyedMessages['username'] as ArrayCollection;
    if (messages && messages.length > 0) {
        var s:String = messages.getItemAt(0).summary;
        Alert.show(s);
    }
}
These per-control messages can also be used to display validation messages on the corresponding UI component, by using the TideControlValidator component:
<mx:Application
    ...
    xmlns:tsv="org.granite.tide.seam.validators">

    <mx:TextInput id="username"/>

    <tsv:TideControlValidator source="{username}" property="text"/>
</mx:Application>
Data Paging with Query Component
With Seam, you can easily use the Query component of the Seam Application Framework as the remote data provider for a paged collection.
Filtering is also supported by using restrictions. All this is supported by the Seam-specific Flex implementation of PagedQuery. You can also see
the Data Paging section for more details.
import org.granite.tide.seam.framework.PagedQuery;

Seam.getInstance().addComponent("people", PagedQuery);
Then declare your Seam Query component:
<component name="examplePerson" class="com.myapp.entity.Person"/>
<framework:entity-query name="people"
ejbql="select p from Person p"
max-results="36">
<framework:restrictions>
<value>lower(p.lastName) like lower( #{examplePerson.lastName} || '%' )</value>
</framework:restrictions>
</framework:entity-query>This is a very standard Seam Query definition, only the max-results property is important as it will be used as the page size for the client component.
|
Warning
|
Note that defining |
You can also specify the max-results property on the client component instead of the server, you can then omit the property on the server component definition:
Seam.getInstance().addComponentWithFactory("people", PagedQuery, { maxResults: 40 });To change filter parameters values on the client-side, you just have to set values on the restriction object (here examplePerson) in the context.
Tide tracks the changes on the object on the Flex side and will update the server filter instance accordingly.
PagedQuery implicitly forces the detected restriction variables to be synchronized remotely with the server so you don’t have to do [Out(remote="true")]
or Seam.getInstance().setComponentRemoteSync("examplePerson", true) manually.
For example, you can use a filter like this :
<mx:Script>
[In(create="true")]
public var examplePerson:Person;
[In]
public var people:PagedQuery;
</mx:Script>
<mx:TextInput id="lastName" text="{examplePerson.lastName}"/>
<mx:Button label="Search" click="people.refresh()"/>
<mx:DataGrid id="peopleGrid" dataProvider="{people}">
...
</mx:DataGrid>Integration with Identity Component
The Seam identity component can be called from the global Tide context and is fully integrated with the Flex RemoteObject security.
This provides end-to-end security from the Flex client to the server component through Seam Security.
The Flex identity component for Seam (of class org.granite.tide.seam.security.Identity) predictably provides two methods login() and logout()
that can be used as any Tide remote call:
public function login(username:String, password:String):void {
tideContext.identity.username = username;
tideContext.identity.password = password;
tideContext.identity.login(loginResult, loginFault);
}
private function loginResult(event:TideResultEvent):void {
Alert.show(event.context.messages.getItemAt(0).summary);
}
private function loginFault(event:TideFaultEvent):void {
Alert.show(event.context.messages.getItemAt(0).summary);
}The identity component also exposes the bindable property loggedIn that represents the current authentication state. As it is bindable, it can be
used to choose between different views, for example to switch between a login form and the application view with a Flex ViewStack component:
<mx:ViewStack id="main" selectedIndex="{identity.loggedIn ? 1 : 0}">
<views:LoginView id="loginView"/>
<views:MainView id="mainView"/>
</mx:ViewStack>Finally the identity component is integrated with Seam Security role-based and permission-based security and can be used to get information or show/hide UI
depending on the user access rights. It provides methods similar to the Seam Security JSF tags s:hasRole and s:hasPermission.
<mx:Button id="deleteCategoryButton"
label="Delete Category"
enabled="{identity.hasRole('admin')}"
click="productService.deleteCategory(category)"/>
<mx:Button id="deleteProductButton" label="Delete Product"
enabled="{productGrid.selectedItem}"
visible="{identity.hasPermission(productGrid.selectedItem, 'delete')}"
click="productService.deleteProduct(productGrid.selectedItem)"/>With these declaration, the button labeled Delete Category will be enabled only if the user has the role admin and the button Delete Product
only if the user has the permission delete for the selected product. Another possibility is to completely hide the button with the properties
visible and includeInLayout, or any other property relevant for the display of the UI component.
This can also be used as any remote class with result and fault handlers:
public function checkRole(role:String):void {
identity.hasRole(role, checkRoleResult, checkRoleFault);
}
private function checkRoleResult(event:TideResultEvent, role:String):void {
if (role == 'admin') {
if (event.result)
trace("User has admin role");
else
trace("User does not have admin role");
}
}You can notice that the result and fault handlers have a second argument so you can use the same handler for many access check calls.
|
Warning
|
|
It is important to note that identity caches the user access rights so only the first call to hasRole() and hasPermission will be remote.
If the user rights have changed on the server, or if you want to enforce security more than once per user session, you can clear the security cache
manually with identity.clearSecurityCache(), for example periodically with a Timer.
Messaging with Seam 2 (Gravity)
It is possible to configure the three kinds of Gravity topics directly in the Seam XML configuration instead of services-config.xml:
<graniteds:messaging-destination id="myTopic"/>This declaration supports the properties no-local and session-selector (see the Messaging Configuration section).
You can also define a secure destination by specifying a list of roles required to access the topic:
<graniteds:messaging-destination id="myTopic">
<graniteds:roles>
<graniteds:role>admin</graniteds:role>
</graniteds:roles>
<graniteds:messaging-destination/><graniteds:jms-messaging-destination id="myTopic"
connection-factory="ConnectionFactory"
destination-jndi-name="topic/MyTopic"
transacted-sessions="true"
acknowledge-mode="AUTO_ACKNOWLEDGE"/>This declaration supports all properties of the default JMS declaration in services-config.xml except for non local initial context environments
(see the JMS Integration section).
<graniteds:activemq-messaging-destination id="myTopic"
connection-factory="ConnectionFactory"
destination-jndi-name="topic/MyTopic"
transacted-sessions="true"
acknowledge-mode="AUTO_ACKNOWLEDGE"
broker-url="vm://localhost"
create-broker="true"
wait-for-start="true"
durable="true"
file-store-root="/opt/activemq/data"/>This declaration supports all properties of the default ActiveMQ declaration in services-config.xml except for non-local initial context environments
(see the ActiveMQ Integration section).
Finally note that the Gravity singleton that is needed to push messages from the server (see here) is available as a
Seam 2 component with the name org.granite.seam.gravity and can be injected in any component :
@In("org.granite.seam.gravity")
private Gravity gravity;Integration with CDI
The specification is a powerful new feature of Java EE 6. It integrates on a common programming model all the services provided by Java EE.
GraniteDS provides out-of-the-box integration with CDI via the Tide API. You can remotely call CDI beans, and it fully supports serialization of JPA 2 entities from and to your Flex application, taking care of lazily loaded associations. The support for JPA entity beans is covered in the section JPA and lazy initialization, so this section will only describe how to call CDI components from a Flex application. GraniteDS also integrates with container security for authentication and role-based authorization.
GraniteDS provides out-of-the-box integration with CDI via the Tide API. You can remotely call CDI beans, and it fully supports serialization of JPA entities from and to your client application, taking care of lazily loaded associations. The support for JPA entity beans is covered in the section JPA and lazy initialization, so this section will only describe how to call CDI components from a Java client. GraniteDS also integrates with container security for authentication and role-based authorization.
The support for CDI is included in the library granite-cdi.jar, so you always have to include this library in either WEB-INF/lib or lib for an ear packaging.
|
Note
|
Only the reference implementation is supported for now because of some inconsistencies in a few parts of the spec (notably conversations). This is the one used in JBoss 6 and GlassFish v3. |
To provide a more native experience for CDI developers when used in a Servlet 3 compliant container, the CDI support in GraniteDS can be configured
with a simple annotated class. The most important features of GraniteDS can be configured this way, and it is still possible to fall back to the
default GraniteDS configuration files services-config.xml and granite-config.xml for unsupported features.
Configuration with Servlet 3
On Servlet 3 compliant containers, GraniteDS can use the new APIs to automatically register its own servlets and filters and thus does not need any particular
configuration in web.xml. This automatic setup is triggered when GraniteDS finds a class annotated with @ServerFilter in one of the application archives:
@ServerFilter(configProvider=CDIConfigProvider.class)
public class GraniteConfig {
}The ConfigProvider class defines suitable default values for the CDI integration. It is possible however to override these values by setting them in
the annotation properties :
@ServerFilter(
tide=true,
factoryClass=CDIServiceFactory.class,
tideInterfaces={ Identity.class }
)
public class GraniteConfig {
}As for any CDI application, don’t forget to add a file WEB-INF/beans.xml, even empty. Note than only the Tide API is currently supported out-of-the-box
with CDI (there is no basic service factory for RemoteService).
The @ServerFilter declaration will setup an AMF processor for the specified url pattern, and the tide attribute specifies that you want a Tide-enabled
service factory. The default url pattern for remoting is /graniteamf/amf.txt and for messaging /gravityamf/amf.txt.
Other configurations can be done with @ServerFilter:
-
tideAnnotationsis equivalent totide-component annotated-with=""ingranite-config.xml. It allows to define the list of annotation names that enable remote access to CDI beans.@RemoteDestinationand@TideEnabledare always declared by default, but you can use any other one if you don’t want a compilation dependency on the GraniteDS libraries. -
tideInterfacesis equivalent totide-component instance-of=""ingranite-config.xml. It allows to define the list of interface/class names that enable remote access to CDI beans. -
tideRolesallows to define a list of security roles that are required to access the Tide remote destination. In general it is not necessary to define this destination-wide security and you can only rely on Java EE security for fine-grained access to individual beans. -
exceptionConvertersallows to define a list of server-side exception converters. It’s the equivalent toexception-convertersingranite-config.xml. -
amf3MessageInterceptorallows to define a message interceptor. You have to define a class implementingAMFMessageInterceptor. It’s highly recommended to subclassorg.granite.cdi.CDIInterceptorand callsuper.beforeandsuper.afterin your implementation.
When using the ConfigProvider allows Tide to search in the CDI context for some of its configuration elements.
For now, it will lookup beans that implement ExceptionConverter, AMF3MessageInterceptor or SecurityService and use the existing beans.
Default Configuration
If you don’t use the Servlet 3 configuration, you will have to use the standard GraniteDS configuration files instead, and setup these elements manually. You can safely skip this section if you choose Servlet 3 configuration.
-
You can define in the
tide-annotationssection ofgranite-config.xmlthe conditions used to enable remote access to Seam destinations (for example all beans annotated with a particular annotation). -
You have to configure the specific Tide/CDI
org.granite.tide.cdi.CDIServiceFactoryservice factory inservices-config.xml. -
You have to configure a unique Tide/CDI destination named
cdiinservices-config.xml -
You have to retrieve the Tide context in Flex with
Cdi.getInstance().getCdiContext()instead ofTide.getInstance().getContext().
Here is a default configuration suitable for most cases:
<granite-config scan="true">
...
<tide-components>
<tide-component annotated-with="org.granite.messaging.service.annotations.RemoteDestination"/>
<tide-component annotated-with="org.granite.tide.annotations.TideEnabled"/>
</tide-components>
</granite-config><services-config>
<services>
<service id="granite-service"
class="flex.messaging.services.RemotingService"
messageTypes="flex.messaging.messages.RemotingMessage">
<!--
! Use "tideCdiFactory" and "my-graniteamf" for "server" destination (see below).
! The destination must be "server" when using Tide with default configuration.
!-->
<destination id="server">
<channels>
<channel ref="my-graniteamf"/>
</channels>
<properties>
<factory>tideCdiFactory</factory>
</properties>
</destination>
</service>
</services>
<!--
! Declare tideCdiFactory service factory.
!-->
<factories>
<factory id="tideCdiFactory" class="org.granite.tide.cdi.CdiServiceFactory"/>
</factories>
<!--
! Declare my-graniteamf channel.
!-->
<channels>
<channel-definition id="graniteamf" class="mx.messaging.channels.AMFChannel">
<endpoint
uri="http://{server.name}:{server.port}/{context.root}/graniteamf/amf"
class="flex.messaging.endpoints.AMFEndpoint"/>
</channel-definition>
</channels>
</services-config>The destination named server will be the one and only destination required for all CDI destinations.
Using the Tide API
Most of what is described in the Tide Remoting section applies for CDI, however GraniteDS also provides a much improved integration with CDI when using the Tide client API.
Basic remoting with dependency injection
When using CDI, the only difference on the client is that you have to use the Cdi singleton. Here is a simple example of remoting with an injected client proxy
for an CDI bean:
<?xml version="1.0"?>
<mx:Application xmlns:mx="http://www.adobe.com/2006/mxml"
creationComplete="Cdi.getInstance().initApplication()">
<mx:Script>
import org.granite.tide.cdi.Cdi;
import org.granite.tide.events.TideResultEvent;
import org.granite.tide.events.TideFaultEvent;
[In]
public var helloService:Component;
private function hello(name:String):void {
helloService.hello(name, resultHandler, faultHandler);
}
private function resultHandler(event:TideResultEvent):void {
outputMessage.text = event.result as String;
}
private function faultHandler(event:TideFaultEvent):void {
// Handle fault
}
</mx:Script>
<!-- Provide input data for calling the service. -->
<mx:TextInput id="inputName"/>
<!-- Call the web service, use the text in a TextInput control as input data.-->
<mx:Button click="hello(inputName.text)"/>
<!-- Result message. -->
<mx:Label id="outputMessage"/>
</mx:Application>This is almost identical to the standard Tide API described in the Tide remoting section, and all other methods apply for CDI.
Typesafe Remoting with Dependency Injection
You can benefit from the capability of the Gas3 code generator (see here) to generate a strongly typed ActionScript 3 client proxy
from the CDI bean interface when it is annotated with @RemoteDestination. In this case, you can inject a typesafe reference to your service and get better
compile time error checking and auto completion in your IDE:
<?xml version="1.0"?>
<mx:Application xmlns:mx="http://www.adobe.com/2006/mxml"
creationComplete="Cdi.getInstance().initApplication()">
<mx:Script>
import org.granite.tide.cdi.Cdi;
import org.granite.tide.events.TideResultEvent;
import org.granite.tide.events.TideFaultEvent;
import com.myapp.service.HelloService;
[In]
public var helloService:HelloService;
private function hello(name:String):void {
helloService.hello(name, resultHandler, faultHandler);
}
...
</mx:Script>
...
</mx:Application>It is possible to benefit from even more type safety by using the annotation [Inject] instead of In. When using this annotation, the full class name
is used to find the target bean in the CDI context instead of the bean name.
<?xml version="1.0"?>
<mx:Application xmlns:mx="http://www.adobe.com/2006/mxml"
creationComplete="Cdi.getInstance().initApplication()">
<mx:Script>
import org.granite.tide.cdi.Cdi;
import org.granite.tide.events.TideResultEvent;
import org.granite.tide.events.TideFaultEvent;
import com.myapp.service.HelloService;
[Inject]
public var myService:HelloService;
private function hello(name:String):void {
myService.hello(name, resultHandler, faultHandler);
}
...
</mx:Script>
...
</mx:Application>This typesafe mode allows to better detect API inconsistencies between the Flex application and the Java services, because the Flex compiler will immediately warn you when a server method signature has changed (and Gas3 has regenerated the client proxy).
Integration with Conversations
Until now, all client-server communications have been done through the global Tide client context. Tide supports secondary client contexts which represent particular server conversations.
When a remote component call triggers the beginning of a new conversation, the context referenced by the TideResultEvent is a new context object corresponding
to this conversation. Of course many such contexts can exist simultaneously on the Flex client, and correspond to different server conversations.
Variables having less than conversation scope are managed in the corresponding context. Session scoped variables and components are always managed in the global context.
@Stateful
public class HotelBookingAction implements HotelBooking {
...
@Inject
private Conversation conversation;
public void selectHotel(Hotel selectedHotel) {
conversation.begin();
hotel = em.merge(selectedHotel);
}
...
}public function selectHotel(hotel:Hotel):void {
(1) tideContext.hotelBooking.selectHotel(hotel, selectHotelResult);
}
private function selectHotelResult(event:TideResultEvent):void {
(2) var localContext:Context = event.context as Context;
var hotel:Hotel = localContext.hotel;
}-
The component
hotelBookingis called from the global context. -
The context returned in the result event is a new context instance, corresponding to the newly created server conversation.
All following operations must be then done through the localContext to be executed in the correct server conversation context.
That means mainly that this context object has to be stored somewhere in the application, for example in the MXML corresponding to a particular wizard component.
Optionally, it is also possible to store only the conversationId, and retrieve the context object by:
var localContext:Context = Cdi.getInstance().getCdiContext(conversationId)When the conversation ends, the context object returned in the result events remains the local conversation context, to allow the Flex client to get the last call resulting context variables. It is deleted just before the next remote component call on the global context.
Integration with Events
The Tide client context can register listeners for CDI events triggered on the server-side. The interesting events are sent back along the server response and dispatched at the end of the processing of the result so that the context is correctly synchronized when the event is dispatched.
Here is a simple example:
@Stateful
public class HotelBookingAction implements HotelBooking {
...
@Inject
@Confirmed
private Event<BookingEvent> bookingConfirmedEventSrc;
...
public void confirm() {
em.persist(booking);
bookingConfirmedEventSrc.fire(new BookingEvent(booking));
conversation.end();
}
}[Observer(remote="true")]
public function bookingConfirmedHandler(event:BookingEvent):void {
Alert.show("Booking confirmed: " + event.booking);
}Security
GraniteDS provides a client-side component named identity that ensures the integration between the client RemoteObject credentials and the server-side
container security. It additionally includes an easy-to-use API to define runtime authorization checks on the Flex UI.
The CDI identity component (of class org.granite.tide.cdi.Identity) predictably provides two methods login() and logout() that can be used as any
Tide remote call:
private var tideContext:Context = Cdi.getInstance().getCdiContext();
public function login(username:String, password:String):void {
tideContext.identity.login(username, password, loginResult, loginFault);
}
private function loginResult(event:TideResultEvent):void {
Alert.show(event.context.identity.loggedIn);
}
private function loginFault(event:TideFaultEvent):void {
Alert.show(event.fault);
}
public function logout():void {
tideContext.identity.logout();
}Or with dependency injection:
[In]
public var identity:Identity;
public function login(username:String, password:String):void {
identity.login(username, password, loginResult, loginFault);
}
private function loginResult(event:TideResultEvent):void {
Alert.show(event.context.identity.loggedIn);
}
private function loginFault(event:TideFaultEvent):void {
Alert.show(event.fault);
}
public function logout():void {
identity.logout();
}The identity component also exposes the bindable property loggedIn that represents the current authentication state. As it is bindable, it can be used
for example to choose between different views, for example to switch between a login form and the application view with a Flex ViewStack component:
<mx:ViewStack id="main" selectedIndex="{identity.loggedIn ? 1 : 0}">
<views:LoginView id="loginView"/>
<views:MainView id="mainView"/>
</mx:ViewStack>Finally the identity component is integrated with server-side role-based security and can be used to get information or show/hide UI depending on the
user access rights:
<mx:Button id="deleteButton"
label="Delete"
enabled="{identity.hasRole('admin')}"
click="myService.deleteEntity(myEntity)"/>With this declaration, this button labeled Delete will be enabled only if the user has the role admin. Another possibility is to completely hide the
button with the properties visible and includeInLayout, or any other property relevant for the UI component.
This can also be used as any remote class with result and fault handlers:
public function checkRole(role:String):void {
identity.hasRole(role, checkRoleResult, checkRoleFault);
}
private function checkRoleResult(event:TideResultEvent, role:String):void {
if (role == 'admin') {
if (event.result)
trace("User has admin role");
else
trace("User does not have admin role");
}
}You can notice that the result and fault handlers have a second argument so you can use the same handler for many access check calls.
|
Warning
|
|
It is important to note that identity caches the user access rights so only the first call to hasRole() will be remote. If the user rights have changed
on the server, or if you want to enforce security more than once per user session, you can clear the security cache manually with identity.clearSecurityCache(),
for example periodically in a Timer.
Messaging with CDI (Gravity)
As with EJB 3 and when using a servlet 3 compliant container, it is possible to configure the three kinds of Gravity topics in the configuration class
annotated with @ServerFilter. You can simply add variables to your configuration class annotated with @MessagingDestination, @JmsTopicDestination
or @ActiveMQTopicDestination, the name of the variable will be used as destination id.
Simple Topic:
@ServerFilter
public class MyConfig {
@MessagingDestination(noLocal=true, sessionSelector=true)
AbstractMessagingDestination myTopic;
}This declaration supports the properties no-local and session-selector (see the Messaging Configuration section).
You can also define a secure destination by specifying a list of roles required to access the topic:
@MessagingDestination(noLocal=true, sessionSelector=true, roles={ "admin", "user" })
AbstractMessagingDestination myTopic;@JMSTopicDestination(noLocal=true,
sessionSelector=true,
connectionFactory="ConnectionFactory",
topicJndiName="topic/myTopic",
transactedSessions=true,
acknowledgeMode="AUTO_ACKNOWLEDGE",
roles={ "admin", "user" })
AbstractMessagingDestination myTopic;This declaration supports all properties of the default JMS declaration in services-config.xml except for non local initial context environments
(see the JMS Integration section).
@ActiveMQTopicDestination(noLocal=true,
sessionSelector=true,
connectionFactory="ConnectionFactory",
topicJndiName="topic/myTopic",
transactedSessions=true,
acknowledgeMode="AUTO_ACKNOWLEDGE",
brokerUrl="vm://localhost",
createBroker=true,
waitForStart=true,
durable=true,
fileStoreRoot="/opt/activemq/data",
roles={ "admin", "user" })
AbstractMessagingDestination myTopic;This declaration supports all properties of the default ActiveMQ declaration in services-config.xml except for non-local initial context environments
(see the ActiveMQ Integration section).
Finally note that the Gravity singleton that is needed to push messages from the server (see here) is available as a CDI bean
and can be injected in any component :
@Inject
private Gravity gravity;Client-Side Validation API (JSR 303)
The "Bean Validation" (aka JSR-303) standardizes an annotation-based validation framework for Java. It provides an easy and powerful way of processing bean validations, with a pre-defined set of constraint annotations, allowing to arbitrarily extend the framework with user specific constraints.
Flex doesn’t provide by itself such a framework. The standard way of processing validation is to use subclasses and to bind a validator to each user input (see ). This method is at least time consuming for the developer, source of inconsistencies between the client-side and the server-side validation processes, and source of redundancies in your MXML code.
GraniteDS provides an implementation of the Bean Validation specification and provides code generation tools integration so that your Java constraint annotations are reproduced in your AS3 beans.
Getting started with the GraniteDS validation framework
As its Java equivalent, the GraniteDS validation framework provides a set of standard constraints. Here is an overview of these constraints (see for details):
| Constraint | Description |
|---|---|
|
The annotated element must be |
|
The annotated element must be |
|
The annotated element must be a number whose value must be lower or equal to the specified |
|
The annotated element must be a number whose value must be greater or equal to the specified |
|
The annotated element must be a number within accepted range |
|
The annotated element must be a date in the future |
|
The annotated element must be a number whose value must be lower or equal to the specified |
|
The annotated element must be a number whose value must be greater or equal to the specified |
|
The annotated element must not be |
|
The annotated element must be |
|
The annotated element must be a date in the past |
|
The annotated String must match the specified regular expression |
|
The annotated element size must be between the specified boundaries (included) |
Each of these contraint annotation may be applied on a bean property, depending on its type and its expected value:
public class MyAnnotatedBean {
[NotNull] [Size(min="2", max="8")]
public var name:String;
private var _description:String;
[Size(max="255")]
public function get description():String {
return _description;
}
public function set description(value:String) {
_description = value;
}
}In the above code sample, the name value must not be null and its length must be between 2 and 8 characters, and the description value may be null
or may have a length of maximum 255 characters. Constraint annotations must be placed on public properties, either public variables or public accessors
(and they may also be placed on the class itself).
In order to validate an instance of the above class, you may use the ValidatorFactory class.
import org.granite.validation.ValidatorFactory;
import org.granite.validation.ConstraintViolation;
var bean:MyAnnotatedBean = new MyAnnotatedBean();
var violations:Array = ValidatorFactory.getInstance().validate(bean);
trace((violations[0] as ConstraintViolation).message); // "may not be null"
bean.name = "123456789";
violations = ValidatorFactory.getInstance().validate(bean);
trace((violations[0] as ConstraintViolation).message); // "size must be between 2 and 8"
bean.name = "1234";
violations = ValidatorFactory.getInstance().validate(bean);
trace(violations.length); // none...Validation may be much more complex than the above basic sample. GraniteDS validation framework supports all advanced concepts of the specification, such as groups, group sequences, default group redefinition, traversable resolver, message interpolator, etc. Please refer to the specification and the various tutorials you may find on the Net.
|
Tip
|
Compilation Tip: You must use the compiler option
|
Working with error messages and localization
Default error messages for built-in constraints are provided in four languages: english, french, german (as in the javax API distribution) and chinese.
Depending on the current locales specified in the ResourceManager.getInstance().localeChain array, error messages will be localized in one of these languages
(defaulted to english if you use other locales).
The easiest way to customize error messages is to use the message attribute of the constraint annotation:
public class MyBean {
[NotNull(message="Name is mandatory"]
[Size(min="2", message="Name must have a length of at least {min} characters")]
public var name;
...
}As you can see, you may use parameters (the min attribute) in such customized messages. These error messages are much more accurate than the default ones ("may not be null", "size must be between…"), but you must specify them for each constraint and you cannot localize the literals used for multiple languages.
In order to add support for different locales, you will have to define variables (eg. name.notnull and name.minsize) and use the built-in
support offered by Flex:
public class MyBean {
[NotNull(message="{name.notnull}"]
[Size(min="2", message="{name.minsize}")]
public var name;
...
}locale/en_US/ValidationMessages.propertiesname.notnull=Name is mandatory
name.minsize=Name must have a length of at least {min} characters
locale/fr_FR/ValidationMessages.propertiesname.notnull=Le nom est obligatoire
name.minsize=Le nom doit avoir une taille d'au moins {min} caractères
Register your Bundles:
[ResourceBundle("ValidationMessages")]If you compile your Flex application with support for these two locales (see Flex ), the error messages will be localized in english or french, depending on the current selected locale, with the values set in your property files. You may also redefine standard messages for a given locale in the same way:
locale/en_US/ValidationMessages.propertiesname.notnull=Name is mandatory
name.minsize=Name must have a length of at least {min} characters
javax.validation.constraints.NotNull.message=This value is mandatory
With the above bundle, the default error message for the NotNull constraint and the locale en_US will be redefined to "This value is mandatory"
(instead of "may not be null").
Adding support for one or more locales other than the default ones will follow the same principle: create a ValidationMessages.properties for the new locale,
translate all default error messages and add new ones for your customized message keys. Note that the bundle name must always be set to "ValidationMessages".
Working with groups
As stated by the specification (section 3.4):
A group defines a subset of constraints. Instead of validating all constraints for a given object graph, only a subset
is validated. This subset is defined by the the group or groups targeted. Each constraint declaration defines the list
of groups it belongs to. If no group is explicitly declared, a constraint belongs to the Default group.
The GraniteDS validation framework fully supports the concepts of group, group inheritance, group sequence, default group redefinition and implicit grouping.
Like in Java, groups are represented by interfaces. For example, suppose that you want to define and use a path.to.MyGroup group.
You will have to write the interface, to reference it in some of your constraints and to call the ValidatorFactory.validate method with one extra parameter:
package path.to {
public interface MyGroup {}
}
...
public class MyBean {
[NotNull]
[Size(min="2", max="10", groups="path.to.MyGroup")]
public var name;
...
}
...
var bean:MyBean = new MyBean();
// Default group: NotNull fails.
ValidatorFactory.getInstance().validate(bean);
// MyGroup group: no failure.
ValidatorFactory.getInstance().validate(bean, [MyGroup]);
// Default & MyGroup groups: NotNull fails.
ValidatorFactory.getInstance().validate(bean, [Default, MyGroup]);
bean.name = "a";
// Default group: no failure.
ValidatorFactory.validate(bean);
// MyGroup group: Size fails.
ValidatorFactory.getInstance().validate(bean, [MyGroup]);
// Default & MyGroup groups: Size fails.
ValidatorFactory.getInstance().validate(bean, [Default, MyGroup]);You may of course specify mutliple groups in the constraint annotation, for example [Size(min="2", max="10", goups="path.to.MyGroup, path.to.MyOtherGroup")].
Because the group interface references in the annotations must be fully qualified, it may be annoying to always specify the complete path to each group interface,
and you may use the namespace resolver available in the ValidatorFactory instance:
ValidatorFactory.getInstance().namespaceResolver.registerNamespace("g", "path.to.*");
...
[Size(min="2", max="10", goups="g:MyGroup, g:MyOtherGroup")]
public var name;Note that the group interface is always
registered in the default namespace and may be use without any prefix specification: groups="Default" is legal and strictly equivalent
to groups="org.granite.validation.groups.Default" (or even groups="javax.validation.groups.Default" - as the javax package is handled as an alias
of the granite's one).
Integration with code generation tools (Gas3)
The Bean Validation specification is primarily intended to be used with Java entity beans. GraniteDS code generation tools replicate your Java model
into an ActionScript 3 model and may be configured in order to copy validation annotations. All you have to do is to change the default
org.granite.generator.as3.DefaultEntityFactory to org.granite.generator.as3.BVEntityFactory.
With the Eclipse builder, go to the "Options" panel and change the entity factory as shown is the picture below:
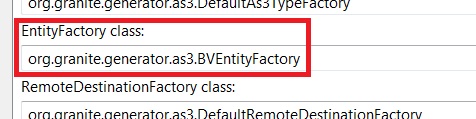
With the Ant task, use the entityfactory attribute as follow in your build.xml:
<gas3 entityfactory="org.granite.generator.as3.BVEntityFactory" ...>
...
</gas3>Then, provided that you have a Java entity bean like this one:
@Entity
public class Person {
@Id @GeneratedValue
private Integer id;
@Basic
@Size(min=1, max=50)
private String firstname;
@Basic
@NotNull(message="You must provide a lastname")
@Size(min=1, max=255)
private String lastname;
// getters and setters...
}-
you will get this generated ActionScript 3 code:
[Bindable]
public class PersonBase implements IExternalizable {
...
public function set firstname(value:String):void {
_firstname = value;
}
[Size(min="1", max="50", message="{javax.validation.constraints.Size.message}")]
public function get firstname():String {
return _firstname;
}
public function set lastname(value:String):void {
_lastname = value;
}
[NotNull(message="You must provide a lastname")]
[Size(min="1", max="255", message="{javax.validation.constraints.Size.message}")]
public function get lastname():String {
return _lastname;
}
....
}You may then use the ValidationFactory in order to validate your ActionScript 3 bean, and the same constraints will be applied on the Flex and the Java sides.
This works for plain Java beans and entity beans.
Writing your own Constraints
Suppose you want to make sure that a Person bean has at least one of its firstname or lastname properties not null. There is no default constraint
that will let you check this. In order to implement a constraint that will do this validation, you will have to write a new IConstraint implementation,
register it with the ValidatorFactory and use the corresponding annotation on top of the Person class.
PersonChecker.aspublic class PersonChecker extends BaseConstraint {
override public function initialize(annotation:Annotation, factory:ValidatorFactory):void {
// initialize the BaseContraint with the default message (a bundle key).
internalInitialize(factory, annotation, "{personChecker.message}");
}
override public function validate(value:*):String {
// don't validate null Person beans.
if (Null.isNull(value))
return null;
// check value type (use helper class).
ConstraintHelper.checkValueType(this, value, [Person]);
// validate the Person bean: at least one of the firstname or lastname property
// must be not null.
if (Person(value).firstname == null && Person(value).lastname == null)
return message;
// return null if validation is successful.
return null;
}
}The PersonChecker class actually extends the BaseContraint class that simplifies IConstraint implementations. It defines a default message
("{personChecker.message}") with a message key that could be used in your validation messages bundles
(see above Working with Error Messages and Localization).
You should then register this new constraint in the validation framework:
ValidatorFactory.getInstance().registerConstraintClass(PersonChecker);Because Flex annotations have no specific implementation, you may then directly use the constraint annotation in the Person class:
[Bindable]
[PersonChecker]
public class Person {
[Size(min="1", max="50")]
public var firstname;
[Size(min="1", max="255")]
public var lastname;
}Note that the annotation isn’t qualified with any package name: registering two constraint class with the same name but in different packages
will result in using the last registered one only. This behavior may additionaly be used in order to override default constraint implementations:
if you write your own Size constraint implementation and register it with the ValidatorFactory class, it will be used instead of the built-in one.
If the constraint exists in Java and if you use the code generation tools, the unqualified class name of the Java constraint will be generated on top
of the Person class, just as above.
|
Tip
|
Don’t forget the |
See standard constraint implementations in the GraniteDS distribution to know more about specific attributes support and other customization options.
Using the FormValidator class
By default, in addition to returning an array of ConstraintViolations, the validation framework will dispatch events for each failed constraint,
provided that the bean that holds the property is an IEventDispatcher. These events are instances of the ConstraintViolationEvent class and are
dispatched between two ValidationEvents events (start and end).
Because ActionScript 3 beans annotated with the [Bindable] annotation are automatically compiled as IEventDispatcher implementations, generated
beans (or other bindable beans written manually) will dispatch constraint events. You may then listen validation events dispatched by a bean if you
register your event listeners as follow:
private function startValidationHandler(event:ValidationEvent):void {
// reset all error messages...
}
private function constraintViolationHandler(event:ConstraintViolationEvent):void {
// display the error message on the corresponding input...
}
private function endValidationHandler(event:ValidationEvent):void {
// done...
}
...
bean.addEventListener(
ValidationEvent.START_VALIDATION,
startValidationHandler, false, 0, true
);
bean.addEventListener(
ConstraintValidatedEvent.CONSTRAINT_VALIDATED,
constraintValidatedHandler, false, 0, true
);
bean.addEventListener(
ValidationEvent.END_VALIDATION,
andValidationHandler, false, 0, true
);
...
ValidatorFactory.getInstance().validate(bean);It may be however very tedious to add such listeners to all your beans and to write the code for displaying or reseting error messages for all inputs.
With the FormValidator component, you get an easy way to use implicitly these events: the FormValidator performs validation on the fly whenever the user
enters data into user inputs and automatically displays error messages when these data are incorrect, based on constraint annotations placed on the bean properties.
A sample usage with Flex 4 (using the Person bean introduced above and bidirectional bindings):
<fx:Declarations>
<v:FormValidator id="fValidator" form="{personForm}" entity="{person}"/>
</fx:Declarations>
<fx:Script>
[Bindable]
protected var person:Person = new Person();
protected function savePerson():void {
if (fValidator.validateEntity()) {
// actually save the validated person entity...
}
}
protected function resetPerson():void {
person = new Person();
}
</fx:Script>
<mx:Form id="personForm">
<mx:FormItem label="Firstname">
<s:TextInput id="iFirstname" text="@{person.firstname}"/>
</mx:FormItem>
<mx:FormItem label="Lastname" required="true">
<s:TextInput id="iLastname" text="@{person.lastname}"/>
</mx:FormItem>
</mx:Form>
<s:Button label="Save" click="savePerson()"/>
<s:Button label="Cancel" click="resetPerson()"/>In the above sample, the personForm form uses two bidirectional bindings between the text inputs and the person bean. Each time the user enter some
text in an input, the value of the input is copied into the bean and triggers a validation. Error messages are then automatically displayed or cleared
depending on the validation result.
you can specify a property entityPath to indicate the validator that it should bind to a deeper element in the object graph.
<fx:Declarations>
<v:FormValidator id="fValidator" form="{personForm}" entity="{model.person}" entityPath="model"/>
</fx:Declarations>The global validation of the person bean will be performed when the user click on the "Save" button. However, class-level constraint violations
(such as the PersonChecker constraint) cannot be automatically associated to an input, and these violations prevent the fValidator.validateEntity()
call to succeed while nothing cannot be automatically displayed to the user.
To solve this problem, three options are available:
(1) Unhandled Violations with the properties Argument:
[Bindable]
[PersonChecker(properties="firstname,lastname"]
public class Person {
...
}This tell the FormValidator to display the PersonChecker error message on both firstname and lastname inputs. You may of course use only
the firstname property or add another property at your convenience.
(2) Unhandled Violations with the unhandledViolationsMessage Property:
<mx:Form id="personForm">
<mx:FormItem label="Firstname">
<s:TextInput id="iFirstname" text="@{person.firstname}"/>
</mx:FormItem>
<mx:FormItem label="Lastname" required="true">
<s:TextInput id="iLastname" text="@{person.lastname}"/>
</mx:FormItem>
<s:Label text="{fValidator.unhandledViolationsMessage}"/>
</mx:Form>All violation messages that cannot be associated with any input will be diplayed in the label at the bottom of the form (separated by new lines).
(3) Unhandled Violations with the unhandledViolations Event:
<fx:Declarations>
<v:FormValidator id="fValidator" form="{personForm}" entity="{person}"
unhandledViolations="showUnhandledViolations(event)"/>
</fx:Declarations>
<fx:Script>
protected function showUnhandledViolations(event:ValidationResultEvent ):void {
// display unhandled messages...
}
</fx:Script>The third option let you do whatever you want with these unhandled violations. You can display the event.message somewhere
(it has the same format as the unhandledViolationsMessage property), you may loop over the event.results (array of ValidationResult's)
or you may even call the fValidator.getUnhandledViolations method that will give you the last unhandled ConstraintViolation instances.
With Flex 3, because bidirectional bindings are not natively supported, you would have to use mx:Binding for each input.
With the above sample, you will add:
<mx:TextInput id="iFirstname" text="{person.firstname}"/>
...
<mx:TextInput id="iLastname" text="{person.lastname}"/>
...
<mx:Binding destination="person.firstname" source="iFirstname.text"/>
<mx:Binding destination="person.lastname" source="iLastname.text"/>Note also that with Tide, to simplify the cancel operations, you may reset the entity state with Managed.resetEntity(entity)
(see Data Management. This may be particularly useful if you are not creating a new person but modifying an existing one.
If you don’t want or if you can’t use bidirectional bindings, you may still use the FormValidator component but will need to specify the
property validationSubField for each input:
<fx:Declarations>
<v:FormValidator id="fValidator" form="{personForm}" entity="{person}"/>
</fx:Declarations>
<fx:Script>
[Bindable]
protected var person:Person = new Person();
protected function savePerson():void {
person.firstname = iFirstname.text == "" ? null : iFirstname.text;
person.lastname = iLastname.text == "" ? null : iLastname.text;
if (fValidator.validateEntity()) {
// actually save the validated person entity...
}
}
protected function resetPerson():void {
person = new Person();
}
</fx:Script>
<mx:Form id="personForm">
<mx:FormItem label="Firstname">
<s:TextInput id="iFirstname" text="{person.firstname}"
validationSubField="firstname"/>
</mx:FormItem>
<mx:FormItem label="Lastname" required="true">
<s:TextInput id="iLastname" text="{person.lastname}"
validationSubField="lastname"/>
</mx:FormItem>
</mx:Form>This time, you have to set manually input values into your bean, but this will work with Flex 3 as well and these subfields may contain a path
to a subproperty: for example, if you have an Address bean in your Person bean, you could write validationSubField="address.address1".
A last option to help the FormValidator detect the data bindings is to define a global list of properties which will be considered as UI component
targets for bindings. By default, text, selected, selectedDate, selectedItem and selectedIndex are prioritarily considered for binding detection
so most standard controls work correctly (for example TextInput, TextArea, CheckBox or DatePicker).
Notes on compatibility
All standard constraints should behave exactly in the same way as they behave in Java, except for some advanced Pattern usages: because the regular expression support in ActionScript 3 may differ from the Java one (especially with supported ), you should be aware of few possible inconstancies between Pattern constraints written in Java and in ActionScript 3.
ActionScript 3 Reflection API
The built-in ActionScript 3 reflection API is basically limited to a single method: . This method returns XML data describing its parameter object and is therefore not type-safe and its use is subject to many syntax errors.
GraniteDS provides a Java-like reflection API that encapsulates describeType calls and offers a type-safe, object-oriented, set of reflection classes and methods.
This API caches its results for better performances and supports advanced features such as ApplicationDomain and namespaces.
Getting the Properties of a Class
The Type class is the entry point of the reflection API. In order to get the properties of a given object, class or class name, you may use one of the following methods:
From a Class Name:
import org.granite.reflect.Type;
var type:Type = Type.forName("path.to.MyClass");
// or: var type:Type = Type.forName("path.to::MyClass");
From an Instance
import org.granite.reflect.Type;
import path.to.MyClass;
var type:Type = Type.forInstance(new MyClass());From a Class:
import org.granite.reflect.Type;
import path.to.MyClass;
var type:Type = Type.forClass(MyClass);Whatever method you use, you will get a unique Type instance for each ActionScript 3 class (see below, however,
the ApplicationDomain Support section for very rare exceptions). This Type instance will give you access to all informations
about the underlying class, such as superclasses and implemented interfaces, fields, methods, constructor and annotations (see API documentation
).
Exploring Class Members
Class members are fields (constants, variables or accessors), constructor and methods. Unlike Java, the ActionScript 3 language does not give access to protected or private members: only those declared in the public namespace or in a specific namespace are accessible.
You may get all public members of a given Type via its members property. It will return an array of
subclasses such as
,
and :
import org.granite.reflect.Type;
import org.granite.reflect.Member;
import org.granite.reflect.Field;
import org.granite.reflect.Method;
import org.granite.reflect.Constructor;
var type:Type = Type.forName("path.to.MyClass");
var members:Array = type.members;
trace("Members of type: " + type.name);
for each (var member:Member in members) {
if (member is Field)
trace("Field " + Field(member).name + ":" + Field(member).type.name);
else if (member is Method)
trace("Method " + Method(member).name + ":" + Method(member).returnType.name);
else if (member is Constructor)
trace("Constructor " + Constructor(member).name);
}Instead of using the general members property, you may use specialized properties such as fields, methods, constructor or even properties:
properties are all not-static, public, read-write properties of a bean, either variables or accessors (get/set methods).
You may also retrieve a method (or field) by its name:
var type:Type = Type.forName("path.to.MyClass");
var field:Field = type.getInstanceField("myPropertyName");
if (field == null)
trace("Could not find 'myPropertyName' field in: " + type.name);
var method:Method = type.getInstanceMethod("myMethodName");
if (method == null)
trace("Could not find 'myMethodName' method in: " + type.name);|
Note
|
Unlike Java, the API distinguishes |
Furthermore, the API allows to filter returned members. For example, if you are interested in instance methods that have at least two parameters, you might write:
var type:Type = Type.forName("path.to.MyClass");
var methods:Array = type.getMethods(function (m:Method):Boolean {
return !m.isStatic() && m.parameters.length >= 2;
});You may of course use the same kind of code for filtering fields or properties.
Looking for Annotations
An interesting feature of ActionScript 3 language is its support for annotations (aka metadatada). Annotations may be placed on classes or interfaces, variables, accessors and methods (there is no support for constructor annotations at this time). Unlike Java however, AS3 annotations aren’t typed.
Four main methods are available to play with annotations (see the interface) for classes, fields and methods.
var type:Type = Type.forName("path.to.MyClass");
var annotations:Array = type.annotations;
for each (var annotation:Annotation in annotations) {
var args:Array = annotation.args;
trace(annotation.name + " with " + args.length + "args {");
for each (var arg:Arg in args)
trace(arg.key + "=" + arg.value);
trace("}");
}Looking for a specific annotation:
var type:Type = Type.forName("path.to.MyClass");
if (type.isAnnotationPresent("MyAnnotationName")) {
trace("Found annotation" + type.getAnnotation("MyAnnotationName").name);
}Filtering annotations based on a name pattern:
var type:Type = Type.forName("path.to.MyClass");
var annotations:Array = type.getAnnotations(false, "MyPrefix.*");In the latter case, the annotation name pattern is a regular expression that matches all annotations that have a name starting with "MyPrefix".
Note also that all these methods allow to look recursively for annotations:
public class MyClass implements MyInterface {
public function doSomething():void {}
}
...
[MyAnnotation1]
public interface MyInterface {
[MyAnnotation2]
function doSomething():void;
}
...
var type:Type = Type.forName("path.to.MyClass");
var method:Method = type.getInstanceMethod("doSomething");
if (type.isAnnotationPresent("MyAnnotation1", true))
trace("Found annotation" + type.getAnnotation("MyAnnotation1", true).name);
if (method.isAnnotationPresent("MyAnnotation2", true))
trace("Found annotation" + method.getAnnotation("MyAnnotation2", true).name);The boolean parameter set to true in isAnnotationPresent and getAnnotation calls tells the API to look recursively for the annotation, and
this code will actually print that the two annotations were found.
Beside these IAnnotatedElement methods, the Type class allows to quickly retieve methods or field annotated specific annotations:
var type:Type = Type.forName("path.to.MyClass");
var annotations:Array = type.getAnnotatedFields(false, "Bindable", "MyAnnotation");This code will return all fields annotated by at least one of the [Bindable] or [MyAnnotation] annotations.
Calling Constructors or Methods, and Getting or Setting Properties
The reflection API let you create new instances of a given class the following manner:
Creating new instances of a class:
var type:Type = type.forName("path.to.MyClass");
var instance:Object = type.constructor.newInstance(param1, param2);
// or type.constructor.newInstanceWithArray([param1, param2]);This way of creating new instances of a class is however limited to constructors that have at most ten mandatory parameters. You may bypass this
limitation by using directly the Class object, ie: new type.getClass()(arg1, arg2, …, arg10, arg11, …).
The main interests of the Constructor methods is that it let you use arrays of parameters and also that it will distinguish between an error thrown by
the constructor body (rethrown as an InvocationTargetError) and an error thrown because of a wrong number of parameters or a wrong type of
one of them (ArgumentError).
You may also call methods in a similar manner:
var type:Type = type.forName("path.to.MyClass");
var myInstanceMethod:Method= type.getInstanceMethod("myInstanceMethod");
myInstanceMethod.invoke(myClassInstance, param1, param2);
// or myInstanceMethod.invokeWithArray(myClassInstance, [param1, param2]);
var myStaticMethod:Method= type.getStaticMethod("myStaticMethod");
myStaticMethod.invoke(null, param1, param2);
// or myStaticMethod.invokeWithArray(null, [param1, param2]);There is no limitation about the number of parameters this time, and the API still distinguish between an error thrown by the method body
(rethrown as an InvocationTargetError) and an error thrown because of a wrong number of parameters or a wrong type of one of them (ArgumentError).
If you want to get or set the value of a given object property, you will use the following kind of code:
var type:Type = type.forName("path.to.MyClass");
var myInstanceField:Field= type.getInstanceField("myInstanceField");
var value:* = myInstanceField.getValue(myClassInstance);
myInstanceField.setValue(myClassInstance, "newValue");
var myStaticField:Field= type.getStaticField("myStaticField");
var value:* = myStaticField.getValue(null);
myStaticField.setValue(null, "newValue");|
Note
|
If you try to set the value of a constant, the |
Working with Application Domains
Like the class in Java, the ActionScript 3 language has support for class loading in different contexts called . This is an advanced feature that is mostly useful if you work with multiple Flex modules: SWF modules are loaded at runtime with their own set of classes and these classes may be owned and declared by a specific application domain.
Loading a module in a child ApplicationDomain:
var childDomain:ApplicationDomain = new ApplicationDomain(ApplicationDomain.currentDomain);
var context:LoaderContext = new LoaderContext(false, childDomain);
var loader:Loader = new Loader();
loader.load(new URLRequest("module.swf"), context);If a class is declared only in the above module (but not in the main application), it will be only available in the new child application domain.
As such, the following code will fail with a ClassNotFoundError exception:
try {
var type:Type = Type.forName("path.to.MyModuleClass");
}
catch (e:ClassNotFoundError) {
// Cannot be found in the main ApplicationDomain.
}The first solution is to pass the child domain as a parameter:
var type:Type = Type.forName("path.to.MyModuleClass", childDomain);This will work, but a better solution would be to register the child domain when loading the new module, so that the reflection API will look for classes in this child domain if it can’t find it in the main domain:
var childDomain:ApplicationDomain = new ApplicationDomain(ApplicationDomain.currentDomain);
// register the child domain.
Type.registerDomain(childDomain);
var context:LoaderContext = new LoaderContext(false, childDomain);
var loader:Loader = new Loader();
loader.load(new URLRequest("module.swf"), context);
// the type is found in the child domain without explicit reference.
var type:Type = Type.forName("path.to.MyModuleClass");|
Note
|
If you use an unknown domain parameter in a |
When you unload a module, you should always unregister any specific application domain by calling:
Type.unregisterDomain(childDomain);This will cleanup the API cache with all classes previously loaded in this domain.
|
Note
|
The |
Working with Specific Namespaces
The ActionScript 3 language lets you declare that may be used instead of the usual public namespace. The reflection API may be used in order to find a method or a field in a specific namespace:
package my.namespaces {
public namespace my_namespace = "http://www.my.org/ns/my_namespace";
}
...
public class MyClass {
import my.namespaces.my_namespace;
my_namespace var myField:String;
}
...
import my.namespaces.my_namespace;
var type:Type = Type.forName("path.to.MyClass");
var field:Field = type.getInstanceField("myField", my_namespace);Because the myField variable is declared in a specific namespace, a call to getInstanceField without the my_namespace parameter will return null.
Adding this optional parameter will fix the problem.
|
Note
|
When you use the |
Visitor Pattern Support
The reflection API comes with a visitor pattern implementation that let you introspect class instances without looping recursively on all their properties. The entry point of this visitor API is the class: it implements an advanced two-phases visitor mechanism (see the interface) that let you first review which property you’re interested in and then actually visit the selected ones.
This is a feature for advanced uses only, please refer to the API documentation and .
Big Numbers Implementations
Number serialization with the standard AMF3 protocol suffers from a lack of precision and support: Java long (64 bits integers),
and
types are converted to ActionScript 3
or String (see ).
These conversions lead to either approximation (significant bits may be lost) or uselessness (you can’t do any arithmetic operation with strings and you
can’t control the way their string representations are produced).
Because GraniteDS doesn’t allow string to number or number to string conversions (see Mapping Java and AS3 Objects), BigInteger and BigDecimal,
like long types, are both converted to Number by default, with even more potential approximations.
Starting with the release 2.2, GraniteDS offers ActionScript 3 implementations for Long, BigInteger and BigDecimal, and features a serialization mechanism
that preserves the exact value of each type (see API documentation ).
Working with Long, BigInteger or BigDecimal AS3 Types
The GraniteDS Long class let you do calculation with 64 bits signed integers.
All arithmetic operations are provided, as well as bitwise, bit shift and comparison operator equivalents.
import org.granite.math.Long;
var a:Long = new Long("9223372036854775807"); // or 0x7fffffffffffffff (max long value)
trace(a); // "9223372036854775807"
trace(a.toHexString()); // "7fffffffffffffff"
a = a.subtract(7);
trace(a); // "9223372036854775800"
trace(a.toHexString()); // "7ffffffffffffff8"
a = a.rightShift(4); // or a.divide(16)
trace(a); // "576460752303423487"
trace(a.toHexString()); // "7ffffffffffffff"
// etc.
// Wrong values with Numbers:
var b:Number = new Number("9223372036854775807"); // max long value
trace(b); // "9223372036854776000" (truncated value)...As you already have noticed from the above code, Long instances (as well as BigInteger and BigDecimal instances) are immutable: a.multiply(2)
won’t change the value of a, unless if you save the returned value of the method into the variable a (ie: a = a.multiply(2)).
The class, as its Java equivalent, represent an immutable arbitrary-precision integer. It provides analogues to all of ActionScript 3’s primitive integer operators (+, -, *, /), as well as comparison operators.
import org.granite.math.BigInteger;
var a:BigInteger = new BigInteger("9223372036854775807"); // max long value
a = a.add(1);
trace(a); // "9223372036854775808"
a = a.multiply(1000000);
trace(a); // "9223372036854775808000000"
// etc.With the BigInteger class, you cannot face the risk of an overflow due to the limited storage of a standard numeric type:
a BigInteger value can be arbitrary big and its value is only limited by the Flash VM memory.
The class, as its Java equivalent, represent an immutable, arbitrary-precision signed decimal number. It provides operations for arithmetic, scale manipulation, rounding, comparison and format conversion.
import org.granite.math.BigDecimal;
import org.granite.math.RoundingMode;
var a:BigDecimal = new BigDecimal("1"); // or BigDecimal.ONE
a = a.divide(3, 2, RoundingMode.DOWN);
trace(a); // "0.33"
// etc.With the BigDecimal class, you can control precisely the scale and the rounding behavior of a division. The above code means: divide 1 by 3,
with 2 digits to the right of the decimal point left in the result and apply a down rounding mode (truncate all extra digits).
Like BigInteger instances, BigDecimal instances have no precision limitation other than the Flash VM memory.
|
Note
|
Arithmetic binary methods are more versatile than their Java equivalents. You may pass not only |
See the API documentation for more informations.
Serializing Long, BigInteger or BigDecimal
As said above, without any specific configuration, long, Long, BigInteger or BigDecimal Java types are converted to AS3 Number (and vice-versa).
To enable serialization into their ActionScript 3 equivalents, you must enable specific externalizers in your granite-config.xml file:
<?xml version="1.0" encoding="UTF-8"?>
<!DOCTYPE granite-config PUBLIC "-//Granite Data Services//DTD granite-config internal//EN"
"http://www.graniteds.org/public/dtd/3.0.0/granite-config.dtd">
<granite-config>
<externalizers>
<externalizer
type="org.granite.messaging.amf.io.util.externalizer.LongExternalizer">
<include instance-of="java.lang.Long"/>
</externalizer>
<externalizer
type="org.granite.messaging.amf.io.util.externalizer.BigIntegerExternalizer">
<include instance-of="java.math.BigInteger"/>
</externalizer>
<externalizer
type="org.granite.messaging.amf.io.util.externalizer.BigDecimalExternalizer">
<include instance-of="java.math.BigDecimal"/>
</externalizer>
</externalizers>
<granite-config>You may of course enable only the externalizers you need, instead of configuring all of them.
With this configuration, you will be able to receive and send big numbers without potential lose of precision. Suppose you have a Java service
that returns and receives BigDecimal values:
import java.math.BigDecimal;
public class TestBigDecimal {
public BigDecimal returnBigValue() {
return new BigDecimal("10000000000000000000000000000.001");
}
public void receiveBigValue(BigDecimal value) {
// do something with the value.
}
}Within your Flex code, provided that the BigDecimalExternalizer is configured, you could use this kind of code:
import org.granite.math.BigDecimal;
private var testBigDecimalService:RemoteObject = null;
private var value:BigDecimal = null;
...
protected function onReturnBigValueResult(event:ResultEvent):void {
value = event.result as BigDecimal;
}
...
protected function sendBigValue():void {
testBigDecimalService.receiveBigValue(new BigDecimal("0.3333"));
}The same kind of code will work with long, Long and BigInteger types as well.
Integration with Code Generation Tools
Besides calling methods that return or receive big numbers, you may have Java bean or entity properties that use long, Long, BigInteger or BigDecimal types.
The standard GraniteDS code generation tools (see Gas3 Code Generator) follow the standard serialization mechanism (ie: converting long
and big number types to AS3 numbers) and generates Number typed variables for Java long and big number types.
In order to tell the code generation tools to generate AS3 Long, BigInteger and BigDecimal typed variables, you must enable three related options.
With the GraniteDS Eclipse builder, you will have to go to the "Options" panel and enable these three options:
With the Gas3 Ant task, you will use the following configuration in build.xml:
<gas3
externalizelong="true"
externalizebiginteger="true"
externalizebigdecimal="true"
...>
...
</gas3>Again, you may enable only one or more of these options, but you must follow the corresponding granite-config.xml configuration.
Suppose you have this kind of Java bean:
import java.math.BigDecimal;
import java.math.BigInteger;
public class MyBean {
private BigDecimal bd;
private BigInteger bi;
private Long l1;
private long l2;
public BigDecimal getBd() {
return bd;
}
public void setBd(BigDecimal bd) {
this.bd = bd;
}
// other get/set...
}With all options enabled, the result of generation will be has follow:
import org.granite.math.BigDecimal;
import org.granite.math.BigInteger;
import org.granite.math.Long;
[RemoteClass(alias="path.to.MyBean")]
public class MyBean {
private var _bd:BigDecimal;
private var _bi:BigInteger;
private var _l1:Long;
private var _l2:Long;
public function get bd():BigDecimal {
return _bd;
}
public function set bd(value:BigDecimal):void {
_bd = value;
}
// other get/set...
}With standard Gas3 configuration, the ActionScript 3 type generated for each property would have been Number.
Note on Performance
The ActionScript 3 implementation of big numbers give reasonable operation performance, but not as good as their Java equivalents.
At this time, due to the lack of a native 64 bits type in the Flash VM, arithmetic operations of the Long, BigInteger and BigDecimal AS3 implementations
rely partly on short (16 bits) native operations rather than integer 32 bits operations, in order to control overflows.
This leads to overall good performance, but not suitable for massive and complex computations.
Tide client framework
GraniteDS comes with a built-in client framework named Tide that is based on the concept of contextual components and serves as the basis for many advanced features (such as data management or simplified remoting).
This client framework implements some classic features of usual Java frameworks such as Spring or Seam and provides a programming model that should look familiar to Java developers. However it tries to be as transparent and unobtrusive as possible and yet stay close from the Flex framework concepts and traditional usage.
The framework features notably:
-
Dependency Injection:: using a programmatic way of declaring client components, Tide makes possible to write applications with a decoupled and testable architecture. The use of annotations to control injection and of various conventions greatly reduces the amount of code needed to wire the different parts of the application. See here for details.
-
Event Bus:: the Flex event model is very powerful and makes possible to decouple various parts of the application. However it requires a lot of manual setup to wire the event listeners to the dispatchers. Tide brings an event bus that centralizes the propagation of events and removes the need for wiring events manually. See here.
-
Contextual Components and Conversations:: it is relatively usual in enterprise applications to have separate portions of the application that should be isolated in different tabs or windows. For example in an insurance application it could be necessary to be able to open simultaneously many tabs for different customer records. Tide brings the concept of client conversation that makes possible to completely isolate different parts of the application while reusing the same components and events. See here.
Getting Started
To get started quickly and see what Tide can do, let’s see how we can Tidify a simple Hello World example in a few steps. In a first iteration, we do everything in one simple MXML:
<?xml version="1.0" encoding="utf-8"?>
<mx:Application
xmlns:mx="http://www.adobe.com/2006/mxml"
xmlns="*"
preinitialize="Tide.getInstance().initApplication()">
<mx:Script>
import org.granite.tide.Tide;
import org.granite.tide.Component;
import org.granite.tide.events.TideResultEvent;
[In]
public var helloService:Component;
private function hello():void {
helloService.hello(iname.text, helloResult);
}
private function helloResult(event:TideResultEvent):void {
lmessage.text = event.result as String;
}
</mx:Script>
<mx:TextInput id="iname"/>
<mx:Button label="Hello" click="hello()"/>
<mx:Label id="lmessage"/>
</mx:Application>This is almost exactly the same example that we have seen in the Tide Remoting chapter. In this first step we see only
the injection feature of Tide with the annotation [In] that can be placed on any writeable property of the component (public or with a setter).
Tide will by default consider any injection point with a type Component (or any type extending Component) as a remoting injection and will create
and inject a client proxy for a service named helloService (by default the name of the property is used as the name of the injected component).
This is more than enough for a Hello World application, but if we continue the application this way, everything will be in the same MXML. So in a first
iteration we want at least to separate the application initialization part and the real UI part. We can for example create a new MXML file named Hello.mxml:
<?xml version="1.0" encoding="utf-8"?>
<mx:Application
xmlns:mx="http://www.adobe.com/2006/mxml"
xmlns="*"
preinitialize="Tide.getInstance().initApplication()">
<mx:Script>
import org.granite.tide.Tide;
</mx:Script>
<Hello id="hello"/>
</mx:Application>Hello.mxml:<?xml version="1.0" encoding="utf-8"?>
<mx:Panel
xmlns:mx="http://www.adobe.com/2006/mxml"
xmlns="*">
<mx:Metadata>[Name]</mx:Metadata>
<mx:Script>
import org.granite.tide.Component;
import org.granite.tide.events.TideResultEvent;
[In]
public var helloService:Component;
private function hello():void {
helloService.hello(iname.text, helloResult);
}
private function helloResult(event:TideResultEvent):void {
lmessage.text = event.result as String;
}
</mx:Script>
<mx:TextInput id="iname"/>
<mx:Button label="Hello" click="hello()"/>
<mx:Label id="lmessage"/>
</mx:Panel>This is a bit better, the main UI is now defined in its own MXML. Tide has not much to do here, but note that we have added the [Name] metadata annotation
on the MXML to instruct Tide that it has to manage the component and inject the dependencies on properties marked with [In]. This was not necessary
in the initial case because the main application itself is always registered as a component managed by Tide (under the name application).
The next step is to decouple our UI component from the server interaction, so we can for example reuse the same UI component in another context or simplify the testing of the server interaction with a mock controller.
The first thing we can do is introduce a controller component (the C in MVC) that will handle this interaction and an interface so that we can easily switch the controller implementation. Then we can just bind it to the MXML component:
package com.myapp.controller {
[Bindable]
public interface IHelloController {
function hello(name:String):void;
function get message():String;
}
}package com.myapp.controller {
import org.granite.tide.Component;
import org.granite.tide.events.TideResultEvent;
[Name("helloController")]
public class HelloController implements IHelloController {
[In]
public var helloService:Component;
[Bindable]
public var message:String;
public function hello(name:String):void {
helloService.hello(name, helloResult);
}
private function helloResult(event:TideResultEvent):void {
message = event.result as String;
}
}
}We have to configure the controller in the main MXML and use it in the view:
<?xml version="1.0" encoding="utf-8"?>
<mx:Application
xmlns:mx="http://www.adobe.com/2006/mxml"
xmlns="*"
preinitialize="Tide.getInstance().initApplication()">
<mx:Script>
import org.granite.tide.Tide;
Tide.getInstance().addComponents([HelloController]);
</mx:Script>
<Hello id="hello"/>
</mx:Application><?xml version="1.0" encoding="utf-8"?>
<mx:Panel
xmlns:mx="http://www.adobe.com/2006/mxml"
xmlns="*">
<mx:Metadata>[Name]</mx:Metadata>
<mx:Script>
import com.myapp.controller.IHelloController;
[Bindable] [Inject]
public var helloController:IHelloController;
</mx:Script>
<mx:TextInput id="iname"/>
<mx:Button label="Hello" click="helloController.hello(iname.text)"/>
<mx:Label id="lmessage" text="{helloController.message}"/>
</mx:Panel>This is already quite clean, and completely typesafe. The annotation [Inject] indicates that Tide should inject any managed component which class
extends or implements the specified type, contrary to the annotation [In] that is used to inject a component by name.
Here the instance of HelloController will be injected, in a test case you could easily configure an alternative TestHelloController implementing
the same interface.
This kind of architecture is inspired by JSF (Java Server Faces) and works fine. However there is still a bit of coupling between the views and the controllers, and it does not really follow the usual event-based style of the Flex framework. To obtain a more pure MVC model, we have to add a model component that will hold the state of the application, and an event class dispatched through the Tide event bus to decouple the view and the controller:
package com.myapp.events {
import org.granite.tide.events.AbstractTideEvent;
public class HelloEvent extends AbstractTideEvent {
public var name:String;
public function HelloEvent(name:String):void {
super();
this.name = name;
}
}
}package com.myapp.model {
[Bindable]
public interface IHelloModel {
function get message():String;
function set message(message:String):void;
}
}package com.myapp.model {
[Name("helloModel")]
public class HelloModel implements IHelloModel {
[Bindable]
public var message:String;
}
}The controller will now observe our custom event, and set the value of the message property in the model:
package com.myapp.controller {
import org.granite.tide.Component;
import org.granite.tide.events.TideResultEvent;
import com.myapp.events.HelloEvent;
[Name("helloController")]
public class HelloController implements IHelloController {
[In]
public var helloService:Component;
[Inject]
public var helloModel:IHelloModel;
[Observer]
public function hello(event:HelloEvent):void {
helloService.hello(event.name, helloResult);
}
private function helloResult(event:TideResultEvent):void {
helloModel.message = event.result as String;
}
}
}Lastly we configure the new model component and dispatch the custom event from the UI:
<?xml version="1.0" encoding="utf-8"?>
<mx:Application
xmlns:mx="http://www.adobe.com/2006/mxml"
xmlns="*"
preinitialize="Tide.getInstance().initApplication()">
<mx:Script>
import org.granite.tide.Tide;
Tide.getInstance().addComponents([HelloController, HelloModel]);
</mx:Script>
<Hello id="hello"/>
</mx:Application><?xml version="1.0" encoding="utf-8"?>
<mx:Panel
xmlns:mx="http://www.adobe.com/2006/mxml"
xmlns="*">
<mx:Metadata>[Name]</mx:Metadata>
<mx:Script>
import com.myapp.events.HelloEvent;
import com.myapp.model.IHelloModel;
[Bindable] [Inject]
public var helloModel:IHelloModel;
</mx:Script>
<mx:TextInput id="iname"/>
<mx:Button label="Hello" click="dispatchEvent(new HelloEvent(iname.text))"/>
<mx:Label id="lmessage" text="{helloModel.message}"/>
</mx:Panel>The main difference here is that we use an event to communicate between the view and the controller. This would allow for example many controllers
to react to the same user action. The view does not know which component will handle the event, and the controllers simply specify that they are
interested in the event HelloEvent with the annotation [Observer] on a public handler method. Tide automatically wires the dispatcher and the
observers through its event bus by matching the event type.
Note that the HelloEvent class extends a (pseudo) abstract class of the Tide framework. If you don’t want any such dependency, you can use any Flex event
but then you have to add an annotation [ManagedEvent] on the dispatcher to instruct Tide which events it has to manage.
See more below in the section Event Bus.
Now we have a completely decoupled and testable architecture, however everything is wired typesafely, meaning that any error will be detected at compile time and not at runtime.
With some Java server frameworks (Spring and CDI) we can even achieve complete client/server type safety by generating a typed client proxy. The controller would then look like:
package com.myapp.controller {
import org.granite.tide.Component;
import org.granite.tide.events.TideResultEvent;
import com.myapp.events.HelloEvent;
import com.myapp.service.HelloService;
[Name("helloController")]
public class HelloController implements IHelloController {
[Inject]
public var helloService:HelloService;
[Inject]
public var helloModel:IHelloModel;
[Observer]
public function hello(event:HelloEvent):void {
helloService.hello(event.name, helloResult);
}
private function helloResult(event:TideResultEvent):void {
helloModel.message = event.result as String;
}
}
}Hopefully you have now a relatively clear idea on what it’s all about. The following sections will describe all this in more details.
Application Initialization
The framework mainly consists in a global singleton object that holds the full configuration of the application. This singleton of type Tide
has to be initialized in the preinitialize handler of the main application:
<mx:Application ...
preinitialize="Tide.getInstance().initApplication()">
...
</mx:Application>|
Note
|
You will have to use the framework-specific Tide singletons (judiciously named |
For example with Spring:
<mx:Application ...
preinitialize="Spring.getInstance().initApplication()">
...
</mx:Application>The Tide framework makes heavy use of Flex annotations, so you will need to configure your build system (Flash Builder, Ant or Maven) correctly so the Flex compiler keeps the necessary annotations at runtime (see the Project Setup chapter for Ant, Maven and Flash Builder).
Contexts and Components
The core concepts of the Tide framework are the context and the component.
Components are stateful objects that can be of any ActionScript 3 class with a default constructor and can have a unique instance stored in each context of the application. Usually components have a name so they can be referenced easily.
There are two main kinds of contexts:
-
The global context is a unique context that exists during the whole lifetime of the Flex application. It can be compared to to the server-side session.
-
The conversation contexts are temporary contexts that can be created and destroyed at any time during the lifetime of the application. Many conversation contexts can exist simultaneously and are isolated from each other. A conversation context always has an identifier. A conversation context is usually tied to a particular use case in the application (a wizard-style form with many pages, or a window displaying some data).
A context is mostly a container for component instances. A component should be defined with a scope that describes in which context its instances will be created and managed. There are three available scopes:
-
The session scope corresponds to the global context. A component in the session scope can have only one instance in the whole application.
-
The conversation scope corresponds to the conversation context. A component in the conversation scope cannot exist in the global context and will have one unique instance in each conversation context.
-
The event scope is not tied to a particular kind of contexts. A component in the event scope will have one unique instance in each context, global or conversation.
The global context object can easily be retrieved from the Tide singleton:
var tideContext:Context = Tide.getInstance().getContext();Conversation contexts can be retrieved by their identifier and are automatically created if they do not exist:
var tideContext:Context = Tide.getInstance().getContext("someConversationId");Note however that this is not the recommended way of working with conversation contexts. See the Conversations section.
Components can be registered programmatically by any of the following methods:
-
Manual registration with
Tide.getInstance().addComponent():Tide.getInstance().addComponent("myComponent", MyComponent):
This method takes two main arguments: the component name and the component class.
-
It also has optional arguments that can be used to describe the metadata of the component:
Tide.getInstance().addComponent(componentName, componentClass, inConversation, autoCreate, restrict);inConversation is a boolean value indicating whether the component in conversation-scoped
(it is false by default), autoCreate is true by default and indicates that the component will
be automatically instantiated by the container. Finally restrict is related to security and indicates that the component instance
has to be destroyed when the user logs out from the application (so that its state cannot be accessed by unauthenticated users).
-
When necessary, it is possible to define initial values for some properties of the component instances with:
Tide.getInstance().addComponentWithFactory("myComponent", MyComponent, { property1: value1, property2: value2 });Of course, this assumes that the component class has accessible setters for the properties specified in the initialization map. Values may be
string expressions of the form #{component.property}, and are then evaluated at run time as a chain of properties starting
from the specified contextual component. All other values are assigned as is.
It is alternatively possible (and indeed recommended) to describe the metadata of the component with annotations in the component class. This simplifies the component registration and is often more readable.
Tide.getInstance().addComponents([MyComponent]);
[Name("myComponent")]
public class MyComponent {
public MyComponent():void {
}
}|
Warning
|
A component class must have a default constructor. |
Once a component is registered, you can get an instance of the component from the Context object by its name, for example tideContext.myComponent
will return the unique instance of the component MyComponent that we have defined before.
You can also retrieve the instance of a component that extend a particular type with tideContext.byType(MyComponent).
Of course it is more useful when specifying an interface so you can get its configured implementation: tideContext.byType(IMyComponent).
When many implementations of an interface are expected to exist in the context, you can use tideContext.allByType(IMyComponent) to retrieve all of them.
|
Note
|
If no component has been registered with a particular name, |
When using dependency injection annotations ([In], [Out] and [Inject]) on component properties, Tide implicitly registers a component
of the target type when it is a concrete class (not an interface):
[Name("myInjectedComponent")]
public class MyInjectedComponent {
[In]
public var myComponent:MyComponent;
}Will implicity register a component of class MyComponent, even if you have never called Tide.addComponent() for this type.
Besides all these options for registering components, it is also possible to dynamically assign a component instance at any time in a Tide
context with tideContext.myComponent = new MyComponent(). This allows you to precisely control the instantiation of the component and will implicitly
register the corresponding component from the object class. For example you can use this feature to switch at runtime between different implementations
of a component interface.
The last case is the one of UI components that are added and removed from the Flex stage. One of the things that Tide does at initialization time
in the method initApplication() is registering listeners for the Flex events add and remove. On the add event, it automatically registers any
component annotated with [Name] and puts its instance in the context. It also removes the instance from the context when getting the remove event.
Note that this behaviour can incur a significant performance penalty due to the ridiculously slow implementation of reflection in ActionScript 3
so it can be disabled by Tide.getInstance().initApplication(false). You will then have to wire the UI components manually.
Dependency Injection
Once you have configured all components of the application, the Tide framework is able to inject the correct component instances for you anywhere you
specify that you have a dependency by using one of the annotations [In] or [Inject].
The annotation [In] indicates a name-based injection point, meaning that Tide will assign the instance of the component with the specified name:
[Name("myInjectedComponent")]
public class MyInjectedComponent {
[In("myComponent")]
public var myComponent:IMyComponent;
}|
Warning
|
Due to limitations in AS3 reflection, properties annotated with |
It is important to note that injection in Tide is not done statically at instantiation time. It is implemented as a Flex data binding between the
source tideContext.myComponent and the target myInjectedComponent.myComponent. That means that any change in the context instance is automatically
propagated to all injected instances. For example if you assign manually a new instance to the context with tideContext.myComponent = new MyExtendedComponent(),
the property myInjectedComponent.myComponent will be updated accordingly (assuming MyExtendedComponent implements IMyComponent, otherwise you
will get a runtime exception).
In most cases, you can omit the name argument from the annotation and let Tide use the property name as a default. The previous example can be reduced to:
[In]
public var myComponent:IMyComponent;You can also use property chain expressions of the form #{mySourceComponent.myProperty}:
[In("#{mySourceComponent.myProperty}")]
public var myComponent:IMyComponent;Tide will then bind tideContext.mySourceComponent.myProperty to the target myInjectedComponent.myComponent.
Depending on the autoCreate metadata of the source component, Tide will automatically instantiate the component to bind it to the injection point.
For components that are not auto created, you can force the instantiation at the injection point with:
[In(create="true")]
public var myComponent:IMyComponent;This ensures that myComponent will never be null.
Tide also supports the concept of outjection, meaning that a component can publish some of its state to the context. This can be done with the
annotation [Out], and just works in a similar way as injection by creating a data binding between the outjecting component and the context:
[Name("myOutjectingComponent")]
public class MyOutjectingComponent {
[Bindable] [Out]
public var myComponent:IMyComponent;
public function doSomething():void {
myComponent = new MyComponent();
}
}In this case, Tide will create a binding from myOutjectingComponent.myComponent to tideContext.myComponent. It is important that outjected
properties are [Bindable] because this is how data binding is able to propagate the value to listeners.
The method doSomething will change the value of myComponent in the context and also propagate it to all components having it in one of their injection points.
With server frameworks that support bijection (only Seam for now), you can also mark the outjection as remote, so Tide will also propagate the value to the server context. This requires that the value is serialized to the server and is thus used generally with entities or simple values (strings or numbers):
[Name("myOutjectingComponent")]
public class MyOutjectingComponent {
[Bindable] [Out(remote="true")]
public var myEntity:MyEntity;
public function doSomething():void {
myEntity = new MyEntity();
}
}Outjection is an interesting way of decoupling controllers and views. In our initial example, we could have used outjection instead of a typesafe model:
<?xml version="1.0" encoding="utf-8"?>
<mx:Panel
xmlns:mx="http://www.adobe.com/2006/mxml"
xmlns="*">
<mx:Metadata>[Name]</mx:Metadata>
<mx:Script>
import com.myapp.events.HelloEvent;
[Bindable] [In]
public var message:String;
</mx:Script>
<mx:TextInput id="iname"/>
<mx:Button label="Hello" click="dispatchEvent(new HelloEvent(iname.text))"/>
<mx:Label id="lmessage" text="{message}"/>
</mx:Panel>package com.myapp.controller {
import org.granite.tide.events.TideResultEvent;
import com.myapp.events.HelloEvent;
import com.myapp.service.HelloService;
[Name("helloController")]
public class HelloController implements IHelloController {
[Inject]
public var helloService:HelloService;
[Bindable] [Out]
public var message:String;
[Observer]
public function hello(event:HelloEvent):void {
helloService.hello(event.name, helloResult);
}
private function helloResult(event:TideResultEvent):void {
this.message = event.result as String;
}
}
}This is very convenient but note that it’s relatively fragile and difficult to maintain as it is based on string names, and that you have to take care
of name conflicts in the global context. Here you would have to ensure that no other component use the name message for another purpose.
This problem can however be limited by defining proper naming conventions (for example with a prefix per module, or per use case).
Specifying an injection point with [In] is also based on string names and thus not typesafe. Alternatively you can (and should whenever possible)
use the annotation [Inject] that specifies a type-based injection point. Tide will lookup any component that extend or implement the specified type
and inject an instance of this component:
[Name("myInjectedComponent")]
public class MyInjectedComponent {
[Inject]
public var bla:IMyComponent;
}Here no name is used, Tide uses only the target type IMyComponent to match with a registered component. If more than one component match the type,
the result is undefined and the first registered component will be selected. It is thus recommended to register only one component for each interface
used in injection points and to avoid too generic types in injection points (e.g. [Inject] public var bla:Object will generally not be very useful).
However it can be useful to register many component implementations for the same interface in the case of service registries. You can define a
service interface, register many implementations, and then retrieve all registered implementations with tideContext.allByType(IMyService).
This is for example how Tide handles exception converters or message interceptors internally.
You can also inject the context object to which the component belongs with either [In] or [Inject] by specifying the source type Context
or BaseContext. This will always be a static injection (i.e. not a binding) because the context of a component instance cannot change.
[Inject]
public var myContext:Context;Tide manages the lifecycle of the components (instantiation and destruction) and provides a means to react to these events with the annotations
[PostConstruct] and [Destroy] than can be put on any public method without argument of the component and will be called by Tide on
the corresponding events. [PostConstruct] is called after all injections and internal initializations have been done so it can been used
to do some custom initialization of a component instance. [Destroy] can be used to cleanup used resources.
[Name("myComponent")]
public class MyComponent {
[PostConstruct]
public function init():void {
// ...
}
[Destroy]
public function cleanup():void {
/// ...
}
}Event Bus
We have already seen in the previous section how the Tide context can server as a centralized bus to propagate events between managed components.
The [In] and [Out] annotations were used to define a kind of publish/subscribe model for events of type PropertyChangeEvent.
However other kinds of events can be propagated though the event bus. Tide automatically registers itself as listener to managed events on all managed components, and forwards the events it receives to interested observers by matching the event with the observer definition.
Let’s see in a first step what kind of events can be managed:
-
Events of class
org.granite.tide.events.TideUIEventare considered as untyped events and only their name is used to match against observers. -
Events of type
org.granite.tide.events.TideUIEvent(orTideUIEvent.TIDE_EVENT), in particular all events extending theAbstractTideEventclass are considered as typed events and only their class is used to match against observers. -
Events declared with the
[ManagedEvent]annotation on the dispatcher component are also matched by their type.
There are two ways of dispatching untyped events:
public function doSomething():void {
dispatchEvent(new TideUIEvent("myEvent", arg1, { arg2: "value" }));
}TideUIEvent takes a variable list of arguments that will be propagated to all observers.
The following method is stricly equivalent and is a bit shorter if you already have an instance of the context somewhere:
public function doSomething():void {
tideContext.raiseEvent"myEvent", arg1, { arg2: "value" });
}Untyped events are very convenient but as said before they are matched by name (like normal Flex events) and thus are prone to typing errors when writing the name of the event in the observer. It is thus recommended when possible to define typed events. As Tide will match by the event class, the Flex compiler will immediately detect that a class name has been incorrectly typed.
There are two options to create custom typed events. First you can create an event class with the type TideUIEvent.TIDE_EVENT.
Tide will always automatically listen to this type of events and there is no more configuration needed.
public class MyEvent extends Event {
public var data:Object;
public function MyEvent(data:Object):void {
super(TideUIEvent.TIDE_EVENT, true, true);
this.data = data ;
}
}You can also simply extend the existing AbstractTideEvent class:
public class MyEvent extends AbstractTideEvent {
public var data:Object;
public function MyEvent(data:Object):void {
super();
this.data = data ;
}
}Note that when creating custom event classes, you should set the bubbling and cancelable properties of the event to true:
Bubbling is necessary when you dispatch the event from UI components. It allows to declare only the top level UI components as Tide-managed
components, and avoid the performance cost of managing all UI components. For example ItemRenderers can simply dispatch such events,
they will be bubbled to their owning UI component and there received and handled by Tide, without Tide knowing anything of the item renderer itself.
Cancelable makes possible to call event.stopPropagation() to stop Tide from propagating the event further.
This first option is easy to use, but creates a compile-time dependency on the Tide framework (either extending AbstractTideEvent or
using the type TIDE_EVENT). You can alternatively create any Flex custom event and then declare it as a managed event in all components that dispatch it.
public class MyEvent extends Event {
public var data:Object;
public function MyEvent(data:Object):void {
super("myEvent", true, true);
this.data = data ;
}
}[Name("myComponent")]
[ManagedEvent(name="myEvent")]
public class MyComponent extends EventDispatcher {
public function doSomething():void {
dispatchEvent(new MyEvent({ property: "value" }));
}
}Note that this second option is more vulnerable to typing errors because you have to write the event name in the [ManagedEvent] annotation
and the Flex compiler does not enforce any control in the annotations.
Now that you know how to dispatch an event that Tide will be able to manage, let’s see how to tell Tide what to do with this event. The key for this
is the annotation [Observer] that can be put on any public method of a component and will be called when
Once again there are a few possibilities to observe events passed through the bus. For untyped events, you have to specify the name of the event you want
to observe in the [Observer("myEvent")] annotation. The target observer method can either have a single argument of type TideContextEvent,
or a list of arguments that will be set with the arguments of the source TideUIEvent:
[Observer("myEvent")]
public function eventHandler(event:TideContextEvent):void {
// You can get the arguments from the events.params array
var arg1:Object = event.params[0];
var arg2:Object = event.params[1]["arg2"];
...
// arg2 should be equal to "value"
}Or
[Observer("myEvent")]
public function eventHandler(arg1:Object, arg2:Object):void {
// arg2["arg2"] should be equals to "value"
}One method can listen to more than one event type by specifying multiple [Observer] annotations:
[Observer("myEvent")]
[Observer("myOtherEvent")]
public function eventHandler(arg1:Object, arg2:Object):void {
// arg2["arg2"] should be equals to "value"
}Or by separating the event types with commas:
[Observer("myEvent, myOtherEvent")]
public function eventHandler(arg1:Object, arg2:Object):void {
// arg2["arg2"] should be equals to "value"
}Observers for typed events can have only one form:
[Observer]
public function eventHandler(event:MyEvent):void {
// Do something
}The match will always be done on the event class, so there is nothing to declare in the [Observer] annotation. Note that this is recommended
to use this kind of typed events for coarse grained events in your application, otherwise this can lead to a proliferation of event classes.
Future versions of Tide may allow for more specific matching on the handler method allowing the reuse of the same event class in different use cases.
There are other possibilities than the annotation [Observer] to register event observers:
-
Tide.getInstance().addEventObserver("myEvent", "myComponent", "myMethod")can be used to register the methodmyMethodof the componentmyComponentas observer for the eventmyEvent. This is exactly equivalent as putting the annotation[Observer("myEvent")]on the method. -
Tide.getInstance().addContextEventListener("myEvent", listener)can be used to directly register an event listener method for a particular event. It can also be called from the context object withtideContext.addContextEventListener("myEvent", listener).
If a component has registered an observer for an event and is not instantiated when the event is raised, it will be automatically instantiated,
unless it is marked as [Name("myComponent", autoCreate="false")]. It is however possible to disable this automatic instantiation for a
particular observer with [Observer("myEvent", create="false")]. In this case the target component instance will react to the event only if
it already exists in the context.
Conversations
A conversation context shares its two main features with the global context: it is a container of component instances and propagates events between these component instances. It has two important differences:
-
Many conversation contexts can exist simultaneously in the application.
-
A conversation context can be created and destroyed at any time during the application.
It is important to note that all conversation contexts are completely isolated. A component instance in a conversation context can only receive events dispatched from another component instance in the same conversation context. Similarly when using injection or outjection, the injected instance will be in the same conversation context as the target component instance.
Another important thing is that conversation contexts are in fact considered as children of the global context. There are some visibility rules between a conversation context and the global context:
-
A global component can observe events dispatched from conversation components. Such an observer will receive events from all the existing conversation contexts and can determine if necessary the source context of the event with
event.context.WarningNote that in this case all parameters of the event must be serializable (annotated with
[RemoteClass]) because the parameters are cloned when passed from one context to another -
A conversation component cannot observe events dispatched from the global context.
-
The same component name cannot be reused by both a conversation scoped component and a global scoped component. A global component instance can be accessed by its name from any conversation context: if
myComponentis the name of a global component,tideContext.myComponentwill always return the instance of the global component for any existing context. -
Similarly when using injection, it is possible to inject a global component instance in a conversation component instance with
[In]:[Name("myConversationComponent", scope="conversation")] public class MyConversationComponent { [In] public var myComponent:MyComponent; // This will always inject the instance of the global component } -
A conversation component cannot outject its properties to the global context.
-
Conversation contexts can be nested. In this case the same visibility rules apply between a conversation context and its parent context.
A conversation context can be simply created by Tide.getInstance().getContext("someConversationId"), however the recommended way to create a
new conversation is to dispatch an event that implement IConversationEvent from the global context (or from a conversation context to create
a nested conversation). The IConversationEvent has a conversationId property that will be used as id of the newly created conversation.
The built-in TideUIConversationEvent can be used instead of TideUIEvent when using untyped events. If the conversation id is set to null,
Tide will automatically assign an incremental numeric id to the new context.
<mx:List id="list" dataProvider="{customerRecords}"
change="dispatchEvent(new TideUIConversationEvent(list.selectedItem.id, "viewRecord", list.selectedItem))")/>[Name("customerRecordController")]
public class CustomerRecordController {
[Observer("viewRecord")]
public function selectRecord(record:Record):void {
// Start the conversation
// For example create a view and display it somewhere
}
}A conversation context can be destroyed by tideContext.meta_end(). We’ll see the use of the merge argument of this method later.
Here is a more complete example of end-to-end conversation handling by a controller:
[Name("customerRecordController", scope="conversation")]
public class CustomerRecordController {
[In]
public var mainTabNavigator:TabNavigator;
[In(create="true")]
public var recordView:RecordView;
[Observer("viewRecord")]
public function viewRecord(record:Record):void {
recordView.record = record;
mainTabNavigator.addChild(recordView);
}
[Observer("closeRecord")]
public function closeRecord(event:TideContextEvent):void {
mainTabNavigator.removeChild(recordView);
event.context.meta_end();
}
}<mx:Panel label="Record #{record.id}">
<mx:Metadata>[Name("recordView", scope="conversation")]</mx:Metadata>
<mx:Script>
[Bindable]
public var record:Record;
</mx:Script>
<mx:Label text="{record.description}"/>
<mx:Button label="Close"
click="dispatchEvent(new TideUIEvent('closeRecord'))"/>
</mx:Panel>The use case is that we want to open a new tab to display a customer record when the user clicks on the customer in a list. Here is the process:
-
The click on the list dispatches a conversation event with the id of the record as conversation id and the selected record as argument.
-
Tide creates a new context with the specified id, instantiates the controller component and calls the observer method
viewRecord. -
The controller uses an injected view that is instantiated and managed by Tide (with the
[In(create="true")]), sets itrecordproperty and adds it to the main tab navigator. Note that we could have outjected the record from the controller and injected it in the view but If the user clicks on many elements in the list, one tab will be created for each element.
The user can then click on the Close button that will trigger the closeRecord event. The controller will then remove the tab from the navigator
and end the conversation context. meta_end() schedules the destruction of the context for the next frame, then all component instances of the
context and the context itself are destroyed.
See this for a complete implementation of conversations.
Integration with Data Management
One of the main points of the Tide framework is that its concepts are completely integrated with the data management features. In particular each context holds its own entity cache so you can modify data in one conversation without touching the others. Only when the user decides to save its changes you can trigger the merge of the changes in the global context and its entity cache, and to the other conversation contexts.
Each context having its own entity cache has some implications:
-
The same entity instance (with the same
uid) can exist once in each context. -
All changes on an entity in the global cache are always propagated to the caches of all conversation contexts (but will NOT overwrite changes made directly in the conversation context).
-
When dispatching events which have entity arguments from the global context to conversation contexts (with
IConversationEvent) or the other way (global observers of conversation events), Tide has to translate the event payload from one cache to the other. In the previous example, theRecordreceived by the controller is NOT the same instance as the one dispatched from the list, it is the copy of this object in the conversation context entity cache. That means that you can do whatever you want on this object, it will not be reflected on the source list. -
At any point, you can merge the cache of a conversation context in the global context (and thus in all other conversation contexts) with
tideContext.meta_mergeInGlobalContext()ortideContext.meta_mergeInParentContext()(for nested conversations). Also when ending a conversation context,tideContext.meta_end(true)will merge the changes in the parent context before ending the conversation.tideContext.meta_end(false)will drop any change made in the conversation context and is suitable for Cancel buttons for example.
Extension and Plugins
Tide provides a few extension points that can be used to extend its functionality.
First there are four events that are dispatched on some internal events:
-
org.granite.tide.startup: Dispatched at application startup, can be used to do some global initialization. -
org.granite.tide.contextCreate: Dispatched at creation of a new conversation context, can be used to do initialization of the context. -
org.granite.tide.contextDestroy: Dispatched at destruction of a conversation context, can be used to cleanup resources. -
org.granite.tide.contextResult: Dispatched at each remoting result. -
org.granite.tide.contextFault: Dispatched at each remoting fault, can be used to run global handling of faults. -
org.granite.tide.login: Dispatched at user login (or relogin when the user refreshes the browser page). -
org.granite.tide.logout: Dispatched before user logout. -
org.granite.tide.loggedOut: Dispatched after user logout.
All these events can be observed from any component as standard Tide events:
[Name("myComponent")]
public class MyComponent {
[Observe("org.granite.tide.startup")]
public function startup():void {
// Do some initialization stuff here...
}
}It is also possible to integrate a bit more deeply with the framework by implementing a plugin (the interface ITidePlugin).
A plugin must be a singleton with a getInstance() method and implement a setter for the tide property. It can then register event listeners
on the Tide instance itself. The type of the dispatched event is TidePluginEvent and it contains some parameters depending on the event in its
map property params. The following events are dispatched:
-
org.granite.tide.plugin.addComponent: Dispatched when a new component is registered, can be used to participate in the scan of the annotations.event.params.descriptorcontains the internal component descriptor (of typeComponentDescriptor), see the API documentation for details on this class, andevent.params.typecontains theTypefor the component class that can be used to retrieve annotations or metadata. -
org.granite.tide.plugin.setCredentials: Dispatched when the user credentials are defined, it can be used to set the user credentials on some object of the plugin.event.paramshas two parametersusernameandpassword. -
org.granite.tide.plugin.loginSuccess: Dispatched when the user has been logged in successfully.event.params.sessionIdcontains the user session id received from the server. -
org.granite.tide.plugin.loginFault: Dispatched when the user login has failed. -
org.granite.tide.plugin.logout: Dispatched when the user logs out.
Here is an example of a simple (and useless) plugin that traces the creation of all components annotated with [Trace]:
public class TideTrace implements ITidePlugin {
private static var _tideTrace:TideTrace;
public static function getInstance():TideTrace {
if (!_tideTrace)
_tideTrace = new TideTrace();
return _tideTrace;
}
public function set tide(tide:Tide):void {
tide.addEventListener(Tide.PLUGIN_ADD_COMPONENT, addComponent);
}
private function addComponent(event:TidePluginEvent):void {
var descriptor:ComponentDescriptor = event.params.descriptor as ComponentDescriptor;
var type:Type = event.params.type as Type;
var anno:Annotation = type.getAnnotationNoCache('Trace');
if (anno != null)
trace("Component added: " + descriptor.name);
}
}Security
There is not much Tide can do concerning security, however it is possible to declare that a particular component can exists only when the user
is authenticated so its state cannot be accessed or modified from unauthorized users. You can use [Name("myComponent", restrict="true")] on
a component to specify this.
Tide will then automatically clear all data of the restricted components when the user logs out and the session becomes anonymous.
Modules
If you have a big number of components to initialize, your main MXML application will quickly be polluted with lots of Tide initializations.
This can be cleaned up by implementing a Tide initialization module class, which just has to implement ITideModule.
Then you can use addModule to call the initialization of a whole application:
Tide.getInstance().addModule(MyModule);
public class MyModule implements ITideModule {
public function init(tide:Tide):void {
tide.addExceptionHandler(ValidationExceptionHandler);
...
tide.addComponents([Component1, Component2]);
tide.addComponent("comp3", Component3);
...
}
}You can think of it as a XML configuration file, such as Seam components.xml or Spring context.xml.
Using Tide modules is also necessary if you need to register components that are dynamically loaded from a Flex module. In this case, Tide will need to
know the Flex ApplicationDomain to which the component classes belong, and you have to pass it to the Tide.addModule() method.
Here is an example on how to handle dynamic loading of Flex modules :
private var _moduleAppDomain:ApplicationDomain;
public function loadModule(path:String):void {
var info:IModuleInfo = ModuleManager.getModule(path);
info.addEventListener(ModuleEvent.READY, moduleReadyHandler, false, 0, true);
_moduleAppDomain = new ApplicationDomain(ApplicationDomain.currentDomain);
info.load(appDomain);
}
private function moduleReadyHandler(event:ModuleEvent):void {
var loadedModule:Object = event.module.factory.create();
Tide.getInstance().addModule(loadedModule, _moduleAppDomain);
}Alternatively you can also use the Flex MX or Spark ModuleLoader components, and just ensure that you are using a specific application domain
when loading a module.
<mx:ModuleLoader id="moduleLoader"
applicationDomain="{new ApplicationDomain(ApplicationDomain.currentDomain)}"
ready="Tide.getInstance().addModule(moduleLoader.child, moduleLoader.applicationDomain)"/>You can then change the loaded module with this code :
private function changeModule(modulePath:String):void {
if (moduleLoader.url != modulePath) {
moduleLoader.applicationDomain = new ApplicationDomain(ApplicationDomain.currentDomain);
moduleLoader.unloadModule();
moduleLoader.loadModule(modulePath);
}
}Support for Deep Linking
Flash/Flex provides an API to handle SEO friendly linking from the url of the swf. For example you may want to provide a simple url to access
a particular resource : . To have this working you have to generate the html wrapper
with Flash Builder / Ant / Maven and use the html wrapper instead of accessing the swf directly.
See for more details on Flex deep linking.
Tide provides a way to integrate deep linking with the MVC framework. It uses a technique inspired by JAX-RS so that changes in the browser url
will trigger a method on a component. It first requires to enable the corresponding Tide plugin just after the Tide initialization with :
Tide.getInstance().initApplication();
Tide.getInstance().addPlugin(TideUrlMapping.getInstance());You will also need to keep the annotation [Path] in your compilation options in Flash Builder / Ant / Maven.
Once enabled, the plugin will listen to browser url changes, and split the url after # in two parts.
The part before the first slash will identify the target controller, and the part after the first slash will determine the target method.
In the previous example, the controller has to be annotated with [Path("product")] and the method with [Path("display/tv")] :
[Name("productController")]
[Path("product")]
public class ProductController {
[Path("display/tv")]
public function displayTv():void {
// Do something to display the TV...
}
}Of course you won’t want to have a different method for each kind of resource so you can use placeholders that will match method arguments:
[Name("productController")]
[Path("product")]
public class ProductController {
[Path("display/{0}")]
public function display(productType:String):void {
// Do something to display the product...
}
}Data Management
GraniteDS provides various features that simplify the handling of data transfer between Flex and Java EE, in particular when using JPA or Hibernate as a persistence mechanism.
JPA and managed entities
Tide provides an integration between the Flex/LCDS concept of managed entities and the server persistence context (JPA or Hibernate).
In particular, Tide maintains a client-side cache of entity instances and ensures that every instance is unique in the Flex client context. To achieve this, it requires a unique identifier on each entity class. This is why GraniteDS supports the concept of managed entities.
All entities marked as [Managed] are considered as corresponding to Hibernate/JPA managed entities on the server.
It is possible to do the same by implementing IEntity and extending EventDispatcher. The managed entities delegate all operations on their getters/setters
to the Tide context to which they belong so all changes can be tracked.
From the Flex documentation of IManaged:
private var _property:String;
public function get property():String {
return Manager.getProperty(this, "property", _property);
}
public function set property(value:String):void {
Manager.setProperty(this, "property", _property, _property = value);
}The Tide Managed implementation itself forwards the getters/setters to its EntityManager/Context containing the entity.
As it also implements the Flex mx.data.Managed class, it cannot be used at the same time than Adobe LCDS.
It is important to note that the IManaged interface is not sufficient to have correct Tide managed entities because Tide needs
that the entities implement a few functionalities that are not provided by the standard Flex IManaged objects.
It is highly recommended to use JPA optimistic locking in a multi-tier environment (@Version annotation).
Note that Tide currently only supports Integer or Long version fields, not timestamps and that this field must be nullable
(entity instances with a null/NaN version field will be considered as unsaved).
It is also highly recommended to add a persistent uid field (generally typed as a 36 bytes String) to have a consistent identifier
across all application layers, see the explication below.
Below is a AbstractEntity class that can be used as a JPA mapped superclass for your application entities.
The entity listener ensures that the entity always has an initialized uid field, but in general this identifier will be initialized from Flex.
@MappedSuperclass
@EntityListeners({AbstractEntity.AbstractEntityListener.class})
public abstract class AbstractEntity implements Serializable {
private static final long serialVersionUID = 1L;
@Id @GeneratedValue
private Long id;
/* "UUID" and "UID" are Oracle reserved keywords -> "ENTITY_UID" */
@Column(name="ENTITY_UID", unique=true, nullable=false, updatable=false, length=36)
private String uid;
@Version
private Integer version;
public Long getId() {
return id;
}
public Integer getVersion() {
return version;
}
@Override
public boolean equals(Object o) {
return (o == this || (o instanceof AbstractEntity && uid().equals(((AbstractEntity)o).uid())));
}
@Override
public int hashCode() {
return uid().hashCode();
}
public static class AbstractEntityListener {
@PrePersist
public void onPrePersist(AbstractEntity abstractEntity) {
abstractEntity.uid();
}
}
private String uid() {
if (uid == null)
uid = UUID.randomUUID().toString();
return uid;
}
}|
Tip
|
The easiest and highly recommended way for getting correct Tide enabled managed entities is to generate them from Java classes with Gas3 or
the GDS Eclipse builder using the |
<gas3 outputdir="as3" tide="true">
<classpath>
<pathelement location="classes"/>
</classpath>
<fileset dir="classes">
<include name="com/myapp/entity/**/*.class"/>
</fileset>
</gas3>Important notes on ID/UID
In a typical Flex/app server/database application, an entity lives in three layers:
-
the Flex client
-
the Hibernate/JPA persistence context
-
the database
During the entity lifecycle, the only invariant is the id. The id reliably links the different existing instances of the entity in the three layers. When updating existing entities coming from the database, there are, in general, no problems because the id is defined and is maintained in the three layers during the different serialization/persistence operations.
A problem arises when a new entity is being created in any of the two upper layers (Flex/JPA). The new entity has no id until it has been persisted to the database. This means that between the initial creation and the final stored entity, the id has changed from null to a real value.
It is thus impossible to maintain a reliable link between the original entity that has been created and the entity that has been stored. This is even more complex if you try to add two or more new entities to a collection because, in this case, there will be absolutely no way to determine which one has been persisted with which id because they all had null ids at the beginning.
The problem already exists outside of Flex with only two layers when you use a database generated id with Hibernate/JPA. The most common solution is to have a second persisted id, the uid, which is created by the client/creator layer and persisted along with the entity.
With Flex, we have the same problem because the entities are often serialized/deserialized between Flex and the server, so we cannot check object instances equality.
Moreover, Flex components themselves (DataGrids, Lists, …) use the uid property as an entity identifier to correctly manage different object instances.
When there is a uid field in the Java entity, the Gas3 Tide template will generate a uid property on the AS3 object.
In other cases, the Tide template tries to build a suitable uid property from the entity id.
This second mode is, of course, vulnerable to the initial null id problem.
In conclusion, the recommended approach to avoid any kind of subtle problems is to have a real uid property which will be persisted in the database
but is not a primary key for efficiency concerns. If it is not possible to add a uid property due to a legacy database schema or Java classes,
it will work most of the time but you will then have to be very careful when creating new entities from the Flex client layer.
Take care that you will then have to either implement hashCode() and equals() based on this property, or if for some reason you need another specific behaviour
for hashCode() and equals() you can also implement the org.granite.tide.IUID Java interface that will instruct Tide to use internally the uid field
for object comparisons.
Transparent lazy loading
All uninitialized lazy collections coming from the server are transparently wrapped on the Flex side by the Tide context in a PersistentCollection or PersistentMap.
This collection can be used as a data provider for any Flex component that is able to handle CollectionEvent (all Flex components, such as DataGrid and List do).
When data is requested by the UI component, the collection requests the server for the real collection content.
This lazy loading functionality is completely automatic but will happen only if the collection is bound to a UI component or by manually calling get or length on
the collection object.
When in the context of a server conversation (Seam or CDI) with a JPA extended persistence context, Tide will try to load the collection inside this persistence context so all collection elements come from the same persistence context as the owning entity.
Outside of a conversation, Tide will try different means to determine the correct JPA entity manager/Hibernate session to use. The whole collection and owning entity are then retrieved from a newly created persistence context. If you have a deep object graph, it will then be possible to get entities from different persistence contexts in the same client context, and it can lead to inconsistencies in the client data and issues with optimistic locking/versioning.
Depending on the server framework of the application (Spring, EJB 3, Seam, CDI…), Tide will lookup an entity manager or an Hibernate session from JNDI,
in the Spring context or any other relevant way, and will try to determine the correct transaction management (JTA, JPA…).
With Spring or Seam, it is possible to override the default persistence manager if you have particular requirements: w
ith Spring you just have to configure a bean implementing TidePersistenceManager in the application context,
with Seam you can override the component named org.granite.tide.seam.seamInitializer with a component extending the class org.granite.tide.seam.seamInitializer.
Using a custom persistence manager can be useful for example if you have multiple EntityManagerFactory instances and want to be able to select one of them
depending on the entity whose collection has to be fetched.
Manual fetching of lazy collections
In some cases you might need to trigger manually the loading of a lazy loaded collection. As told earlier, all collections are wrapped
in a PersistentCollection or PersistentMap. These two classes expose a method withInitialized that can take a callback function that can do something
once the collection is populated:
Object(myEntity.myCollection).withInitialized(function(collection:IList):void {
// Do something with the content of the list
var obj:Object = collection.getItemAt(0);
});Reverse lazy loading
Lazy loading greatly helps in limiting the amount of data that is transferred between the server and the client. When receiving data from the server, the lazy-loading state is managed by the JPA engine depending on what is done by the service, so only the necessary data is sent. When sending objects to the server, the lazy-loading state depends on what has been loaded or not in the client context. As the lifespan of the entities in the client context is much longer than in stateless services, there is a good chance that after a few time of running an application, the whole object graph will be loaded on the client. That means that passing an entity as an argument to a remote method call will send the fully loaded object graph, whenever maybe a single property has been modified on the main entity. For example :
public function savePerson():void {
person.lastName = "Test";
personService.save(person);
// This will send all loaded collections associated to the Person object
}Obviously this is not very efficient. You can tell Tide to fold the object graph before sending it. It can be done manually in Flex with the following API :
var uperson:Person = new EntityGraphUnintializer(tideContext).uninitializeEntityGraph(person) as Person;
personService.save(uperson); // This will send only the Person object without any loaded collectionHere all loaded collections of the Person object will be uninitialized so uperson contains only the minimum of data to correctly merge your changes
in the server persistence context. If there is a change deeper in the object graph, the uninitializer is able to detect it and will not uninitialize
the corresponding subgraph so the server receives all changes.
person.contacts.getItemAt(0).email = '[email protected]';
var uperson:Person = new EntityGraphUnintializer(tideContext).uninitializeEntityGraph(person) as Person;
personService.save(uperson); // This will send the Person object with only the contacts collection loadedTide uses the client data tracking (the same used for dirty checking, see below) to determine which parts of the graph need to be sent.
If you need to uninitialize more than one argument for a remote call, you must use the same EntityGraphUninitializer.
It is important because the uninitializer copies the entities in a temporary context before uninitializing their associations so the normal context keeps unchanged,
and all processed entities have to share this same temporary context.
var egu:EntityGraphUnintializer = new EntityGraphUninitialize(tideContext);
uperson1 = egu.uninitializeEntityGraph(person1);
uperson2 = egu.uninitializeEntityGraph(person2);
personService.save(uperson1, uperson2);Calling the EntityGraphUninitializer manually is a bit tedious and ugly, so there is a cleaner possibility when you are using generated typesafe service proxies.
You can annotate your service method arguments with @org.granite.tide.data.Lazy :
public void save(@Lazy Person person) {
}Gas3 will then generate a [Lazy] annotation on your service methods (so take care that you have added the [Lazy] annotation to your Flex metadata compilation
configuration). Next in the Flex application, register the UninitializeArgumentPreprocessor component in Tide as follows :
Tide.getInstance().addComponents([UninitializeArgumentPreprocessor]);Once you have done this, all calls to PersonService.save() will automatically use a properly uninitialized version of the person argument.
Change sets
In most cases, end users update very few properties of an object graph at the same time so it’s not very efficient to send the full graph to the server for merging, even folded and uninitialized as much as possible. To handle this very common use case, Tide provides the change set feature which consists in building a diff object representing only the actual updates on the object graph and only send this diff. As with reverse lazy loading, it can be used manually or automated through some annotations and configuration.
This feature can work when sending objects from the client, or when dispatching updates from the server. In this case, GraniteDS has to integrate more deeply into the JPA provider to build the change set objects. The server-to-client change sets are currently implemented only for Hibernate 3.5+.
Client to server change sets
Usually, when a user does some changes on an entity, the application will execute something like this to send the changes to the server :
public function savePerson():void {
person.lastName = "Test";
personService.save(person);
// This will send all loaded collections associated to the Person object
}To build a ChangeSet for a particular entity instead of sending the whole graph, you can use the ChangeSetBuilder API :
var csperson:ChangeSet = new ChangeSetBuilder(tideContext).buildEntityChangeSet(person);
personService.applyChangeSet(csperson);Tide will use the client data tracking to determine what has been modified since last server update and build a diff object.
Note that it’s also possible to build the complete ChangeSet for the whole local entity context :
var csfull:ChangeSet = new ChangeSetBuilder(tideContext).buildChangeSet();
entityService.applyChangeSet(csfull);If you have to build change sets for many arguments at the same time, you should use the same ChangeSetBuilder to ensure they
use the same temporary merge context:
var csb:ChangeSetBuilder = new ChangeSetBuilder(tideContext);
var csperson:ChangeSet = csb.buildEntityChangeSet(person);
var cscompany:ChangeSet = csb.buildEntityChangeSet(company);
personService.savePersonCompany(csperson, cscompany);Obviously any of these client operations mean that the server method that is called knows what to do with the ChangeSet objects.
Tide provides the ChangeSetApplier API that can be used on the server :
public void applyChangeSet(ChangeSet changeSet) {
new ChangeSetApplier(new JPAPersistenceAdapter(entityManager)).applyChanges(changeSet);
}As its name indicates, the JPAPersistenceAdapter expects a JPA entity manager. If you are using the Hibernate native
Session API, you can use the HibernatePersistenceAdapter. It’s quite easy if needed to implement a custom adapter for other
kinds of persistence providers by implementing the TidePersistenceAdapter interface.
Automatic build of change sets on the client
Calling the ChangeSetBuilder manually is a bit tedious and ugly, so there is a cleaner possibility when you are using generated typesafe service proxies.
You can annotate your service method arguments with @org.granite.tide.data.Lazy :
public void save(@Lazy Person person) {
}Gas3 will then generate a [Lazy] annotation on your service methods (so take care that you have added the [Lazy] annotation to your Flex metadata compilation
configuration). Next in the Flex application, register the ChangeArgumentPreprocessor component in Tide as follows :
Tide.getInstance().addComponents([ChangeArgumentPreprocessor]);Once you have done this, all calls to PersonService.save() will automatically use a ChangeSet for the argument person.
Note that this cannot be used in conjuction with reverse lazy loading but completely replaces it.
Automatic server merge of change sets (Hibernate 3.x only)
When using Hibernate 3.x it’s possible to further simplify this process by enabling a specific merge event listener. When configured, it
allows to apply an incoming ChangeSet with any method using EntityManager.merge() of the underlying entity. For example,
public void save(Person person) {
entityManager.merge(person);
}When this method is called with an incoming ChangeSet, GraniteDS will use a special converter to transform the ChangeSet to a
Javassist proxy which can be accepted by the method call. Then the merge listener will intercept this proxy and apply the change
instead of letting Hibernate do its normal merge. It’s important to note that this can work only with merge() and not with any
other JPA EntityManager/Hibernate Session method.
The configuration on the Hibernate side depends on the way the SessionFactory/EntityManagerFactory is configured but simply
consists in setting up the event listener org.granite.tide.hibernate.HibernateDataChangeMergeListener for the event merge.
configuration.setListener("merge", new HibernateDataChangeMergeListener());With Hibernate XML config:
<hibernate-configuration>
<session-factory>
...
<event type="merge">
<listener class="org.granite.tide.hibernate.HibernateDataChangeMergeListener"/>
</event>
</session-factory>
</hibernate-configuration>And with Spring:
<bean id="sessionFactory"
class="org.springframework.orm.hibernate3.annotation.AnnotationSessionFactoryBean">
<property name="dataSource" ref="dataSource" />
<property name="hibernateProperties">
<props>
<prop key="hibernate.dialect">org.hibernate.dialect.HSQLDialect</prop>
<prop key="hibernate.show_sql">false</prop>
<prop key="hibernate.hbm2ddl.auto">update</prop>
</props>
</property>
<property name="eventListeners">
<map>
<entry key="merge">
<list><bean class="org.granite.tide.hibernate.HibernateDataChangeMergeListener"/></list>
</entry>
</map>
</property>
...
</bean>Dirty checking and conflict handling
The Tide framework includes a client-side entity cache where each managed entity exists only once for each Tide context.
Besides maintaining this cache, Tide tracks all changes made on managed entities and on their associations and saves these changes for each modification.
This flag is always reset to false when the same instance is received from the server, so this flag is indeed an indication that the user has changed
something since the last remote call.
A particular entity instance can be in two states :
-
Stable: the instance has not been modified until it was received from the server
-
Dirty : the instance has been modified
The current state of an entity can be accessed with :
entity.meta_dirtyThis meta_dirty property only indicates if a direct property of the entity has been changed. To check if something has changed deeper in the object graph, you can use:
tideContext.meta_deepDirty(entity);Finally you can check the dirty state of the whole data context with the property meta_dirty of the Tide context.
<mx:Button label="Save" click="entityService.save()"
enabled="{tideContext.meta_dirty}"/>|
Warning
|
This |
In a typical client/server interaction, here is what happens :
-
The Flex application retrieves an entity instance from the server, for example with a version number 0. This instance is considered stable.
-
The user modifies data on the client, possibly with bidirectional data binding. The version number stays 0, the client state becomes dirty.
-
The user clicks on a Save button. The Flex application calls a service and retrieves the result. The server has incremented the version number to 1, so Tide overwrites the cached instance on the client and it is considered as stable again.
Note that if you retrieve the same instance without version increment, the local changes won’t be overwritten. In the previous example, if the server returns the same instance with an unchanged version number of 0, the local instance will still be dirty. That means that you can still issue queries that return a locally changed entity without losing the user changes.
One nice possibility with this programming model is that you can easily implement a Cancel button after step 2. If you use bidirectional data binding, the client view of the entity instance has already become dirty. As Tide always saves the local changes, it also provides a simple way of restoring the last stable state :
private function restore():void {
Managed.resetEntity(entity);
}You can also reset all entities in the context to their last stable state with :
private function restoreAll():void {
tideContext.meta_resetAllEntities();
}If you look at the previous process in 3 steps, we assume that nobody else has changed the data the user has been working on between 1 and 3. In concurrent environments with read-write data, there is a chance that someone else has modified the entity on the server between step 1 and step 3.
There are two ways of handling this: either you just rely on optimistic locking and intercept the corresponding server exceptions to display a message to the user, or you use data push (see section Data Push) so all Flex clients are updated in near real-time. Note however that even with data push, there can still be conflicts between changes made by a user and updates received from the server.
With normal optimistic locking, the remote service call at step 3 will trigger a OptimisticLockException. Tide provides a built-in exception handler
to handle this exception: it will extract the entity argument of the exception, compare its state with the client state and dispatch a conflict
event TideDataConflictEvent on the Tide context when it’s not identical. The exception handler can be enabled with :
Tide.getInstance().addExceptionHandler(OptimisticLockExceptionHandler);When data push is used, an entity instance can be updated with data received from the server at any time. If the current user was working on this instance,
it is obviously not desirable that his work is overwritten without notice. Similarly to the previous case, Tide will determine that an incoming data from another
user session is in conflict with the local data and dispatch a TideDataConflictEvent on the Tide context.
What can you do with this event ?
Basically there are two possibilities : accept the server-side state or keep the client state. Here is an example of a conflict handler defined in a Flex application, generally in the main mxml :
<mx:Application ...
preinitialize="Tide.getInstance().initApplication()"
creationComplete="init();">
<mx:Script>
private function init():void {
Tide.getInstance().getEjbContext().addEventListener(
TideDataConflictsEvent.DATA_CONFLICTS, conflictsHandler);
}
private var _conflicts:Conflicts;
private function conflictsHandler(event:TideDataConflictsEvent):void {
_conflicts = event.conflicts;
Alert.show("Keep local state ?", "Data conflict",
Alert.YES|Alert.NO, null, conflictsCloseHandler);
}
private function conflictsCloseHandler(event:CloseEvent):void {
if (event.detail == Alert.YES)
_conflicts.acceptAllClient();
else
_conflicts.acceptAllServer();
}
</mx:Script>
...
</mx:Application>If you look at the ASDoc for Conflicts, there are a few properties that give more details about the conflicts, such as the conflicting properties,
which make possible to present a better alert message to the user.
When using the Hibernate native API (Session), the optimistick lock exception StaleObjectStateException is unfortunately missing a critical information
to allow for correct conflict handling (that is present in the JPA OptimistickLockException).
In this case, you should use the provided Hibernate event wrappers that add the missing data to the Hibernate exception.
Here is what is will look like when configuring the SessionFactory with Spring :
<bean id="sessionFactory"
class="org.springframework.orm.hibernate3.annotation.AnnotationSessionFactoryBean">
<property name="dataSource" ref="dataSource" />
<property name="hibernateProperties">
<props>
<prop key="hibernate.dialect">org.hibernate.dialect.HSQLDialect</prop>
<prop key="hibernate.show_sql">false</prop>
<prop key="hibernate.hbm2ddl.auto">update</prop>
</props>
</property>
<property name="eventListeners">
<map>
<entry key="merge">
<bean class="org.granite.tide.hibernate.HibernateMergeListener"/>
</entry>
<entry key="create">
<bean class="org.granite.tide.hibernate.HibernatePersistListener"/>
</entry>
<entry key="create-onflush">
<bean class="org.granite.tide.hibernate.HibernatePersistOnFlushListener"/>
</entry>
<entry key="delete">
<bean class="org.granite.tide.hibernate.HibernateDeleteListener"/>
</entry>
<entry key="update">
<bean class="org.granite.tide.hibernate.HibernateSaveOrUpdateListener"/>
</entry>
<entry key="save-update">
<bean class="org.granite.tide.hibernate.HibernateSaveOrUpdateListener"/>
</entry>
<entry key="save">
<bean class="org.granite.tide.hibernate.HibernateSaveOrUpdateListener"/>
</entry>
<entry key="lock">
<bean class="org.granite.tide.hibernate.HibernateLockListener"/>
</entry>
<entry key="flush">
<bean class="org.granite.tide.hibernate.HibernateFlushListener"/>
</entry>
<entry key="auto-flush">
<bean class="org.granite.tide.hibernate.HibernateAutoFlushListener"/>
</entry>
</map>
</property>
...
</bean>Integration with client conversations
When using client conversations, the situation becomes a bit more complex as each conversation has its own entity cache. That means that when a user modifies some data in a conversation context, the change is not immediately visible in others even if they contain the same entity instance.
The Tide context object provides a few methods to deal with such situations :
tideContext.meta_mergeInParentContext()This will merge all stable state of the current conversation context in its parent context and all its children. In the common case where you don’t use nested conversations, that just means that the changes are merged in the global context as well as all other conversations.
If you use nested conversations, the merge will be done only in the direct parent context and all its children, but not in the global context.
tideContext.meta_mergeInGlobalContext()This will merge all stable state of the current conversation context in its parent context, in the global context and in all child contexts recursively.
Data validation
Tide integrates with Hibernate Validator 3.x and the Bean Validation API (JSR 303) implementations, and propagate the server validation errors to the client UI components.
Starting with GraniteDS 2.2, however, the preferred way to execute validation is a Flex-side, JSR-303 like, validation framework (see Bean Validation (JSR-303) for details).
The server support for Hibernate Validator 3 is available in granite-hibernate.jar, but the the support for Bean Validation is available in
a separate granite-beanvalidation.jar. You will have to add one of these jars in your application lib folder.
The validator integration is based on the GraniteDS exception handling framework. A server exception converter is registered to handle the InvalidStateException,
and a client exception handler can be registered with:
Tide.getInstance().addExceptionHandler(ValidatorExceptionHandler);This exception handler intercepts all server validation faults and dispatches a validation event on the context. To complete the integration, a TideEntityValidator
Flex component can be attached to any UI component:
<mx:Application
...
xmlns:tv="org.granite.tide.validators.*">
<tv:TideEntityValidator id="teval" entity="{tideContext.booking}"
property="creditCardName" listener="{creditCardNameInput}"/>
<mx:TextInput id="creditCardNameInput" text="{tideContext.booking.creditCardName}"/>
...
</mx:Application>You can have more control on the validation behaviour by directly listening to validation events on the context:
public function setup():void {
tideContext.addEventListener(TideValidatorEvent.INVALID, validationHandler);
}
private function validationHandler(event:TideValidatorEvent):void {
var invalidValues:Array = event.invalidValues;
for each (var iv:Object in invalidValues) {
var invalidValue:InvalidValue = iv as InvalidValue;
Alert.show(
"Invalid property: " + invalidValue.path +
" on object " + invalidValue.bean
);
}
}Remote validation of input fields
Another possibility is to use an input validator that calls the server when the validation is triggered.
With Seam on the server, it then uses the Validators component to get a proper ClassValidator, and thus just works with Hibernate Validator 3.x for now.
With other server technologies, it uses a built-in validator handler which supports both HV3 and Bean Validation implementations.
The use of this component is quite simple and very similar to any other Flex validator, with additional parameters to define the entity to validate.
<tv:TideInputValidator id="tival"
source="{creditCardNameInput}" property="text"
entity="{tideContext.booking}" entityProperty="creditCardName"
entityManager="{tideContext}"/>
<mx:TextInput id="creditCardNameInput" text="{tideContext.booking.creditCardName}"/>The property entityManager of the validator may be optional if the entity is maintained in the context (i.e., ctx.myEntity)
and has a proper entityManager defined (with meta_getEntityManager). This is in particular the case for all entities retrieved from the server.
Data paging
GraniteDS provides the PagedQuery component which is an implementation of ListCollectionView and can be used as a data provider for most UI components
such a grids or lists.
This component supports paging and can be mapped to a server component which execute queries. The collection is completely paged and keeps in memory only the data needed for the current display. In fact, it keeps in memory two complete pages to avoid too many server calls. The elements that get out of display during scrolling are discarded, so you never fill up the memory of the Flash VM.
PagedQuery also supports automatic remote sorting and filtering. The server-side part of the paging depends on the server technology and is described in
the next paragraphs.
On the client-side, you first need to register the client component with:
<mx:Script>
import org.granite.tide.collections.PagedQuery;
Tide.getInstance().addComponent("people", PagedQuery);
</mx:Script>This registers a client component with a page size defined by the server. It’s also possible and recommended to define the page size on the client with :
<mx:Script>
import org.granite.tide.collections.PagedQuery;
Tide.getInstance().addComponentWithFactory("people", PagedQuery, { maxResults: 36 });
</mx:Script>When using the Tide client framework, that can be done in a Tide module initializer as any other component declaration.
|
Note
|
It is important that this registration is done in a static block initializer of the main MXML class, because it has to be defined before
the first reference in a component, and in particular before any data binding on |
That’s all. Just bind the component as a data provider for any component and it should work as expected:
<mx:DataGrid id="people" dataProvider="{ctx.people}" width="100%" height="100%"
liveScrolling="false">
<mx:columns>
<mx:DataGridColumn dataField="firstName" headerText="First name"/>
<mx:DataGridColumn dataField="lastName" headerText="Last name"/>
</mx:columns>
</mx:DataGrid>The DataGrid sorting triggers a remote refresh of the collection, and the changes on the data filter are maintained during the remote refresh,
so the filtering is also done remotely.
|
Warning
|
It is important to disable |
|
Warning
|
Flex 4 Spark controls do not handle |
AsyncListView with Spark components<s:List>
<mx:AsyncListView list="{people}"/>
</s:List>See for more details in the Flex 4 documentation.
Just like the paged collections of LCDS, everything works only if there is a correct uid property on the entities. It is thus recommended to use the Tide templates
for the Gas3 generator, which provide a default suitable implementation of uid if there is none.
The default AsyncListView does not support automatic propagation of the UI control sorting state to its data provider.
Tide provides an alternative SortableAsyncListView that works in all cases.
<s:VGroup ...
xmlns:c="org.granite.tide.collections.*">
<s:DataGrid ...>
<c:SortableAsyncListView list="{people}"/>
</s:DataGrid>Server-side implementation
The PagedQuery components expects that the corresponding server component implements a specific method to fetch elements.
There are two ways of handling filtering, either with an untyped map or with a typesafe filter object:
For untyped filters, the server component shoud implement the following method:
public Map find(Map filter, int first, int max, String order, boolean desc);first, max, order and desc are straightforward. filter is a map containing the parameter values of the query. These values can be set on the client by:
tideContext.pagedQuery.filter.<parameter1> = <value1>;
tideContext.pagedQuery.filter.<parameter2> = <value2>;
...The return object must be a map containing four properties:
-
firstResult: Should be exactly the same as the argument passed in (int first). -
maxResults: Should be exactly the same as the argument passed in (int max), except when its value is 0, meaning that the client component is initializing and requests a max value. In this case, you have to set the page value, which must absolutely be greater than the maximum expected number of elements displayed simultaneously in a table. -
resultCount: Count of results. -
resultList: List of results.
Alternatively you can also return a result of type org.granite.tide.data.model.Page. That implies a compile dependency of your services on a GraniteDS API,
which may not be suitable. If necessary you can define your own page class and use a converter to translate from your server class to the client Page class.
If you are using Spring Data, you can simply return an instance of the Page class of Spring Data and let GraniteDS do the conversion
between GraniteDS Page and Spring Data Page. You can also use PageRequest as an argument instead of firstResult, maxResults…
The following code snippet is a quick and dirty implementation and can be used as a base for other implementations (here this is a Spring service but the equivalent implementations for EJB3 or CDI would be extremely similar):
@Service("people")
@Transactional(readOnly=true)
public class PeopleServiceImpl implements PeopleService {
@PersistenceContext
protected EntityManager manager;
public Map find(Map filter, int first, int max, String order, boolean desc) {
Map result = new HashMap(4);
String from = "from Person e ";
String where = "where lower(e.lastName) like '%' || lower(:lastName) || '%' ";
String orderBy = (
order != null ? "order by e." + order + (desc ? " desc" : "") : ""
);
String lastName = (
filter.containsKey("lastName") ? (String)filter.get("lastName") : ""
);
Query qc = manager.createQuery("select count(e) " + from + where);
qc.setParameter("lastName", lastName);
long resultCount = (Long)qc.getSingleResult();
if (max == 0)
max = 36;
Query ql = manager.createQuery("select e " + from + where + orderBy);
ql.setFirstResult(first);
ql.setMaxResults(max);
ql.setParameter("lastName", lastName);
List resultList = ql.getResultList();
result.put("firstResult", first);
result.put("maxResults", max);
result.put("resultCount", resultCount);
result.put("resultList", resultList);
return result;
}
}It is also possible to define on the Flex size an alternative remote component name and method name that will implement the querying :
<mx:Script>
Spring.getInstance().addComponentWithFactory("people", PagedQuery,
{ maxResults: 36, remoteComponentName: "peopleService", methodName: "list" });
</mx:Script>In this case, the previous component would be :
@Service("peopleService")
@Transactional(readOnly=true)
public class PeopleServiceImpl implements PeopleService {
@PersistenceContext
protected EntityManager manager;
public Map list(Map filter, int first, int max, String order, boolean desc) {
Map result = new HashMap();
String from = "from Person e ";
String where = "where lower(e.lastName) like '%' || lower(:lastName) || '%' ";
String orderBy = (
order != null ? "order by e." + order + (desc ? " desc" : "") : ""
);
String lastName = (
filter.containsKey("lastName") ? (String)filter.get("lastName") : ""
);
Query qc = manager.createQuery("select count(e) " + from + where);
qc.setParameter("lastName", lastName);
long resultCount = (Long)qc.getSingleResult();
if (max == 0)
max = 36;
Query ql = manager.createQuery("select e " + from + where + orderBy);
ql.setFirstResult(first);
ql.setMaxResults(max);
ql.setParameter("lastName", lastName);
List resultList = ql.getResultList();
result.put("resultCount", resultCount);
result.put("resultList", resultList);
return result;
}
}
Note that this time we did not have to return firstResult and maxResults because the page size is defined on the client.
It is finally possible to use a typesafe filter object instead of the Map. The server implementation will then be something like :
@Service("peopleService")
@Transactional(readOnly=true)
public class PeopleServiceImpl implements PeopleService {
@PersistenceContext
protected EntityManager manager;
public Map list(Person examplePerson, int first, int max, String order, boolean desc) {
Map result = new HashMap();
String from = "from Person e ";
String where = "where lower(e.lastName) like '%' || lower(:lastName) || '%' ";
String orderBy = (
order != null ? "order by e." + order + (desc ? " desc" : "") : ""
);
String lastName = (
examplePerson.getLastName() != null ? examplePerson.getLastName() : ""
);
Query qc = manager.createQuery("select count(e) " + from + where);
qc.setParameter("lastName", lastName);
long resultCount = (Long)qc.getSingleResult();
if (max == 0)
max = 36;
Query ql = manager.createQuery("select e " + from + where + orderBy);
ql.setFirstResult(first);
ql.setMaxResults(max);
ql.setParameter("lastName", lastName);
List resultList = ql.getResultList();
result.put("resultCount", resultCount);
result.put("resultList", resultList);
return result;
}
}To use this, you also have to define the filter class on the client component :
<mx:Script>
import org.granite.tide.collections.PagedQuery;
Tide.getInstance().addComponentWithFactory("people", PagedQuery,
{ maxResults: 36, filterClass: Person });
</mx:Script>If the filter class is bindable, then people.filter will be an instance of the provided filter class.
If not, the PagedQuery will create an ObjectProxy that wraps the filter instance to track changes on it.
You can also directly provide your own instance of the filter instead of letting the component instantiate the class itself:
<mx:Script>
import org.granite.tide.collections.PagedQuery;
Tide.getInstance().addComponentWithFactory("people", PagedQuery,
{ maxResults: 36, filter: new Person() });
</mx:Script>Data push
In classic Flex applications using remoting, data is updated only when the user does an action that triggers a call to the server. As it is possible to do many things purely on the client without involving the server at all, that can lead to stale client state if someone else has modified something between updates.
Optimistic locking ensures that the data will keep consistent on the server and in the database, but it would be better if data updates were pushed in real-time to all connected clients.
Tide makes this possible by integrating with the JPA provider and the Gravity messaging broker to dispatch data updates to subscribed clients.
This requires a bit of configuration :
-
Define a Gravity topic
-
Add the Tide JPA listener DataPublishListener on entities that should be tracked
-
Add the Tide annotation DataEnabled on all server components involved in modifications of these data
-
Subscribe to the topic on the client with the DataObserver component
Let’s see all this in details :
Define a Gravity topic: in the standard case, it can be done in services-config.xml:
<service id="gravity-service"
class="flex.messaging.services.MessagingService"
messageTypes="flex.messaging.messages.AsyncMessage">
<adapters>
<adapter-definition id="simple"
class="org.granite.gravity.adapters.SimpleServiceAdapter"/>
</adapters>
<destination id="dataTopic">
<properties>
<no-local>true</no-local>
<session-selector>true</session-selector>
</properties>
<channels>
<channel ref="gravityamf"/>
</channels>
<adapter ref="simple"/>
</destination>
</service>
...
<channel-definition id="gravityamf" class="org.granite.gravity.channels.GravityChannel">
<endpoint
uri="http://{server.name}:{server.port}/{context.root}/gravityamf/amf"
class="flex.messaging.endpoints.AMFEndpoint"/>
</channel-definition>With Spring or Seam, this can be done more easily in the respective configuration files application-context.xml or components.xml:
<graniteds:messaging-destination id="dataTopic" no-local="true" session-selector="true"/>components.xml<graniteds:messaging-destination name="dataTopic" no-local="true" session-selector="true"/>This example configuration defines a simple Gravity destination but it’s also possible to use the JMS, ActiveMQ or any custom adapter if you need transactional behaviour or better scalabilty.
The two important parameters for the topic definition are :
-
no-localshould be set totrue. That means that the client that triggers the modification will not receive the result of the update twice : first by the remoting call, then by the messaging update. -
session-selectormust be set totrue. Tide uses JMS-style selectors to determine which data will be sent to which clients and thus needs to store the current messaging selector state in the user session.
Add the Tide JPA publishing listener on the entities that should be tracked:
@Entity
@EntityListeners({DataPublishListener.class})
public abstract class MyEntity {
...
}When using the Hibernate native API instead of JPA, you can use the following listener configuration:
Configuration configuration = new Configuration();
...
configuration.setListener("post-insert", new HibernateDataPublishListener());
configuration.setListener("post-update", new HibernateDataPublishListener());
configuration.setListener("post-delete", new HibernateDataPublishListener());With Hibernate XML config:
<hibernate-configuration>
<session-factory>
...
<event type="post-insert">
<listener class="org.granite.tide.hibernate.HibernateDataPublishListener"/>
</event>
<event type="post-update">
<listener class="org.granite.tide.hibernate.HibernateDataPublishListener"/>
</event>
<event type="post-delete">
<listener class="org.granite.tide.hibernate.HibernateDataPublishListener"/>
</event>
</session-factory>
</hibernate-configuration>And with Spring:
<bean id="sessionFactory"
class="org.springframework.orm.hibernate3.annotation.AnnotationSessionFactoryBean">
<property name="dataSource" ref="dataSource" />
<property name="hibernateProperties">
<props>
<prop key="hibernate.dialect">org.hibernate.dialect.HSQLDialect</prop>
<prop key="hibernate.show_sql">false</prop>
<prop key="hibernate.hbm2ddl.auto">update</prop>
</props>
</property>
<property name="eventListeners">
<map>
<entry key="post-insert">
<list><bean class="org.granite.tide.hibernate.HibernateDataPublishListener"/></list>
</entry>
<entry key="post-update">
<list><bean class="org.granite.tide.hibernate.HibernateDataPublishListener"/></list>
</entry>
<entry key="post-delete">
<list><bean class="org.granite.tide.hibernate.HibernateDataPublishListener"/></list>
</entry>
</map>
</property>
...
</bean>For Hibernate 4.x, the way of declaring these listeners has completely changed and uses the ServiceLoader API.
You will have to add the following file in META-INF/services/org.hibernate.integrator.spi.Integrator of your application jar:
org.granite.tide.hibernate4.Hibernate4Integrator
Then add the Tide data annotation on all services, example here with a Spring service:
@DataEnabled(topic="dataTopic", publish=PublishMode.ON_SUCCESS)
public interface MyService {
...
}It’s generally recommended to put the annotation on the service interface but it can also work when defined on the service implementation.
Note that even services that only read data should be annotated this @DataEnabled because they also participate in the construction of the message selector.
The attributes of this annotations are:
-
topic: the name of the messaging topic that will be used to dispatch updates. Obviously this is the one we declared just before inservices-config.xml. -
publish: the publishing mode.PublishMode.MANUALmeans that you will have to trigger the dispatch manually, for example in an interceptor.PublishMode.ON_SUCCESSmeans that Tide will automatically dispatch the updates on any successful call.PublishMode.ON_COMMITmeans that Tide will dispatch the updates upon transaction commit (and inside the current transaction). -
params: a filter class that will define to which updates are sent to which clients. By default there is no filtering, otherwise see below for a more detailed explanation.
Publishing Filters
It is possible to tell the Tide engine how it should dispatch each update (i.e. to which clients).
It works in two phases : at each remote call from a client, Tide calls the observes method of the params class and builds the current message selector. Next at each update it calls publishes to set the message headers that will be filtered by the selector. Let’s see it on an example:
public class AddressBookParams implements DataTopicParams {
public void observes(DataObserveParams params) {
params.addValue("user", Identity.instance().getCredentials().getUsername());
params.addValue("user", "__public__");
}
public void publishes(DataPublishParams params, Object entity) {
if (((AbstractEntity)entity).isRestricted())
params.setValue("user", ((AbstractEntity)entity).getCreatedBy());
else
params.setValue("user", "__public__");
}
}The method observes here adds two values to the current selector: the current user name (here retrieved by Seam Identity but could be any other means)
and the value __public__. From these values Tide will build a message selector (user = 'username' OR user = '__public__') meaning that we only want
to be notified of updates concerning public data or data that the current user owns.
During the publishing phase, Tide will call the method publishes for each updated entity and build the message headers with the provided values.
In the example, an update message will have a user header with either __public__ or the entity owner for restricted data.
These headers are then matched with the current message selector for each subscribed client.
Here we have used only one header parameter but it’s possible to define as many as you want. Just take care that the match between observed and published
values can become very complex and difficult to predict with too many criteria. When having many header values, the resulting selector is an AND of all criteria :
public void observes(DataObserveParams params) {
params.addValue("user", Identity.instance().getCredentials().getUsername());
params.addValue("user", "__public__");
params.addValue("group", "admin");
params.addValue("group", "superadmin");
}Will generate the following selector :
(user = 'username' OR user = '__public__') AND (group = 'admin' OR group = 'superadmin')Publishing Modes
There are three publishing modes :
-
PublishMode.ON_SUCCESSis the easiest to use, and dispatch updates after each successful remote call, regardless of the actual result of the transaction (if there is one). -
PublishMode.ON_COMMITallows for a transactional behaviour, and does the dispatch only on transaction commit. -
PublishMode.MANUALlets you do the dispatch manually in your services when you want, giving the most control.
By default only GraniteDS remoting calls are able to dispatch update messages with ON_SUCCESS or MANUAL modes.
If you need the ON_COMMIT mode, or need that services that are not called from GraniteDS also trigger the dispatch, then you will have to enable
the Tide data dispatcher interceptor that will handle updates in threads that are not managed by GraniteDS.
To enable the interceptor, it is necessary to indicate on the @DataEnabled annotation that there is one with the useInterceptor attribute :
@DataEnabled(topic="dataTopic", publishMode=PublishMode.ON_COMMIT, useInterceptor=true)
public class MyService {
}|
Warning
|
When using interceptors, you have to put the |
There are four versions of the interceptor available for each supported framework : EJB3, Spring, Seam 2, CDI.
For Spring, add the advice to your context (take care that you need to reference the latest GraniteDS XSD version 3.0 to allow this) :
<beans
xmlns="http://www.springframework.org/schema/beans"
xmlns:xsi="http://www.w3.org/2001/XMLSchema-instance"
xmlns:graniteds="http://www.graniteds.org/config"
xsi:schemaLocation="
http://www.springframework.org/schema/beans
http://www.springframework.org/schema/beans/spring-beans-3.0.xsd
http://www.graniteds.org/config
http://www.graniteds.org/public/dtd/3.0.0/granite-config-3.0.xsd">
...
<graniteds:tide-data-publishing-advice/>For Seam 2, there is nothing special to configure. The interceptor will be automatically enabled for all components having the @DataEnabled
annotation with useInterceptor=true.
For CDI, enable the interceptor in beans.xml :
<beans
xmlns="http://java.sun.com/xml/ns/javaee"
xmlns:xsi="http://www.w3.org/2001/XMLSchema-instance"
xsi:schemaLocation="http://java.sun.com/xml/ns/javaee
http://java.sun.com/xml/ns/javaee/beans_1_0.xsd">
<interceptors>
<class>org.granite.tide.cdi.TideDataPublishingInterceptor</class>
</interceptors>
</beans>For EJB 3, you can define a global interceptor in ejb-jar.xml :
<assembly-descriptor>
<interceptor-binding>
<ejb-name>*</ejb-name>
<interceptor-class>org.granite.tide.ejb.TideDataPublishingInterceptor</interceptor-class>
</interceptor-binding>
...
</assembly-descriptor>Or alternatively configure the interceptor on each EJB 3 :
@Stateless
@Local(MyService.class)
@Interceptors(TideDataPublishingInterceptor.class)
@DataEnabled(topic="myTopic", publish=PublishMode.ON_COMMIT, useInterceptor=true)
public class MyServiceBean {
...
}Manual Publishing
If you need full control on the publishing process, you can create your own interceptor or use the following API in your services :
@DataEnabled(topic="dataTopic", params=DefaultDataTopicParams.class, publishMode=PublishMode.MANUAL,
useInterceptor=true)
public class MyService {
@Inject
private Gravity gravity;
public void doSomething() {
DataContext.init(gravity, "dataTopic", DefaultDataTopicParams.class, PublishMode.MANUAL);
try {
Object result = invocation.proceed();
DataContext.publish(PublishMode.MANUAL);
return result;
}
finally {
DataContext.remove();
}
}
}@Interceptor
public class CustomPublishInterceptor {
@Inject
private Gravity gravity;
@AroundInvoke
public Object aroundInvoke(InvocationContext invocation) throws Exception {
DataContext.init(gravity, "dataTopic", DefaultDataTopicParams.class, PublishMode.MANUAL);
try {
Object result = invocation.proceed();
DataContext.publish(PublishMode.MANUAL);
return result;
}
finally {
DataContext.remove();
}
}
}Transactional Publishing
You can setup a fully transactional dispatch by using the ON_COMMIT mode with a JMS transport. When using JMS transacted sessions with the ON_COMMIT mode,
you will ensure that only successful database updates will be dispatched.
<destination id="dataTopic">
<properties>
<jms>
<destination-type>Topic</destination-type>
<connection-factory>ConnectionFactory</connection-factory>
<destination-jndi-name>topic/dataTopic</destination-jndi-name>
<destination-name>dataTopic</destination-name>
<acknowledge-mode>AUTO_ACKNOWLEDGE</acknowledge-mode>
<transacted-sessions>true</transacted-sessions>
<no-local>true</no-local>
</jms>
<no-local>true</no-local>
<session-selector>true</session-selector>
</properties>
<channels>
<channel ref="gravityamf"/>
</channels>
<adapter ref="jms"/>
</destination>Server to client change sets
Limiting the amount of data sent by one client to the server is important, but it’s even more important to limit the amount of data sent from the server to the clients as the same change object can possibly be sent to a lot of clients when using real-time updates.
GraniteDS can handle this with Hibernate 3.x by integrating with the Hibernate core through a specific native listener.
From Hibernate 3.6+, the HibernateDataChangePublishListener must be used instead of the standard JPA listener to publish changes
instead of complete object graphs. The alternative Hibernate35DataChangePublishListener must be used with older Hibernate 3.5+ versions.
Configuration configuration = new Configuration();
...
configuration.setListener("post-insert", new HibernateDataChangePublishListener());
configuration.setListener("post-update", new HibernateDataChangePublishListener());
configuration.setListener("post-delete", new HibernateDataChangePublishListener());
configuration.setListener("pre-collection-update", new HibernateDataChangePublishListener());
configuration.setListener("flush-entity", new HibernateDataChangePublishListener());With Hibernate XML config:
<hibernate-configuration>
<session-factory>
...
<event type="post-insert">
<listener class="org.granite.tide.hibernate.HibernateDataChangePublishListener"/>
</event>
<event type="post-update">
<listener class="org.granite.tide.hibernate.HibernateDataChangePublishListener"/>
</event>
<event type="post-delete">
<listener class="org.granite.tide.hibernate.HibernateDataChangePublishListener"/>
</event>
<event type="pre-collection-update">
<listener class="org.granite.tide.hibernate.HibernateDataChangePublishListener"/>
</event>
<event type="flush-entity">
<listener class="org.granite.tide.hibernate.HibernateDataChangePublishListener"/>
</event>
</session-factory>
</hibernate-configuration>And with Spring:
<bean id="sessionFactory"
class="org.springframework.orm.hibernate3.annotation.AnnotationSessionFactoryBean">
<property name="dataSource" ref="dataSource" />
<property name="hibernateProperties">
<props>
<prop key="hibernate.dialect">org.hibernate.dialect.HSQLDialect</prop>
<prop key="hibernate.show_sql">false</prop>
<prop key="hibernate.hbm2ddl.auto">update</prop>
</props>
</property>
<property name="eventListeners">
<map>
<entry key="post-insert">
<list><bean class="org.granite.tide.hibernate.HibernateDataChangePublishListener"/></list>
</entry>
<entry key="post-update">
<list><bean class="org.granite.tide.hibernate.HibernateDataChangePublishListener"/></list>
</entry>
<entry key="post-delete">
<list><bean class="org.granite.tide.hibernate.HibernateDataChangePublishListener"/></list>
</entry>
<entry key="pre-collection-update">
<list><bean class="org.granite.tide.hibernate.HibernateDataChangePublishListener"/></list>
</entry>
<entry key="flush-entity">
<list><bean class="org.granite.tide.hibernate.HibernateDataChangePublishListener"/></list>
</entry>
</map>
</property>
...
</bean>Once this is configured, it’s also necessary to configure the client to be able to merge these incoming ChangeSet objects
correctly. This can be done easily by setting up the ChangeSetMerger components.
Tide.getInstance().addComponents([ChangeSetMerger]);When all this is set up, all server to client updates will be sent as ChangeSet objects.
Extensibilty
Handling custom data types
If you need special type conversion support, like Joda time to regular AS3 Date, you may write a custom converter/reverter.
A JodaDateTime2Date converter/reverter:
Here is a complete implementation of a Joda DateTime converter/reverter:
package com.myapp.converters;
import java.lang.reflect.Type;
import java.util.Date;
import org.granite.messaging.amf.io.convert.Converter;
import org.granite.messaging.amf.io.convert.Converters;
import org.granite.messaging.amf.io.convert.Reverter;
import org.granite.util.TypeUtil;
import org.joda.time.DateTime;
public class JodaDateTime2Date extends Converter implements Reverter {
public JodaDateTime2Date(Converters converters) {
super(converters);
}
// AMF3Deserialization (Converter)...
@Override
protected boolean internalCanConvert(Object value, Type targetType) {
Class<?> targetClass = ClassUtil.classOfType(targetType);
return (
targetClass.isAssignableFrom(DateTime.class) &&
(value == null || value instanceof Date)
);
}
@Override
protected Object internalConvert(Object value, Type targetType) {
return (value == null ? null : new DateTime(((Date)value).getTime()));
}
// AMF3Serialization (Reverter)...
public boolean canRevert(Object value) {
return value instanceof DateTime;
}
public Object revert(Object value) {
return ((DateTime)value).toDate();
}
}When you send an AS3 Date to the server, either as method parameter or as a bean field value, it is deserialized as java.util.Date object and,
if your target type is a org.joda.time.DateTime instance, it fails to find a matching method, since it looks for a java.util.Date parameter,
or to assign the bean value, issuing a ClassCastException.
Hence, the first purpose of the JodaDateTime2Date converter above is to convert java.util.Date to org.joda.time.DateTime at deserialization time
using internalCanConvert/internalConvert methods.
JodaDateTime2Date converter also implements the Reverter interface because Joda time is not a known type, and it must be converted back, or reverted,
to a java.util.Date instance before AMF3 serialization using canRevert/revert methods.
Plug-in your converter
The converter should be setup in granite-config.xml
<?xml version="1.0" encoding="UTF-8"?>
<!DOCTYPE granite-config PUBLIC
"-//Granite Data Services//DTD granite-config internal//EN"
"http://www.graniteds.org/public/dtd/3.0.0/granite-config.dtd">
<granite-config>
<converters>
<converter type="com.myapp.converters.JodaDateTime2Date" />
</converters>
</granite-config>Modifying Gas3 in Order to Generate AS3 Date Fields for Joda Date Type
When generating AS3 beans for your Java beans, Gas3 will not be able to know about this new converter, and it will write Joda DateTime fields
with a raw org.joda.time.DateTime type:
import org.joda.time.DateTime;
private var myDate:DateTime = null;In order to tell the generator to use simple AS3 Date type for Joda date, you have to extend the org.granite.generator.as3.DefaultAs3TypeFactory class:
package com.myapp.converters;
import org.granite.generator.as3.As3Type;
import org.granite.generator.as3.DefaultAs3TypeFactory;
import org.joda.time.DateTime;
public class CustomAs3TypeFactory extends DefaultAs3TypeFactory {
@Override
protected As3Type createAs3Type(Class<?> jType) {
if (DataTime.class.isAssignableFrom(jType))
return As3Type.DATE;
return super.createAs3Type(jType);
}
}Then, declare this new factory in the Gas3 task (here for example in an Ant build file):
<gas3 as3typefactory="com.myapp.converters.CustomAs3TypeFactory" ...>
...
<classpath>
...
<pathelement location="path/to/my/factory"/>
</classpath>
...
</gas3>When using the GraniteDS Eclipse Builder, you may declare it in the Options panel and add your class in the Classpath panel.
Writing a security service
GraniteDS implements security based on the following SecurityService interface. Note that the term Service in SecurityService has nothing to do
with a true Flex destination, since security services are not exposed to outside calls:
package org.granite.messaging.service.security;
import java.util.Map;
public interface SecurityService {
public void configure(Map<String, String> params);
public void login(Object credentials) throws SecurityServiceException;
public void login(Object credentials, String charset) throws SecurityServiceException;
public Object authorize(AbstractSecurityContext context) throws Exception;
public void logout() throws SecurityServiceException;
public void handleSecurityException(SecurityServiceException e);
}An implementation of this interface must be thread safe, i.e., only one instance of this service is used in the entire web-app and will be called by concurrent threads.
-
configure: This method is called at startup time and gives a chance to pass parameters to the security service. -
login: This method is called when you call one of thesetCredentialsorsetRemoteCredentialsRemoteObject's method. Note that these method calls do not fire any request by themselves but only pass credentials on the next destination service method call. Theloginmethod is responsible for creating and exposing ajava.security.Principalor throwing an appropriateorg.granite.messaging.service.security.SecurityServiceExceptionif credentials are invalid. Note that credentials are a Base64 string with the common"username:password"format. An additional login method with an extracharsetparameter is available, so you can use theRemoteObject.setCredentials(user, pass, charset)method and specify the charset used in the username/password string (default is ISO-8859-1). -
authorize: This method is called upon each and every service method call invocations (RemoteObject) or subscribe/publish actions (Consumer/Producer). When used withRemoteObjects, theauthorizemethod is responsible for checking security, calling the service method, and returning the corresponding result. When used withConsumers/Producers, it is simply responsible for checking security; no service method invocation, no result. If authorization fails, either because the user is not logged in or because it doesn’t have required rights, it must throw an appropriateorg.granite.messaging.service.security.SecurityServiceException. -
logout: This method is called when you call theRemoteObject'slogoutmethod. Note that theRemoteObject.logoutmethod fires a remote request by itself. -
handleSecurityException: This method is called whenever aSecurityServiceExceptionis thrown by a login or logout operation. The default implementation of this method inAbstractSecurityServiceis to do nothing, but you may add extra care for these security exceptions if you need so.
Custom exception handlers
The default exception handling mechanism of GraniteDS already provides a lot of flexibility with exception converters that can transform the exceptions
caught on the server to meaningful errors on the client side. However if you need even more flexibility, you can completely replace the handling mechanism
and provide you own exception handler. This is however not recommended with Tide as some features rely on proper exception conversions to work, but in this case
you can simply extend the ExtendedExceptionHandler and add you custom behaviour.
If you need special service exception handling, either to add extra informations or to mask implementation details, you may configure a custom implementation
of ServiceExceptionHandler in services-config.xml:
<?xml version="1.0" encoding="UTF-8"?>
<services-config>
...
<factories>
<factory id="..." class="...">
<properties>
<service-exception-handler>
path.to.my.CustomServiceExceptionHandler
</service-exception-handler>
...
</properties>
</factory>
</factories>
...
</services-config>Your custom service exception handler must implement the org.granite.messaging.service.ServiceExceptionHandler interface.
Note that it can of course extend the org.granite.messaging.service.DefaultServiceExceptionHandler class:
public ServiceException handleNoSuchMethodException(
Message request,
Destination destination,
Object invokee,
String method,
Object[] args,
NoSuchMethodException e
);
public ServiceException handleInvocationException(
ServiceInvocationContext context,
Throwable t
);The first method is called whenever the service invoker cannot find any suitable method with the supplied name and arguments.
The second one is called whenever the method invocation throws an exception. Note that java.lang.reflect.InvocationTargetException are
unwrapped (getTargetException) before handleInvocationException is called.
In both cases, the returned ServiceException will be thrown and serialized in a client ErrorMessage instead of the raw NoSuchMethodException e
or Throwable t one.
Server message interceptors
If you need to do some actions before and after each remote call, such as setting or accessing message headers, or doing some setup before request handling,
you can configure a custom AMF3MessageInterceptor in granite-config.xml :
<?xml version="1.0" encoding="UTF-8"?>
<granite-config>
...
<amf3-message-interceptor type="com.myapp.MyMessageInterceptor"/>
</granite-config>When using configuration scanning, you can also put this in META-INF/granite-config.properties of your application jar archive :
amf3MessageInterceptor=com.myapp.MyMessageInterceptor
When using Spring or CDI, you will just have to declare a bean implementing AMF3MessageInterceptor in the framework context (with CDI, that just means
adding an implementation in the application archive with a META-INF/beans.xml marker file).
Take care that some of the GraniteDS server frameworks integrations (CDI and Seam) already provide their own message interceptors. If you need to do something else,
you will have to override the existing interceptor and call super.before and super.after.
Custom Java or ActionScript3 Class Descriptors
When a Java object is not Externalizable nor externalized by a GDS externalizer, it is serialized by means of
the org.granite.messaging.amf.io.util.DefaultJavaClassDescriptor. This class controls which fields must be serialized and how to retrieve values from those fields.
In similar situations, but at deserialization time, the org.granite.messaging.amf.io.util.DefaultActionScriptClassDescriptor class controls how
the corresponding Java object is instantiated and how values are set in this new instance.
You may write and plugin your own Java or ActionScript3 descriptors, for example:
public class MyJavaClassDescriptor
extends org.granite.messaging.amf.io.util.JavaClassDescriptor {
public MyJavaClassDescriptor(Class type) {
super(type);
}
@Override
protected List<Property> introspectProperties() {
// put your custom code here...
}
}public class MyAS3ClassDescriptor
extends org.granite.messaging.amf.io.util.ActionScriptClassDescriptor {
public MyAS3ClassDescriptor(String type, byte encoding) {
super(type, encoding);
}
@Override
public void defineProperty(String name) {
// put your custom code here...
}
@Override
public Object newJavaInstance() {
// put your custom code here...
}
}Then, you have to declare these descriptors in your granite-config.xml:
<?xml version="1.0" encoding="UTF-8"?>
<!DOCTYPE granite-config PUBLIC
"-//Granite Data Services//DTD granite-config internal//EN"
"http://www.graniteds.org/public/dtd/3.0.0/granite-config.dtd">
<granite-config>
<descriptors>
<descriptor
type="path.to.MyClass"
java="path.to.MyJavaClassDescriptor"
as3="path.to.MyAS3ClassDescriptor" />
<descriptor
instance-of="path.to.MyBaseClass"
java="path.to.MyJavaClassDescriptor"
as3="path.to.MyAS3ClassDescriptor" />
<!-- other descriptor configuration... -->
</descriptors>
</granite-config>You must use only one of type or instance-of attributes (i.e., should my descriptor(s) be used for all path.to.MyClass objects, or for all instances
of path.to.MyBaseClass), you may use one of, or both, Java or AS3 attributes.
Custom AMF3 (De)Serializers (Advanced use only)
You may plug your own AMF3 serializer/deserializer. A custom AMF3 serializer must implement java.io.ObjectOutput and have a special constructor signature:
public class MyAMF3Serializer implements java.io.ObjectOutput {
public MyAMF3Serializer(java.io.OutputStream out) {
// ...
}
// ObjectOutput implemention...
}Then, you must register this serializer in granite-config.xml:
<?xml version="1.0" encoding="UTF-8"?>
<!DOCTYPE granite-config PUBLIC
"-//Granite Data Services//DTD granite-config internal//EN"
"http://www.graniteds.org/public/dtd/3.0.0/granite-config.dtd">
<granite-config>
<amf3-serializer type="path.to.MyAMF3Serializer"/>
</granite-config>A custom AMF3 deserializer must implement java.io.ObjectInput and have a special constructor signature:
public class MyAMF3Deserializer implements java.io.ObjectInput {
public MyAMF3Deserializer(java.io.InputStream in) {
// ...
}
// ObjectInput implemention...
}Then, you have to register this deserializer in granite-config.xml:
<?xml version="1.0" encoding="UTF-8"?>
<!DOCTYPE granite-config PUBLIC
"-//Granite Data Services//DTD granite-config internal//EN"
"http://www.graniteds.org/public/dtd/3.0.0/granite-config.dtd">
<granite-config>
<amf3-deserializer type="path.to.MyAMF3Deserializer"/>
</granite-config>You may of course extend org.granite.messaging.amf.io.AMF3Serializer or org.granite.messaging.amf.io.AMF3Deserializer to override only some parts of
the default AMF3 (de)serialization process, as all methods in thoses classes are public or protected.
ServiceInvocationListener (Advanced use only)
If you need to listen to each service invocation method call, you may plugin a org.granite.messaging.service.ServiceInvocationListener implementation like this:
<?xml version="1.0" encoding="UTF-8"?>
<!DOCTYPE granite-config PUBLIC
"-//Granite Data Services//DTD granite-config internal//EN"
"http://www.graniteds.org/public/dtd/3.0.0/granite-config.dtd">
<granite-config>
<invocation-listener type="path.to.MyServiceInvocationListener"/>
</granite-config>Your class must implement the org.granite.messaging.service.ServiceInvocationListener interface containing the following methods:
public Object[] beforeMethodSearch(Object invokee, String methodName, Object[] args);
public void beforeInvocation(ServiceInvocationContext context);
public void afterInvocationError(ServiceInvocationContext context, Throwable t);
public Object afterInvocation(ServiceInvocationContext context, Object result);|
Warning
|
Be very careful with those listeners as you may break the entire invocation process if you do not return proper args ( |
Configuration Reference
The two main files used to configure GraniteDS are granite-config.xml and services-config.xml.
By default these files should be present in the web archive at the locations WEB-INF/granite/granite-config.xml and WEB-INF/flex/services-config.xml.
If absolutely needed, they can be placed in another location, but then you will have to specify two servlet parameters in web.xml to indicate GraniteDS
where to look for them:
web.xml<context-param>
<param-name>servicesConfigPath</param-name>
<param-value>/WEB-INF/flex/services-config.xml</param-value>
</context-param>
<context-param>
<param-name>graniteConfigPath</param-name>
<param-value>/WEB-INF/granite/granite-config.xml</param-value>
</context-param>Framework Configuration
granite-config.xml contains all the internal configuration of the framework. It can contain the following sections:
-
<granite scan="true">: instructs GraniteDS to scan application archives and to automatically register the configuration elements it discovers. -
<amf3-deserializer type="com.myapp.custom.CustomAMF3Deserializer">: registers a custom deserializer that should implement the interfacejava.io.ObjectInput. The default isorg.granite.messaging.amf.io.AMF3Deserializer. -
<amf3-serializer type="com.myapp.custom.CustomAMF3Serializer">: registers a custom serializer that should implement the interfacejava.io.ObjectOutput. The default isorg.granite.messaging.amf.io.AMF3Serializer. -
<amf3-message-interceptor type="">: registers an optional message interceptor that will be called for each received/sent message. The interceptor must implementorg.granite.messaging.amf.process.AMF3MessageInterceptor. -
<class-getter type="">: registers a class getter that should implementorg.granite.messaging.amf.io.util.ClassGetter. -
<converters>: registers a list of data converters that should implementorg.granite.messaging.amf.io.convert.Converter. -
<descriptors>: registers a list of type descriptors that should extend eitherorg.granite.messaging.amf.io.util.ActionScriptClassDescriptorororg.granite.messaging.amf.io.util.JavaClassDescriptor. -
<exception-converters>: registers a list of exception converters that should implementorg.granite.messaging.service.ExceptionConverter. -
<externalizers>: registers custom externalizers that should implementorg.granite.messaging.amf.io.util.externalizer.Externalizer. See also here.<externalizers> <configuration> </configuration> <externalizer type=""/> </externalizers> -
<gravity>: configures the Gravity internal parameters. See here. -
<instantiators>: registers custom instantiators that should implementorg.granite.messaging.amf.io.util.instantiator.AbstractInstantiator. -
<invocation-listener type="">: registers an invocation listener that will be called at each invocation and should implementorg.granite.messaging.service.ServiceInvocationListener. -
<message-selector>: registers a custom message selector implementation that should implementorg.granite.gravity.selector.MessageSelector. 3 implementations are available, the default isGravityMessageSelector. -
<method-matcher type="">: registers a custom method matcher that should implementorg.granite.messaging.service.MethodMatcher. -
<security>: registers a custom security service that should implementorg.granite.messaging.service.security.SecurityService. -
<tide-components>: registers a list of component matchers to enable remote access for Tide service factories. There are 4 ways or enabling or diabling access to Tide components:<tide-components> <tide-component annotated-with=""/> <tide-component instance-of=""/> <tide-component name=""/> <tide-component type="" disabled="true"/> </tide-components> -
annotated-with: component class is annotated with the specified annotation class. -
instance-of: component class extends or implements the specified interface or class. -
name: component name matches the specified name regular expression. -
type: component class matches the specified class name regular expression.
Application Configuration
services-config.xml contains all the remoting and messaging configuration of the application.
There are three main sections: channels, factories and services.
Channels
A channel definition mostly contains the endpoint url and the client channel implementation:
<channels>
<channel-definition id="my-graniteamf" class="mx.messaging.channels.AMFChannel">
<endpoint
uri="http://{server.name}:{server.port}/{context.root}/graniteamf/amf"
class="flex.messaging.endpoints.AMFEndpoint"/>
</channel-definition>
</channels>GraniteDS supports 4 implementations of the Flex Channel:
-
mx.messaging.channels.AMFChannel: standard HTTP remoting channel. -
mx.messaging.channels.SecureAMFChannel: standard HTTPS remoting channel. -
org.granite.gravity.channels.GravityChannel: standard HTTP messaging channel. -
org.granite.gravity.channels.SecureGravityChannel: standard HTTPS messaging channel.
Factories
A factory defines a way to tell GraniteDS how to route incoming remoting calls to a server component. A factory should implement org.granite.messaging.service.ServiceFactory. The factory definition can also have configuration options in the section properties:
<factory id="myFactory" class="com.myapp.custom.MyServiceFactory">
<properties>
<service-exception-handler>com.myapp.custom.MyServiceExceptionHandler</service-exception-handler>
<enable-exception-logging>true<enable-exception-logging>
</properties>
</factory>service-exception-handler: an exception handler should implement org.granite.messaging.service.ServiceExceptionHandler and will be called
when an exception is thrown by the remote service. The default is DefaultServiceExceptionHandler for standard factories and ExtendedServiceExceptionHandler
for Tide factories.
enable-exception-logging: enables (true) or disable (false) the logging of exceptions thrown by remote services.
This can avoid double logging if the server application already logs everything. Default is true.
Other properties exist for the built-in service factories. You will get more details in the corresponding sections.
For example EJB3 factories have a lookup and initial-context-environment properties.
Remoting destinations
Remoting destinations can be defined in a service definition with the class property value flex.messaging.services.RemotingService
and the messageTypes value flex.messaging.messages.RemotingMessage. Destinations can also have a properties section and in general
they will define at least the factory and the channels they are attached to.
<services>
<service
id="granite-service"
class="flex.messaging.services.RemotingService"
messageTypes="flex.messaging.messages.RemotingMessage">
<destination id="cars">
<channels>
<channel ref="my-graniteamf"/>
</channels>
<properties>
<factory>guiceFactory</factory>
<source>test.granite.guice.services.Cars</source>
</properties>
</destination>
</service>
</services>You can define multiple channels for the same destination to handle failover. When the first channel cannot be accessed, the remote object will try the next one in the list.
The property source is often used to determine the target component and its value depend on the server framework.
In this example with Guice this is the class name of the target bean.
A destination can also define a list of security roles that are allowed to access the remote component. See Remoting security.
Messaging destinations
Messaging destinations can be defined in a service definition with the class property value flex.messaging.services.MessagingService and
the messageTypes value flex.messaging.messages.AsyncMessage. Destinations can also have a properties section that is used for example with the JMS adapter.
A messaging service can also define a list of service adapters that define how messages are routed and each destination can reference one of the configured adapters.
<service id="gravity-service"
class="flex.messaging.services.MessagingService"
messageTypes="flex.messaging.messages.AsyncMessage">
<adapters>
<adapter-definition id="simple" class="org.granite.gravity.adapters.SimpleServiceAdapter"/>
<!--adapter-definition id="jms" class="org.granite.gravity.adapters.JMSServiceAdapter"/-->
</adapters>
<destination id="addressBookTopic">
<properties>
<!--jms>
<destination-type>Topic</destination-type>
<connection-factory>ConnectionFactory</connection-factory>
<destination-jndi-name>topic/testTopic</destination-jndi-name>
<destination-name>dataTopic</destination-name>
<acknowledge-mode>AUTO_ACKNOWLEDGE</acknowledge-mode>
<transacted-sessions>true</transacted-sessions>
<no-local>true</no-local>
</jms-->
<no-local>true</no-local>
<session-selector>true</session-selector>
</properties>
<channels>
<channel ref="gravityamf"/>
</channels>
<adapter ref="simple"/>
<!--adapter ref="jms"/-->
</destination>
</service>You can define multiple channels for the same destination to handle failover. When the first channel cannot be accessed, the remote object will try the next one in the list.
A destination can also define a list of security roles that are allowed to access the remote component. See Messaging Security.