Let’s take the as a simple starting point. First we clone, build and run the default application with a JavaFX client and a basic Servlet 3 container :
git clone http://github.com/graniteds-tutorials/graniteds-tutorial-chat.git

cd graniteds-tutorial-chat

mvn clean install -Dclient=javafx -Dserver=servlet3

cd ../server-servlet3

mvn tomcat7:run-war
And start the JavaFX application in another window :
cd client-javafx

mvn jfx:jar

java -jar target/jfx/app/chat.jar
To configure websocket for this application, there are a few steps required :
- Add the websocket client dependency on the JavaFX application
- Set the Consumer/Producer to use a websocket channel
- When using a Servlet 3 configuration, the JSR 356 support is automatically detected and enabled. When using Spring, it is necessary to enable it manually in web.xml
1. Add the websocket client dependency
In client-javafx/pom.xml, add the following dependency :
<dependencies>
    <dependency>
        <groupId>org.eclipse.jetty.websocket</groupId>
        <artifactId>websocket-client</artifactId>
        <version>9.1.5.v20140505</version>
    </dependency>
    <dependency>
        <groupId>org.eclipse.jetty.websocket</groupId>
        <artifactId>javax-websocket-client-impl</artifactId>
        <version>9.1.5.v20140505</version>
    </dependency>
</dependencies>
This is the dependency for the Jetty 9 websocket client. You can alternatively use :
<dependency>
    <groupId>org.glassfish.tyrus.bundles</groupId>
    <artifactId>tyrus-standalone-client-jdk</artifactId>
    <version>1.8.2</version>
</dependency>
2. Configure the Consumer/Producer
In client-javafx/src/main/java/ChatClient.java, modify the configuration of the Consumer and Producer objects to use a websocket channel :
final Consumer chatConsumer = serverSession.getConsumer("chatTopic", "room", ChannelType.WEBSOCKET);
final Producer chatProducer = serverSession.getProducer("chatTopic", "room", ChannelType.WEBSOCKET);
NOTE: if you are using a DataObserver in your application, it can be configured with:
new DataObserver(ChannelType.WEBSOCKET, serverSession)
That’s all if you are using the Servlet 3 configuration (with @ServerFilter).
You can rebuild and restart the server and client applications.
4. (Spring only) Configure JSR 356 support in web.xml
The Spring support does not (yet) detect and setup the JSR 356 support. You will also have to add the following listener to your web.xml :
<listener>
    <listener-class>org.granite.gravity.websocket.GravityWebSocketDeployer</listener-class>
</listener>
Now you can rebuild everything and restart the server and client with a Spring backend.
cd graniteds-tutorial-chat

cd server-spring

mvn clean install -Dserver=spring

mvn tomcat7:run-war
]]>
Let’s take the as a simple starting point. First we clone, build and run the default application with a Flex client and a basic Servlet 3 container :
git clone http://github.com/graniteds-tutorials/graniteds-tutorial-chat.git

cd graniteds-tutorial-chat

mvn clean install -Dclient=flex -Dserver=servlet3

cd server-servlet3

mvn tomcat7:run-war
Now browse to check that everything works.
To configure websocket for this application, there are a few steps required :
- Add the websocket client dependency on the Flex application
- Set the Consumer/Producer to use a websocket channel
- Configure a Flash Policy server (mandatory for Flex clients)
- When using a Servlet 3 configuration, the JSR 356 support is automatically detected and enabled. When using Spring, it is necessary to enable it manually in web.xml
1. Add the websocket client dependency
In client-flex/pom.xml, add the following dependency :
<dependencies>
    <dependency>
        <groupId>org.graniteds</groupId>
        <artifactId>flex-websocket-client</artifactId>
        <version>1.0</version>
        <type>swc</type>
    </dependency>
</dependencies>
2. Configure the Consumer/Producer
In client-flex/src/main/flex/chat.mxml, modify the configuration of the Consumer and Producer objects to use a websocket channel :
chatConsumer = Spring.getInstance().mainServerSession.getConsumer("chatTopic", "room", ChannelType.WEBSOCKET);
chatProducer = Spring.getInstance().mainServerSession.getProducer("chatTopic", "room", ChannelType.WEBSOCKET);
If you are using a DataObserver component, you can just change its channel before subscribing with :
myDataObserver.type = ChannelType.WEBSOCKET;
NOTE: if you are not using the Tide API (ServerSession) in your application, you will have to replace the GravityChannel by a WebSocketChannel :
channel = new WebSocketChannel("mychannel", "ws://localhost:8080/chat/websocketamf/amf");
channelSet = new ChannelSet();
channelSet.addChannel(channel);

chatConsumer = new Consumer();
chatConsumer.destination = "chatTopic";
chatConsumer.topic = "room";
chatConsumer.channelSet = channelSet;

chatProducer = new Producer();
chatProducer.destination = "chatTopic";
chatProducer.topic = "room";
chatProducer.channelSet = channelSet;
3. Configure a Flash policy server
Flash requires a specific policy server for security reasons to allow the use of network sockets.
GraniteDS provides a very basic one that can be enabled with a simple listener in web.xml :
Add a web.xml in server-servlet3/src/main/webapp/WEB-INF/web.xml :
<?xml version="1.0" encoding="UTF-8"?>
<web-app xmlns="http://java.sun.com/xml/ns/javaee"
           xmlns:xsi="http://www.w3.org/2001/XMLSchema-instance"
           xsi:schemaLocation="http://java.sun.com/xml/ns/javaee

http://java.sun.com/xml/ns/javaee/web-app_3_0.xsd"

           version="3.0">

    <listener>
        <listener-class>org.granite.gravity.websocket.PolicyFileServerListener</listener-class>
    </listener>
    <context-param>
        <param-name>flashPolicyFileServer-allowDomains</param-name>
        <param-value>*:*</param-value>
    </context-param>

</web-app>
NOTE: If you have multiple webapps in the same server, you need only one policy server (because it must run at the root context on the specific port 843). In this case, either configure it on one webapp, or better create a specific empty webapp that only hosts the policy server.
Now you can rebuild everything, restart the server and check that the application still works.
4. (Spring only) Configure JSR 356 support in web.xml
The Spring support does not (yet) detect and setup the JSR 356 support. You will also have to add the following listener to your web.xml :
<listener>
    <listener-class>org.granite.gravity.websocket.GravityWebSocketDeployer</listener-class>
</listener>
Now you can rebuild everything and restart the server with a Spring backend.
cd graniteds-tutorial-chat

mvn clean install -Dclient=flex -Dserver=spring

cd server-spring

mvn tomcat7:run-war
]]>
Benchmark results
Let’s start at the end and review the results.


These results were obtained by running the full benchmark 5 consecutive times and calculating mean times (the variation between two runs is very low on the same machine). The setup / environment giving these results is as follow:
System Hardware:
  Model Name:			MacBook Pro
  Model Identifier:		MacBookPro8,2
  Processor Name:		Intel Core i7
  Processor Speed:		2.2 GHz
  Number of Processors:		1
  Total Number of Cores:	4
  L2 Cache (per Core):		256 KB
  L3 Cache:			6 MB
  Memory:			8 GB
System Software:
  System Version:		OS X 10.9.2 (13C1021)
  Kernel Version:		Darwin 13.1.0
  Boot Volume:			Macintosh HD
  Boot Mode:			Normal
Java Version:
  java version "1.7.0_45"
  Java(TM) SE Runtime Environment (build 1.7.0_45-b18)
  Java HotSpot(TM) 64-Bit Server VM (build 24.45-b08, mixed mode)
Ant Version:
Apache Ant(TM) version 1.8.2 compiled on December 20 2010
BlazeDS Version (flex-messaging-common and flex-messaging-core):
  Implementation-Title: BlazeDS - Common Library
  Implementation-Version: 4.0.0.14931
  Implementation-Vendor: Adobe Systems Inc.

  Implementation-Title: BlazeDS - Community Edition
  Implementation-Version: 4.0.0.14931
  Implementation-Vendor: Adobe Systems Inc.
GraniteDS Version (granite-server-core):
3.1.0.M1
The benchmark was executed in console mode after a full reboot, with network disabled.
What kind of data are benchmarked?
The benchmark uses two beans and . Each instance of DataObject2 contains a HashSet of DataObject1 (between 10 and 20 DataObject1 per DataObject2 instance). DataObject2 and DataObject1 also have other properties of type String, Date, int, boolean and double).
The creation of the data is handled by the class.
The benchmark uses the following collections:
- Big List of Objects: an ArrayList that contains 10,000 distinct instances of DataObject2,
- Small List of Objects: an ArrayList that contains 50 distinct instances of DataObject2,
- Big List of Strings: an ArrayList that contains 10,000 distinct String of length less than 100 characters.
The most “real-world” test is the one using a list of 50 beans (aka “Small List of Objects”): serializing a collection of 10,000 beans or strings is very unusual.
How does this benchmark work?
The benchmark is ran through an Apache Ant build file that spawns a new JVM for each test.
Basically, it first create random Java data (eg. a list of random Strings) and save them in a file with the standard Java serialization (through ObjectOutputStream). Then, it calls a benchmark class (GraniteDS or BlazeDS), which reads the serialized data (through ObjecInputStream) and repeatedly (eg. 10,000 times) encode them in the AMF3 format. The benchmark class then repeatedly decode the AMF3 encoded data the same number of times.
Each benchmark then prints out the total amount of time spend to repeatedly encode and repeatedly decode the data in the AMF3 format.
Finally, the benchmark goes through a cross checking process by deserializing with GraniteDS what was encoded with BlazeDS and vice-versa.
If you want to go into details, check the full benchmark sources on Github .
How to get the benchmark sources and run it?
Requirements:
- ,
- Apache ,
- A .
First, you need to clone the benchmark project:
$ git clone https://github.com/fwolff/amf-benchmark.git
Then, go to the newly created amf-benchmark directory and run ant:
$ cd amf-benchmark
$ ant
This will compile the benchmark sources, run it and print the results to the standard output.
You can also customize the benchmark with a model of your choice. Comments are welcome!
]]>In this post, we will give a basic configuration for clustering GraniteDS 3.0 and Tomcat 7 with an Apache front server with mod_proxy. We will not cover the additional setup of, for example, a distributed JMS topic over cluster nodes with ActiveMQ: while this kind of setup is mandatory if you want to use real-time messaging with your cluster, it is outside the scope of this quick post. Please refer to Tomcat / ActiveMQ documentation and GraniteDS documentation here.
To make things clear, here is the architecture we are looking for:
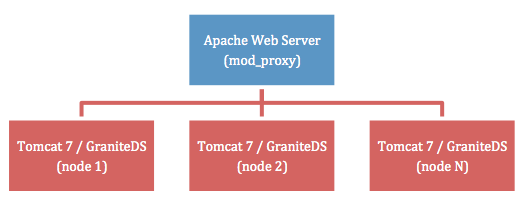
Except for real-time messaging through distributed topics, this simple setup enables load balancing (one-nth traffic is handled by each cluster node) and failover (when a node crashes, all traffic to this node is redirected to other nodes, with transparent re-authentication).
Apache Mod Proxy Configuration
Edit your conf/httpd.conf file as follow:
...

# LoadModule proxy_ajp_module modules/mod_proxy_ajp.so (be sure to comment
# AJP out, because it isn't compatible with APR)

...

ServerName front.myapp.com
ProxyRequests Off
<Proxy balancer://mycluster>
    Order deny,allow
    Allow from all

    BalancerMember http://192.168.0.101:8080 route=node1
    BalancerMember http://192.168.0.102:8080 route=node2

    # BalancerMember http://IP(n):8080 route=node(n) (for each node of
    # your cluster, adjust IP/port configuration)
</Proxy>
ProxyPass / balancer://mycluster/ stickysession=JSESSIONID|jsessionid
ProxyPassReverse / balancer://mycluster/

...
This configuration creates only one front server with two cluster nodes (node1 and node2) but you can add as many nodes as you need. You could also have several front servers with an heartbeat configuration, please refer to the mod_proxy documentation.
Tomcat Configuration
Edit your Tomcat conf/server.xml configuration file and do the following changes:
...

<!-- See the "Start Your Cluster" section below for the ${tomcat.connector.address} and the
     ${tomcat.engine.jvmroute} parameters -->
<Connector address="${tomcat.connector.address}" port="8080" protocol="HTTP/1.1" ...>

<!-- NO AJP: comment it out! -->
<!--Connector port="8009" protocol="AJP/1.3" redirectPort="8443" /-->

<!-- Use ${tomcat.engine.jvmroute} parameter here -->
<Engine name="Catalina" defaultHost="${tomcat.engine.jvmroute}" jvmRoute="${tomcat.engine.jvmroute}">

<!-- Uncomment this line -->
<Cluster className="org.apache.catalina.ha.tcp.SimpleTcpCluster"/>

<!-- Use ${tomcat.engine.jvmroute} parameter here -->
<Host name="${tomcat.engine.jvmroute}"  appBase="webapps" unpackWARs="true" autoDeploy="true">

...
Be sure to disable AJP and to use startup parameters instead of default values.
Application Configuration
Edit your WEB-INF/web.xml file and do the following changes:
...

<distributable />

<!-- Uncomment this part if you need real-time messaging
<filter>
    <filter-name>Session Filter</filter-name>
    <filter-class>org.granite.clustering.CreateSessionFilter</filter-class>
    <async-supported>true</async-supported>
</filter>
<filter-mapping>
    <filter-name>Session Filter</filter-name>
    <url-pattern>/gravity/*</url-pattern>
</filter-mapping>

<servlet>
        <servlet-name>GravityServlet</servlet-name>
        <servlet-class>org.granite.gravity.servlet3.GravityAsyncServlet</servlet-class>
        <load-on-startup>1</load-on-startup>
        <async-supported>true</async-supported>
</servlet>
<servlet-mapping>
        <servlet-name>GravityServlet</servlet-name>
        <url-pattern>/gravity/*</url-pattern>
</servlet-mapping>
 -->

...
Start Your Cluster
First, start your Apache front server with mod_proxy:
$ /opt/apache/bin/apachectl start
Then, start each Tomcat instance:
$ export CATALINA_OPTS="-Dtomcat.connector.address=192.168.0.101 \
-Dtomcat.engine.jvmroute=node1"; ./startup.sh
$ export CATALINA_OPTS="-Dtomcat.connector.address=192.168.0.102 \
-Dtomcat.engine.jvmroute=node2"; ./startup.sh
You should now be able to launch your client application, which will connect to the Apache front server: it will then be routed to one of the available Tomcat node.
Final note: when failing over, mod_proxy waits a few seconds before redirecting the traffic to one of the nodes still alive. This is just normal behavior, failing over isn’t instantaneous with mod_proxy.
]]>The technical reasons can be more or less sorted in 3 main groups :
- Benefit from a better messaging scalability by using the asynchronous servlet support of your application server (for example with the APR native library of Tomcat or a Servlet 3 compliant container)
- Avoid the famous LazyInitializationException and similar errors when serializing JPA detached objects
- Using the advanced data management features
These 3 reasons imply different levels of complexity of the migration. This post is going to show how to implement 1 and 2, this is quite easy and mainly implies a few changes in the configuration. Implementing 3 is a bit more involving and greatly depends on your application architecture, however in general it will allow massive cuts in the usual boilerplate code needed in typical data-intensive applications.
Using Gravity support for asynchronous processing
Starting from a working BlazeDS project, here are the steps that are needed to use GraniteDS :
- Replace the BlazeDS libraries and their dependencies by granite-server.jar in WEB-INF/lib
- Configure the GraniteDS servlets in web.xml (and remove the BlazeDS MessageBroker)
- Configure the messaging destination in WEB-INF/flex/services-config.xml (this file follows the same format as default BlazeDS configuration files) but use the org.granite.gravity.channels.GravityChannel implementation for the messaging channel
- Add the granite-client-flex.swc library as a compilation dependency for the Flex project using the linking mode -include-libraries
- Replace all occurences of mx.messaging.Consumer and mx.messaging.Producer with org.granite.gravity.Consumer and org.granite.gravity.Producer
Each of these steps is quite easy, but to help understand what all this means, let’s do it on an existing project. The easiest is to start from an example of the BlazeDS turnkey server that you can find . As a first example, we’re going to migrate the Collaboration Dashboard sample project to Gravity. You should also download the latest distribution of GraniteDS here.
First start the turnkey server database by executing blazeds-turnkey/sampledb/startdb.bat on Windows or startdb.sh on Linux/OSX, and the built-in Tomcat server by executing blazeds-turnkey/tomcat/bin/startup.bat or startup.sh. You should now have the turnkey server up and running and you can browse the url . If you are a BlazeDS user, you most likely already know these examples.
Migrating the Collaboration Dashboard
Then import the project dashboard in Flash Builder by following the instructions that you will find at .
Now to keep the BlazeDS samples working, make a copy of the tomcat/webapps/samples folder to tomcat/webapps/samplesgds. We can now follow the 5 steps described above :
- Remove all BlazeDS libraries from WEB-INF/lib (in fact remove all libs) and replace them by granite-server-{version}.jar (that you can find in the libraries/server folder of the GDS distribution)
- Configure the Gravity servlet and listener for Tomcat in WEB-INF/web.xml:
<web-app>
    <display-name>GraniteDS Samples</display-name>
    <description>GraniteDS Sample Application</description>

    <!-- GraniteDS startup/shutdown listener -->
    <listener>
        <listener-class>org.granite.config.GraniteConfigListener</listener-class>
    </listener>

    <!-- The Gravity messaging servlet for Tomcat -->
    <servlet>
        <servlet-name>GravityServlet</servlet-name>
        <servlet-class>org.granite.gravity.tomcat.GravityTomcatServlet</servlet-class>
        <load-on-startup>1</load-on-startup>
    </servlet>
    <servlet-mapping>
        <servlet-name>GravityServlet</servlet-name>
        <url-pattern>/gravityamf/*</url-pattern>
    </servlet-mapping>

    <welcome-file-list>
        <welcome-file>index.html</welcome-file>
    </welcome-file-list>
</web-app>
As you can see, it’s very similar to the declarations in BlazeDS, the only differences being the names of the implementations of the servlet/listeners and the fact that the servlet implementation itself depends on the target server. The reason is that it uses the specific CometProcessor API of Tomcat that allows asynchronous processing using Java NIO or the APR native library and is a lot more scalable than standard blocking servlets. If you want to use the newer Tomcat 7 or better, which we highly recommend, use the following standard declaration:
<servlet> <servlet-name>GravityServlet</servlet-name> <servlet-class>org.granite.gravity.servlet3.GravityAsyncServlet</servlet-class> <load-on-startup>1</load-on-startup> <async-supported>true</async-supported> </servlet> - Configure the destination in WEB-INF/flex/services-config.xml:
<services-config>
    <services>
        <service id="messaging-service"
            class="flex.messaging.services.MessagingService"
            messageTypes="flex.messaging.messages.AsyncMessage">
            <adapters>
                <adapter-definition id="default"
                    class="org.granite.gravity.adapters.SimpleServiceAdapter"
                    default="true"/>
            </adapters>
            <destination id="dashboard">
                <channels>
                    <channel ref="my-gravityamf"/>
                </channels>
            </destination>
        </service>
    </services>
    <channels>
        <channel-definition id="my-gravityamf" class="org.granite.gravity.channels.GravityChannel">
            <endpoint
                uri="http://{server.name}:{server.port}/{context.root}/gravityamf/amf"
                class="flex.messaging.endpoints.AMFEndpoint"/>
        </channel-definition>
    </channels>
</services-config>
As with web.xml, this is very similar to the BlazeDS services-config.xml or messaging-config.xml, but simpler. The main differences are the implementation of the channel which is GravityChannel and the implementation of the default adapter SimpleAdapter. Also note that we have put everything in one single services-config.xml file because GraniteDS does not support file includes. This is not really an issue as the configuration of GraniteDS is usually very short.
- Add granite-client-flex.swc as a compilation dependency in Flash Builder (this swc can be found in the libraries/flex-client folder of the GDS distribution), you should just have to copy the file in the libs folder of the project. It includes the specific implementations of Gravity messaging channels, consumer and producer.
- Add the gds namespace xmlns:gds=”org.granite.gravity.*” in the <mx:Application> declaration and replace the occurences of <mx:Producer> and <mx:Consumer> with <gds:Producer> and <gds:Consumer>. Last details, the GDS Consumer does not directly expose the message event in mxml, you will have to add consumer.addEventListener(MessageEvent.MESSAGE, messageHandler) just after consumer.subscribe().
private function initApp():void {
	consumer.subscribe();
	consumer.addEventListener(MessageEvent.MESSAGE, messageHandler);
}
...
<gds:Producer id="producer" destination="dashboard"/>
<gds:Consumer id="consumer" destination="dashboard"/>
Now you can reconfigure the server for the Flex application by unchecking “Use remote object access service” in Flex Server. Also set the target folder to the turnkey server deployment folder :

Migrating the Trader Desktop
As a next example, we are going to migrate the Trader Desktop example.
Fortunately most of the configuration has already been done for the previous example so we can skip steps 1 and 2. For step 3, we are simply going to add a new destination in services-config.xml for the data feed :
<destination id="market-data-feed">
    <channels>
        <channel ref="my-gravityamf"/>
    </channels>
</destination>
Note that we won’t migrate the 3 different channel types present in the BlazeDS example (my-polling-amf, my-streaming-amf and per-client-qos-polling-amf) because the only channel type provided by GraniteDS is the long-polling Gravity channel which can advantageously replace all of the 3 others.
Then follow steps 4 and 5. Note that the property subtopic of the mx:Consumer is named topic on the Gravity Consumer. Here is the part we have to change:
private function subscribe(symbol:String):void {
    var consumer:Consumer = new Consumer();
    consumer.destination = 'market-data-feed';
    consumer.topic = symbol;
    consumer.channelSet = new ChannelSet([channels.selectedItem]);
    consumer.addEventListener(MessageEvent.MESSAGE, messageHandler);
    consumer.subscribe();
    consumers[symbol] = consumer;
}
We’re close to the end, but note that this example uses the MessageBroker API to send messages from the server. We have to update this server thread to use the Gravity API. To do the changes quickly, we are simply going to create a new Java project (for example named samplesgds or whatever name you like) in Eclipse and use the path blazeds-turnkey-4.0.0.14931\tomcat\webapps\samplesgds as location for the project, so it will find the existing sources and compile them directly in WEB-INF/classes.
Once you do this, there will probably we some compilation errors that are normal because we removed the BlazeDS libs and the existing samples expect these libs, so for now you may just delete the classes that do not compile. We just need the classes in the package flex.samples.marketdata for this example.
The feed provider is the simple class flex.samples.marketdata.Feed. It you look at the source, it uses MessageBroker.getMessageBroker(null) to retrieve the current BlazeDS message broker. It’s a bit different in GraniteDS because the object Gravity which is the equivalent of MessageBroker is not stored as a static instance but in the servlet context. So we have to pass it from the startfeed.jsp and stopfeed.jsp which can easily access the servlet context. Here are the modified Feed which the changes highlighted in blue :
public class Feed {

    private static FeedThread thread;

    private final Gravity gravity;

    public Feed(Gravity gravity) {
        this.gravity = gravity;
    }

    public void start() {
        if (thread == null) {
            thread = new FeedThread(gravity);
            thread.start();
        }
    }

    public void stop() {
        thread.running = false;
        thread = null;
    }

    public static class FeedThread extends Thread {

        private Gravity gravity;

        public FeedThread(Gravity gravity) {
            this.gravity = gravity;
        }

        public boolean running = true;

        private Random random;

        public void run() {
            Portfolio portfolio = new Portfolio();
            List stocks = portfolio.getStocks();
            int size = stocks.size();
            int index = 0;

            random = new Random();

            Stock stock;

            while (running) {

                stock = (Stock) stocks.get(index);
                simulateChange(stock);

                index++;
                if (index >= size) {
                    index = 0;
                }

                AsyncMessage msg = new AsyncMessage();
                msg.setDestination("market-data-feed");
                msg.setHeader(AsyncMessage.SUBTOPIC_HEADER, stock.getSymbol());
                msg.setTimestamp(System.currentTimeMillis());
                msg.setBody(stock);
                gravity.publishMessage(msg);

                try {
                    Thread.sleep(20);
                } catch (InterruptedException e) {
                }
            }
        }

        private void simulateChange(Stock stock) {
            ...
        }
    }
}
Then the changes in the jsp files:
<%@page import="flex.samples.marketdata.Feed"%>
<%@page import="org.granite.gravity.*" %>
<%
	try {
		Feed feed = new Feed(GravityManager.getGravity(application));
		feed.start();
		out.println("Feed Started");
	} catch (Exception e) {
		out.println("A problem occured while starting the feed: " + e.getMessage());
	}
%>
You can see that the API is once again very similar to BlazeDS with only the slight change of using ServletContext. Note that when using the Spring integration for example, the Gravity object is a managed bean and can be directly injected in any Spring bean without having to access the ServletContext.
Now restart Tomcat and you should be able to start/stop the data feed and to access the example at?.
Using Remoting
The BlazeDS turnkey does not include any advanced example using Hibernate or similar so we cannot easily demonstrate how to migrate this kind of applications. However we can simply show how to migrate a simple application using remoting, the Inventory example.
Switching from BlazeDS remoting to GraniteDS remoting is by far the simplest of the 3 examples we wanted to demonstrate as there is stricly no change required in the source code, neither Flex nor Java.
What we have to do is simply add the remoting filter and servlet in web.xml (provided you have already followed the previous examples) :
<filter>
	<filter-name>AMFMessageFilter</filter-name>
	<filter-class>org.granite.messaging.webapp.AMFMessageFilter</filter-class>
</filter>
<filter-mapping>
	<filter-name>AMFMessageFilter</filter-name>
	<url-pattern>/graniteamf/*</url-pattern>
</filter-mapping>
<servlet>
	<servlet-name>AMFMessageServlet</servlet-name>
	<servlet-class>org.granite.messaging.webapp.AMFMessageServlet</servlet-class>
	<load-on-startup>1</load-on-startup>
</servlet>
<servlet-mapping>
	<servlet-name>AMFMessageServlet</servlet-name>
	<url-pattern>/graniteamf/*</url-pattern>
</servlet-mapping>
and configure the remoting destination and channel in services-config.xml:
<service id="granite-service" messageTypes="flex.messaging.messages.RemotingMessage">
     <destination id="product">
        <channels>
            <channel ref="my-graniteamf"/>
        </channels>
        <properties>
             <source>flex.samples.product.ProductService</source>
        </properties>
    </destination>
</service>
<channels>
    <channel-definition id="my-graniteamf">
        <endpoint uri="http://{server.name}:{server.port}/{context.root}/graniteamf/amf"/>
    </channel-definition>
</channels>
That’s all, the example should work exactly the same with just this configuration change. Once you are here, you can then try the other features or GraniteDS such as automatic destination scanning which avoids the need to define destinations manually in the XML configuration, or externalizers which make possible to properly serialize Java enum, BigInteger and others.
Conclusion
If you are used to RemoteObject and Consumer/Producer, you should be able to use GraniteDS in no time, and benefit from more advanced features incrementally.
In a future document, we will try to demonstrate how to migrate a more complex BlazeDS/Spring/Hibernate application to GraniteDS. If you have an idea of an existing project (with public source code) that could be used as a starting point for the article, don’t hesitate to give us your suggestions.
]]>