When your application becomes critical or when you reach scalability issues, you need to adopt a deployment architecture which supports failover and load-balancing. Creating such a cluster is very dependent on the application server you are running and the setup requires an advanced knowledge of its configuration options.
In this post, we will give a basic configuration for clustering GraniteDS 3.0 and Tomcat 7 with an Apache front server with mod_proxy. We will not cover the additional setup of, for example, a distributed JMS topic over cluster nodes with ActiveMQ: while this kind of setup is mandatory if you want to use real-time messaging with your cluster, it is outside the scope of this quick post. Please refer to Tomcat / ActiveMQ documentation and GraniteDS documentation here.
To make things clear, here is the architecture we are looking for:
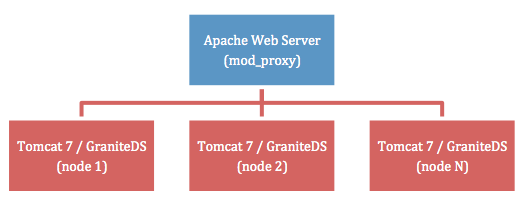
Except for real-time messaging through distributed topics, this simple setup enables load balancing (one-nth traffic is handled by each cluster node) and failover (when a node crashes, all traffic to this node is redirected to other nodes, with transparent re-authentication).
Apache Mod Proxy Configuration
Edit your conf/httpd.conf file as follow:
...

# LoadModule proxy_ajp_module modules/mod_proxy_ajp.so (be sure to comment
# AJP out, because it isn't compatible with APR)

...

ServerName front.myapp.com
ProxyRequests Off
<Proxy balancer://mycluster>
    Order deny,allow
    Allow from all

    BalancerMember http://192.168.0.101:8080 route=node1
    BalancerMember http://192.168.0.102:8080 route=node2

    # BalancerMember http://IP(n):8080 route=node(n) (for each node of
    # your cluster, adjust IP/port configuration)
</Proxy>
ProxyPass / balancer://mycluster/ stickysession=JSESSIONID|jsessionid
ProxyPassReverse / balancer://mycluster/

...
This configuration creates only one front server with two cluster nodes (node1 and node2) but you can add as many nodes as you need. You could also have several front servers with an heartbeat configuration, please refer to the mod_proxy documentation.
Tomcat Configuration
Edit your Tomcat conf/server.xml configuration file and do the following changes:
...

<!-- See the "Start Your Cluster" section below for the ${tomcat.connector.address} and the
     ${tomcat.engine.jvmroute} parameters -->
<Connector address="${tomcat.connector.address}" port="8080" protocol="HTTP/1.1" ...>

<!-- NO AJP: comment it out! -->
<!--Connector port="8009" protocol="AJP/1.3" redirectPort="8443" /-->

<!-- Use ${tomcat.engine.jvmroute} parameter here -->
<Engine name="Catalina" defaultHost="${tomcat.engine.jvmroute}" jvmRoute="${tomcat.engine.jvmroute}">

<!-- Uncomment this line -->
<Cluster className="org.apache.catalina.ha.tcp.SimpleTcpCluster"/>

<!-- Use ${tomcat.engine.jvmroute} parameter here -->
<Host name="${tomcat.engine.jvmroute}"  appBase="webapps" unpackWARs="true" autoDeploy="true">

...
Be sure to disable AJP and to use startup parameters instead of default values.
Application Configuration
Edit your WEB-INF/web.xml file and do the following changes:
...

<distributable />

<!-- Uncomment this part if you need real-time messaging
<filter>
    <filter-name>Session Filter</filter-name>
    <filter-class>org.granite.clustering.CreateSessionFilter</filter-class>
    <async-supported>true</async-supported>
</filter>
<filter-mapping>
    <filter-name>Session Filter</filter-name>
    <url-pattern>/gravity/*</url-pattern>
</filter-mapping>

<servlet>
        <servlet-name>GravityServlet</servlet-name>
        <servlet-class>org.granite.gravity.servlet3.GravityAsyncServlet</servlet-class>
        <load-on-startup>1</load-on-startup>
        <async-supported>true</async-supported>
</servlet>
<servlet-mapping>
        <servlet-name>GravityServlet</servlet-name>
        <url-pattern>/gravity/*</url-pattern>
</servlet-mapping>
 -->

...
Start Your Cluster
First, start your Apache front server with mod_proxy:
$ /opt/apache/bin/apachectl start
Then, start each Tomcat instance:
$ export CATALINA_OPTS="-Dtomcat.connector.address=192.168.0.101 \
-Dtomcat.engine.jvmroute=node1"; ./startup.sh
$ export CATALINA_OPTS="-Dtomcat.connector.address=192.168.0.102 \
-Dtomcat.engine.jvmroute=node2"; ./startup.sh
You should now be able to launch your client application, which will connect to the Apache front server: it will then be routed to one of the available Tomcat node.
Final note: when failing over, mod_proxy waits a few seconds before redirecting the traffic to one of the nodes still alive. This is just normal behavior, failing over isn’t instantaneous with mod_proxy.
Leave a Comment